A SANDWICH WITH THE MAHATMA
By MICHAEL PERKINS
THE FIRST TIME I SAW THE STATUE, situated at the side of a newly opened bookstore, I thought it looked a bit…lonely, rather like the first chair you move into an otherwise empty apartment. The sheer amount of sidewalk and parking lot surrounding the bronze figure of Mahatma Gandhi made it look like someone had delivered it to the wrong place, and was perhaps returning at some future time to see it on to its rightful owner. And while I certainly have reverence for the eminent leader as, well, an eminent leader, I would have thought a more predictable bust of Poe or effigy of Twain might have made a better outside advertisement for the tomes within.
Then, a year later, I got a second chance to see the possibilities.
In the intervening period, and as they are wont to do, a very lush desert bird of paradise bush had sprung up, flowering fully by the end of this summer, nearly obscuring the Mahatma and placing him in a very different kind of visual space. Suddenly I visualized a design, or at least a design idea, for an image. In traditional Indian art, the same flame-tip orange found in the shrub’s flowers are a very dominant color, symbolizing sun, flames, birds, and the raiment of various gods. The sea of blossoms now fronting the statue seemed less to me like plants and more to me like banks of fire, or oceanic waves, or those brilliantly colored clouds of dye dust billowing up during celebrations and rituals all across India. I began to imagine Gandhi as a mystical figure emerging from those clouds, as if released from the bonds of time, or maybe even as Shiva himself summoned him forth. The problem with this whole conception now became how to render something fanciful with a machine (the camera) whose default is merely to document.
But, of course, that was the fun of it…
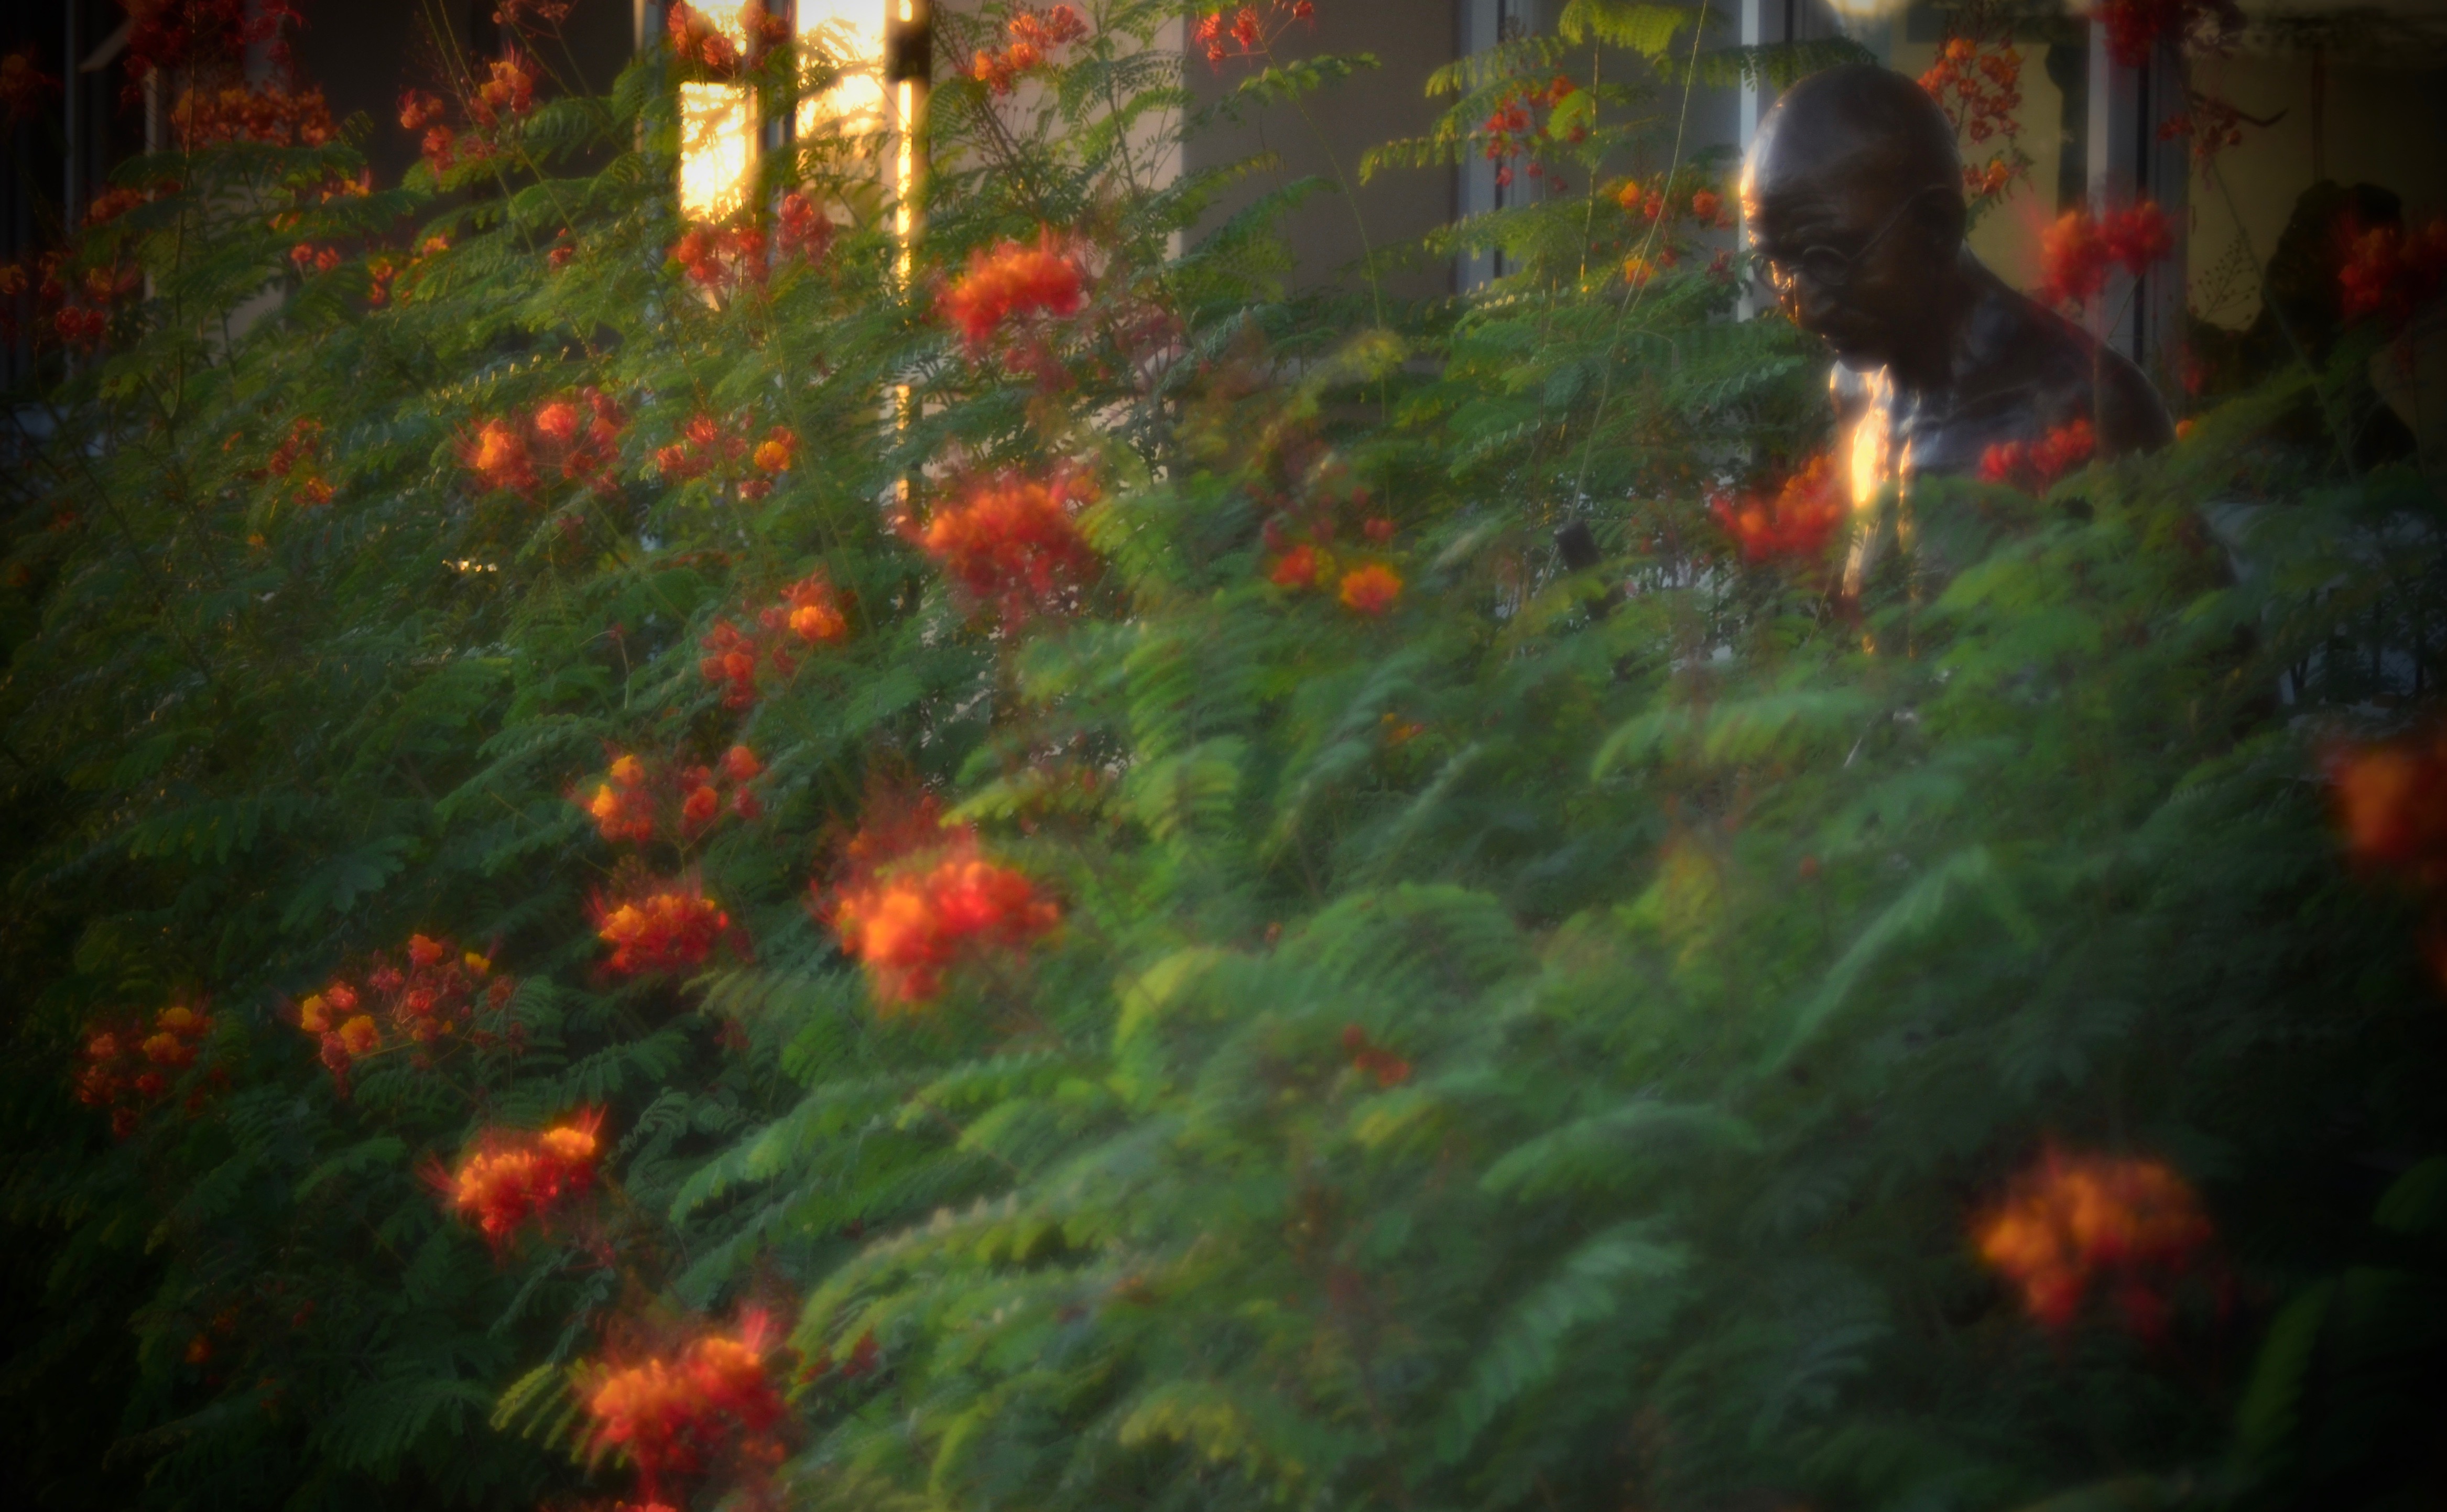
Suddenly Shiva Ordered The Mahatma Forth, 2019
I had one very fortunate ally in the fading, pre-sunset light, which amped up the orange in the blossoms and also bounced that same color off the shiner portions of the statue’s bronze. I also figured that the flowers on the bird of paradise might be more suggestive of movement if they weren’t rendered in absolutely sharp focus, so I opened my lens all the way to f/2, shrinking my depth of field to almost nothing. I then concentrated any sharpness to be had on the statue’s head alone, isolating it in a kind of focal sandwich with the softened foreground and background as the “bread”, if you will. The slight glowing affect achieved when shooting wide open on this particular lens (A Soviet-era Helios 44M) also helped the dreamlike quality suggested by what I saw in my mind. The result is not a technically perfect realization of all this, but it at least records the rudiments of my idea, much like a sketchbook “rough”, a field test of the idea that I may refine later.
The only really important thing here was in reminding myself that the addition of a single new element in our view of the familiar can substantially expand one’s options in photography. The newly added straw may not break the camel’s back, but someone may be inspired to remark, “oh, you stuck a straw on his back. That’s just what was needed….”
OPEN AND SHUT CASE
By MICHAEL PERKINS
ANYTIME I HEAR A PHOTOGRAPHER EXPLAIN HIS TECHNIQUE in sentences that start with “I always”, my hackles raise…just a little.
You’ve heard people point to stylistic routines that they never break, as if that rigidity were itself a guarantee of consistent excellence. I always shoot in natural light. I always shoot RAW. I always use a red filter…. you get the idea. Let’s agree that there is no gear or procedure which works wonderfully all the time. Every choice we make as photographers means, well, unchoosing other choices. Sometimes that’s a winning strategy. Sometimes it just bespeaks our insecurity or inflexibility.
One of the “always” boasts that’s prominent among users of very fast lenses is, “I always shoot wide open” (at the largest possible aperture), as if that’s some miracle prescription. In terms of exposure range, If you’re shooting at around f/2 (or wider, if you’ve laid out a small fortune), you’ve certainly elected to suck in as much light as your lens will allow, and often, that can give you a tremendous advantage over slower lenses. But it comes at a cost.

Distant subjects shot at the widest apertures will be decidedly softer.
At widest apertures, your depth of field, the area of sharpest focus, will be extremely shallow. Now, if you are shooting a portrait at close range and are okay with your background registering as a blur, this can be great, but if the mountain in the background is as important as the girl in the foreground, f/2 will not get that done. Another thing to factor into a shallow DOF shot is manual focusing (in case your autofocus throws a hissy fit). That will require even more time and patience to nail the shot…..which is okay in a casual setting but impractical in fast-moving situations, like street work or sports.
But let’s talk upside. Like mountain ranges? Wide open at F/2, our theoretical lens will, at around 250 feet from the nearest part of a landscape subject, be effectively sharp to infinity. However the result will be measurably softer than, for example, a telephoto shooting at f/8 or slower. One last caveat: using f/2 for everything could also generate additional chromatic aberration or color fringing, in case either of those are deal breakers for you.
The point here is that no setting, no lens, no trick can cover every situation with equal results. If that were true, someone would have already devised a universal high-end point-and-shoot that we could all buy, and the golden age of Gear Wars would end. Till that day, all we have is judgement….creative decisions weighed against all available options.
It means making pictures on purpose, an intention that is the dead opposite of “I always…..”
PLANE SPEAKING
 By MICHAEL PERKINS
THE CONCEPT OF FOCUS HAS, over my lifetime (and, I’m sure in some of your own), moved through three distinct phases. The first, when I was very new to the making of pictures, was absolute. All or nothing. An image was either sharp from corner to corner, front to back, or it was worthless. My goals at this point all centered on technical mastery, I suspect because I had none.
The second phase for how I viewed focus could be called front plane, rear plane as I got more adept at the selective use of depth-of-field, making decisions to sharpen either the tree in the front plane or the mountain in the rear plane. Here, I started to actually make deliberate choices on what to emphasize within a frame, and thus to prioritize the order in which I wanted people to discover my pictures.
The third and most recent focal phase, one that could be called priorities within the plane, allows for even more controlled decision-making, as objects that are, from left to right, all the same general distance from the lens, rendered in vastly different degrees of sharpness as a matter of interpretation. This kind of selective focus is abetted by lenses like the Lensbaby line of products, many of which allow for the placement of a sharp “sweet spot” in-camera, anywhere within the image. Even more importantly, many remarkable apps allow for the same effect to be applied in post from a cel camera.
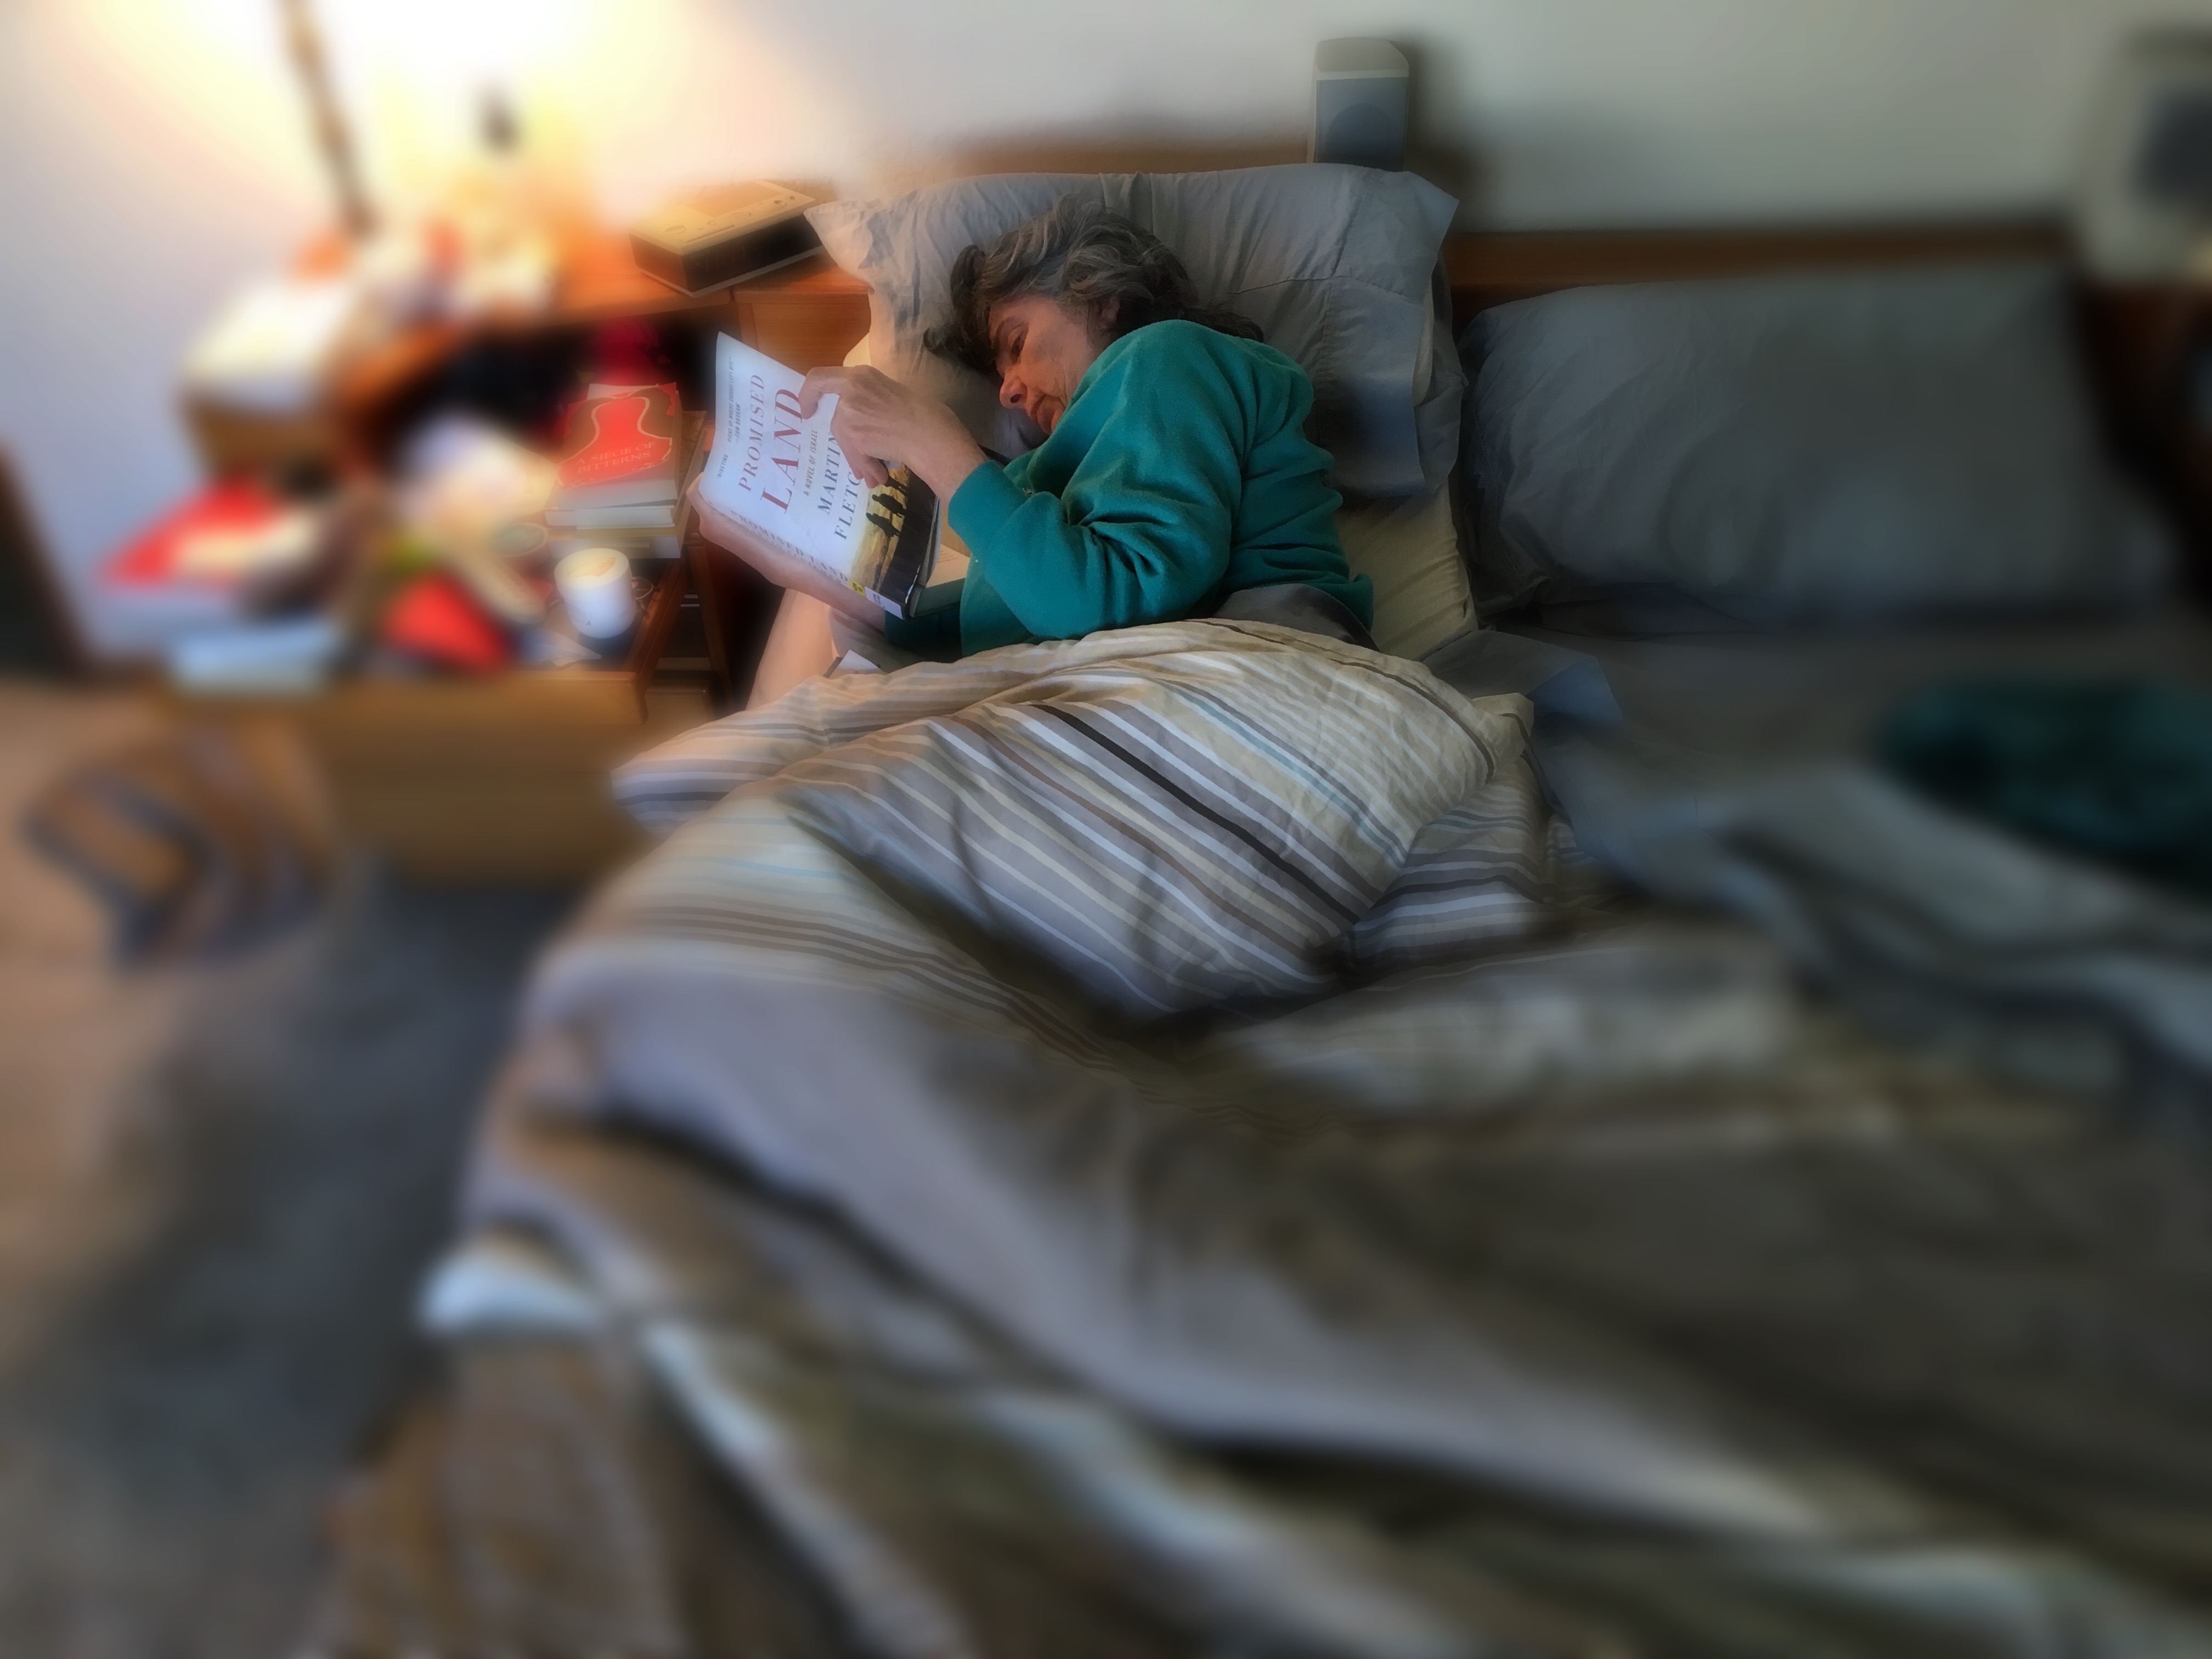
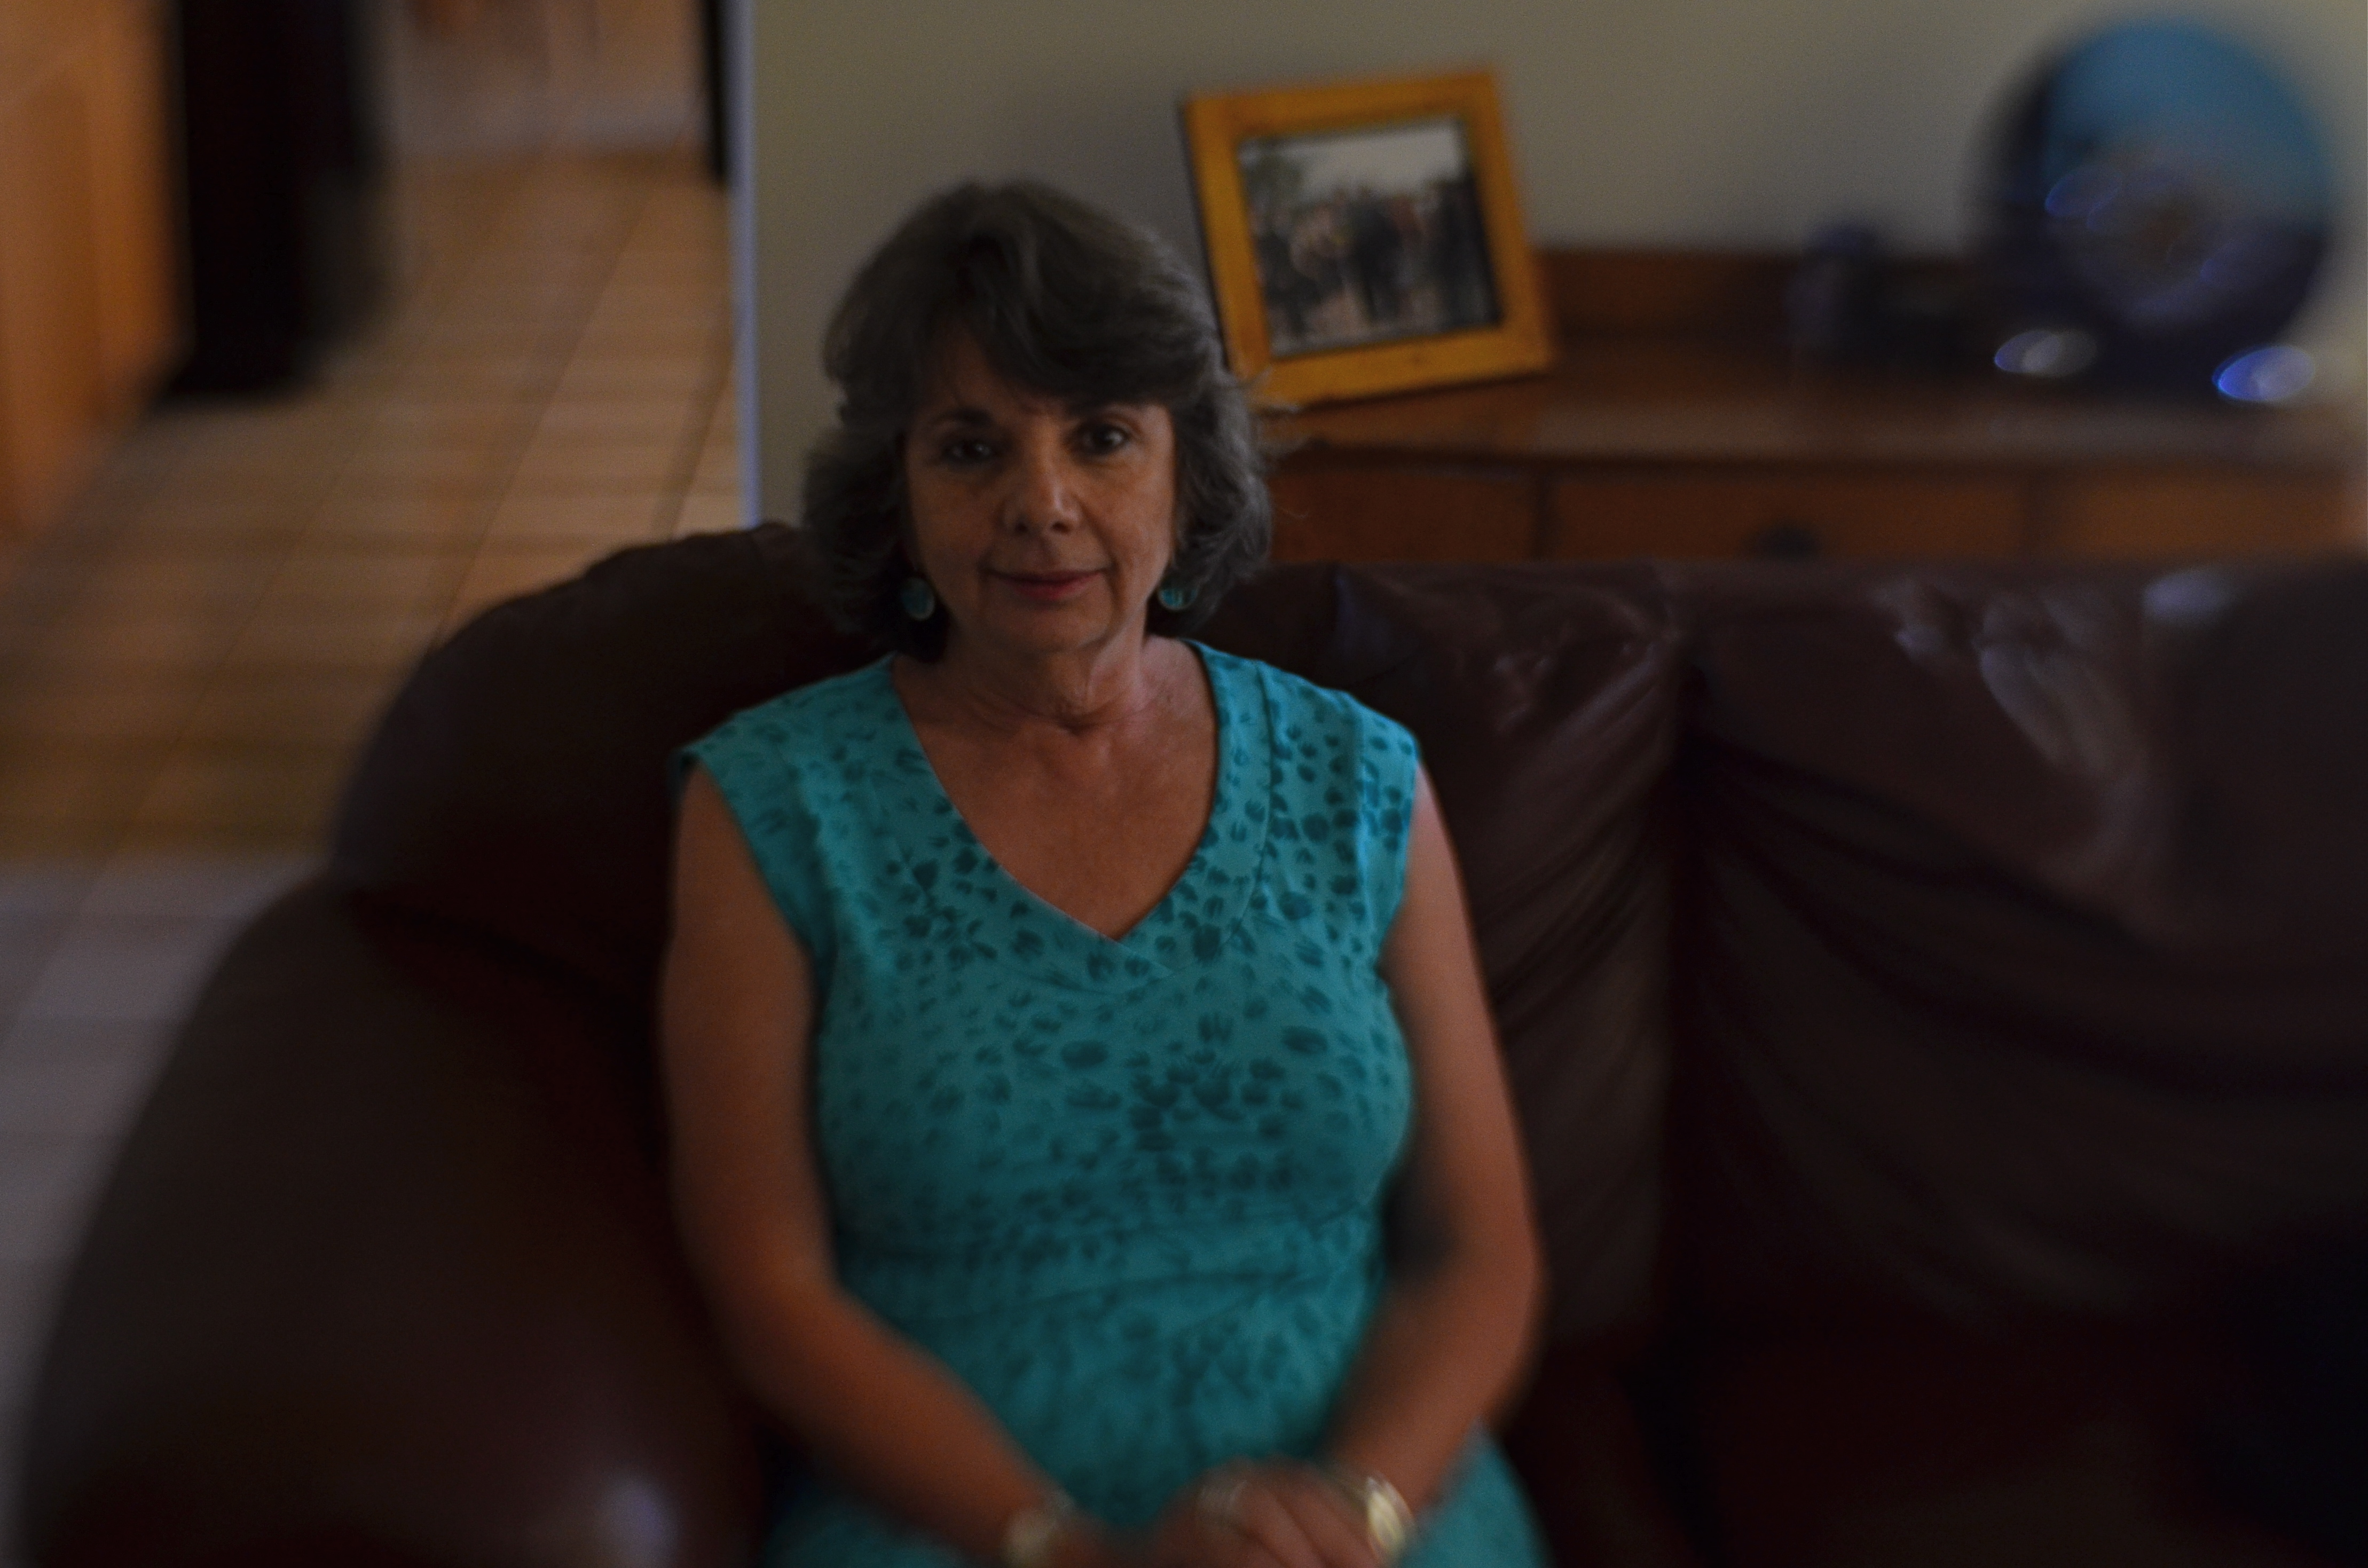
The image at the top left is straight from my iPhone, with all objects across the plane registering in the same depth of field. The larger frame just overhead was rendered using the popular Hipstamatic app, which features a depth-of-field control that can be applied by the same tap-pinch move used by millions for nearly ten years. The effect of the doctored shot is to isolate the subject and her book from the general clutter of the room, suggesting a gauzy dream state as she settles into her chill mode. In inter-plane imagery, even a finished photograph can be re-interpreted endlessly, each “reading” as potentially powerful as a conventionally focused shot, proving, as the best photography always does, that images benefit most from an open approach.
Years after I snapped my first shutter, I try to see myself as being on a journey. Every time I think I’ve arrived at a destination, it’s time to stick out my thumb again.
LEADING THE WITNESS
By MICHAEL PERKINS
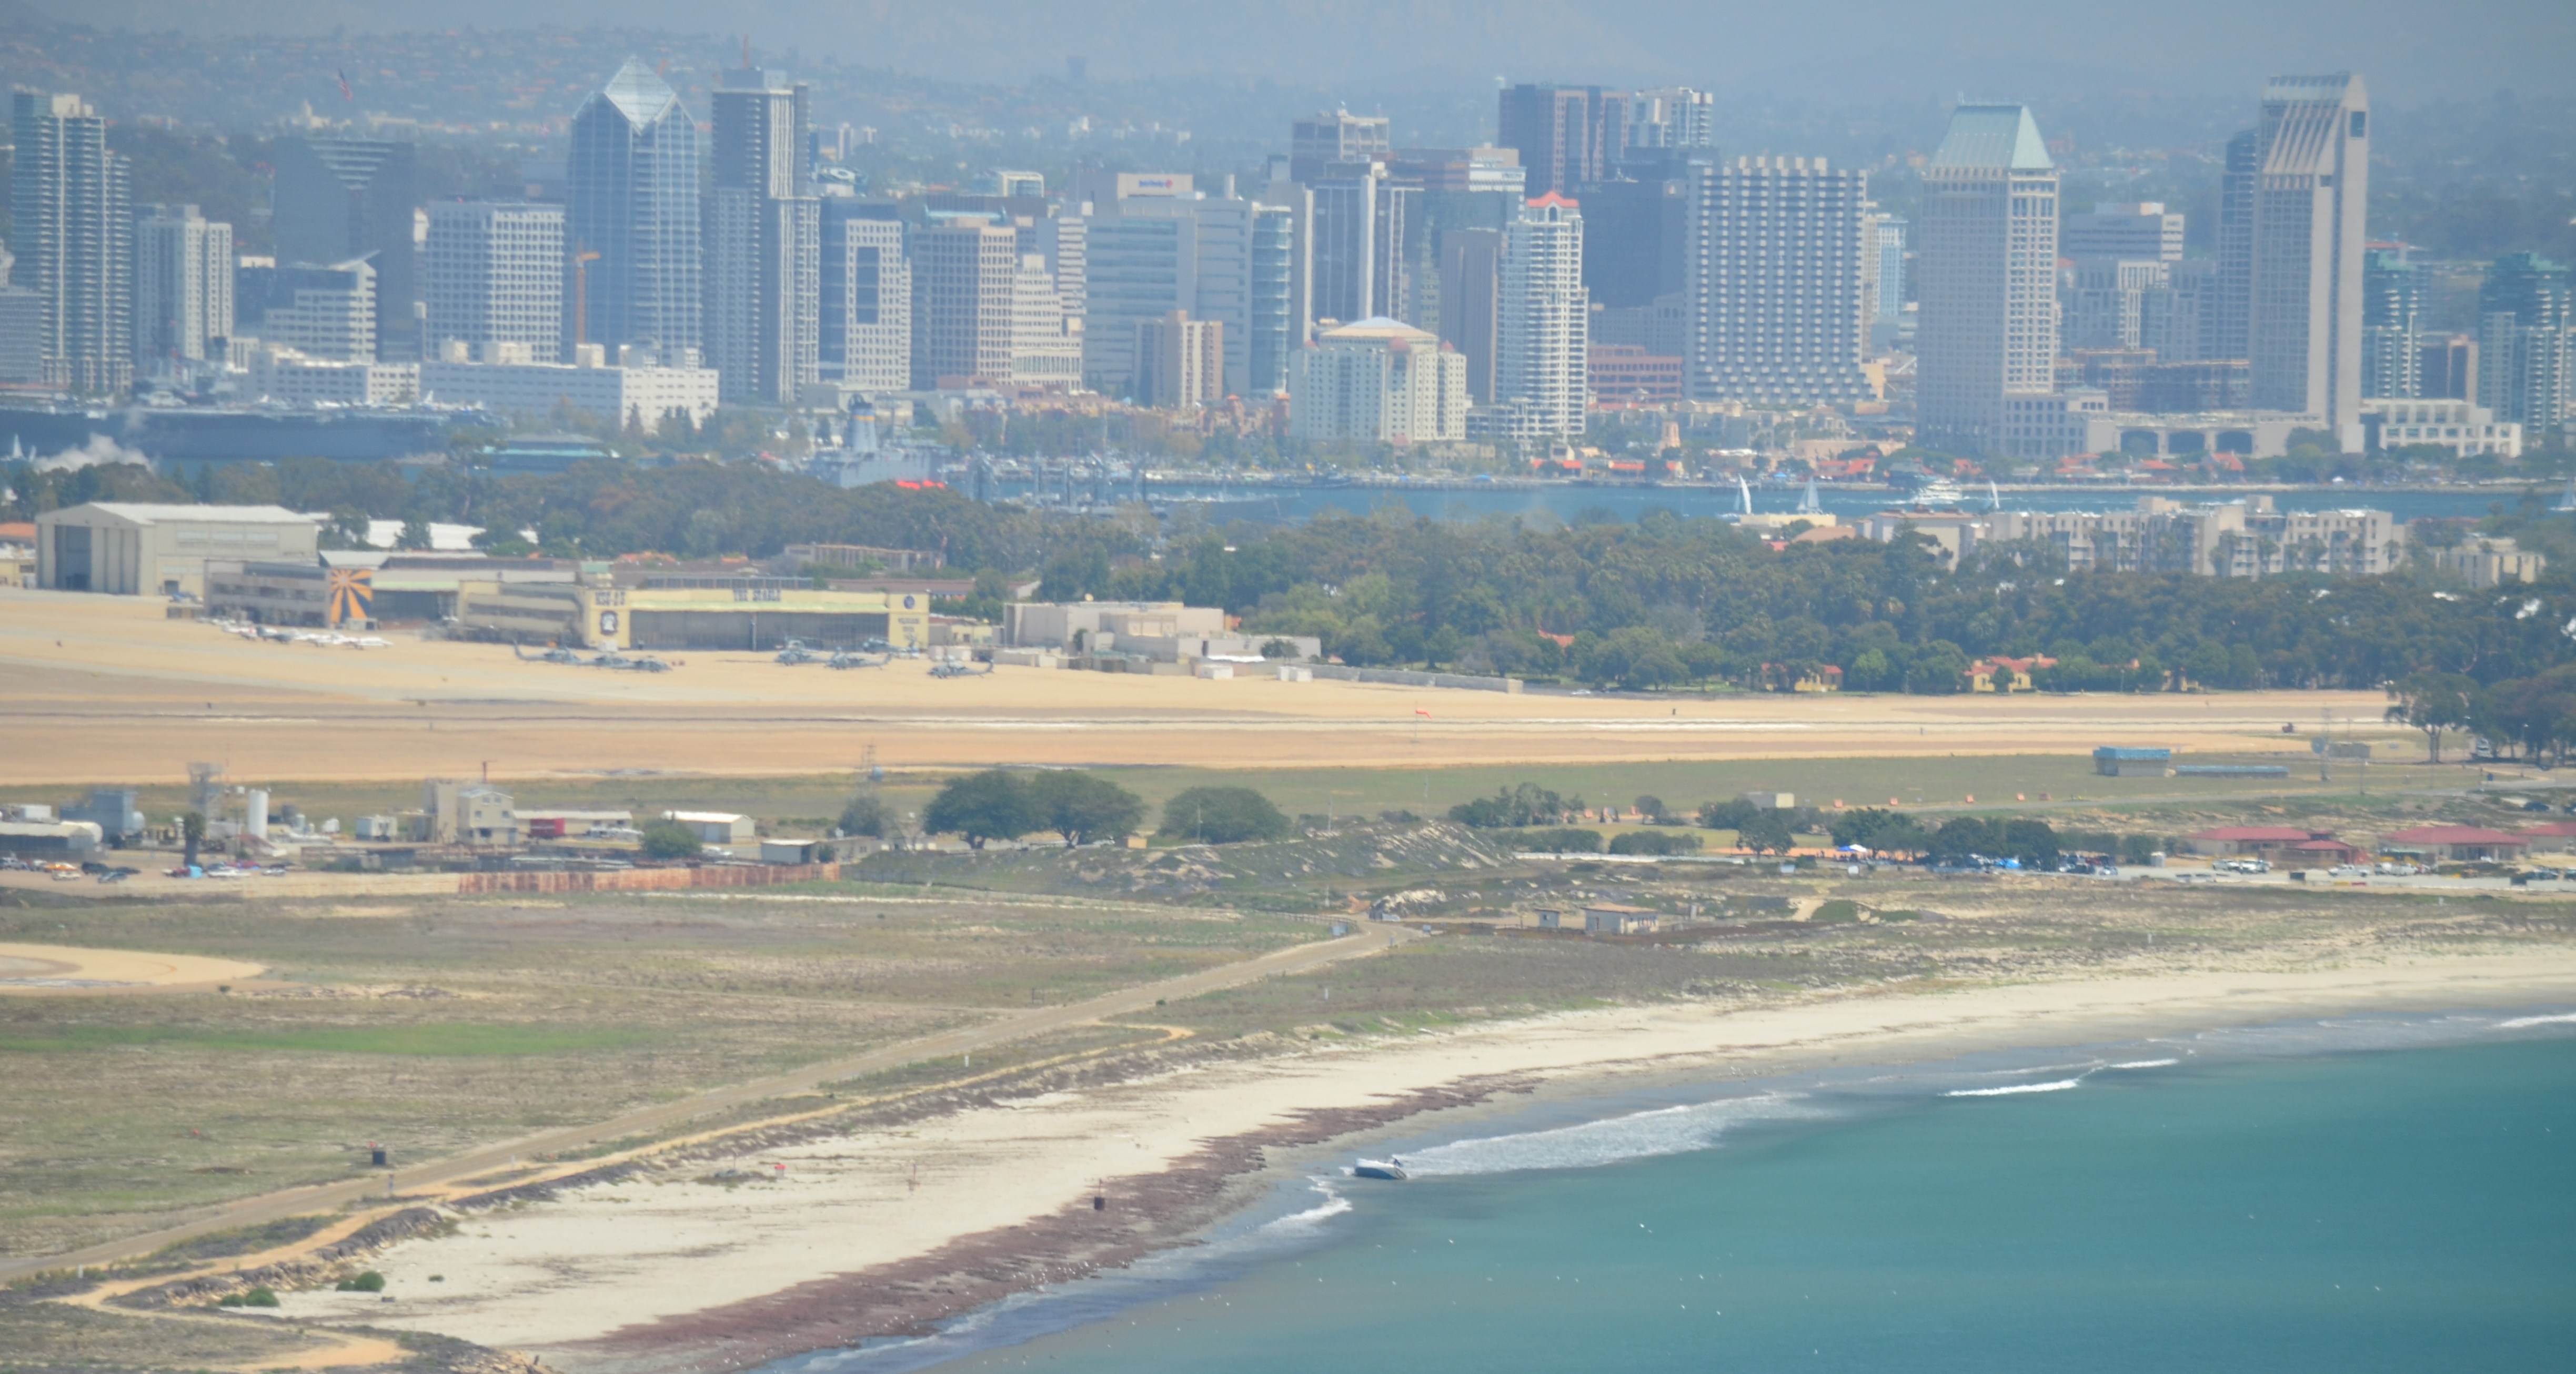
PHOTOGRAPHY IS GUILTY OF MANY AN UNTRUTH, simply by the very nature of how it mimics reality. And chief among these falsehoods is its assertion that it’s reproducing depth as well as length and breadth, that you’re not only looking at a photograph but into it as well. Compositional tricks employed to sell this illusion are as old as the medium itself, many employing the technique familiarly known as leading lines.
The phrase is practically an explanation in itself: two or more lines of some kind seem to originate near the foreword edge of the picture and trail inward, receding toward the “back” of the frame, usually toward a horizon line of infinity, at a point at which the lines seem to converge, like train tracks that grow closer as they fade into the distance. Leading lines can take the form of a spiral staircase, a winding stream, or some similar invitation for your eye to “buy into” the idea that the flat image is actually “deep”.
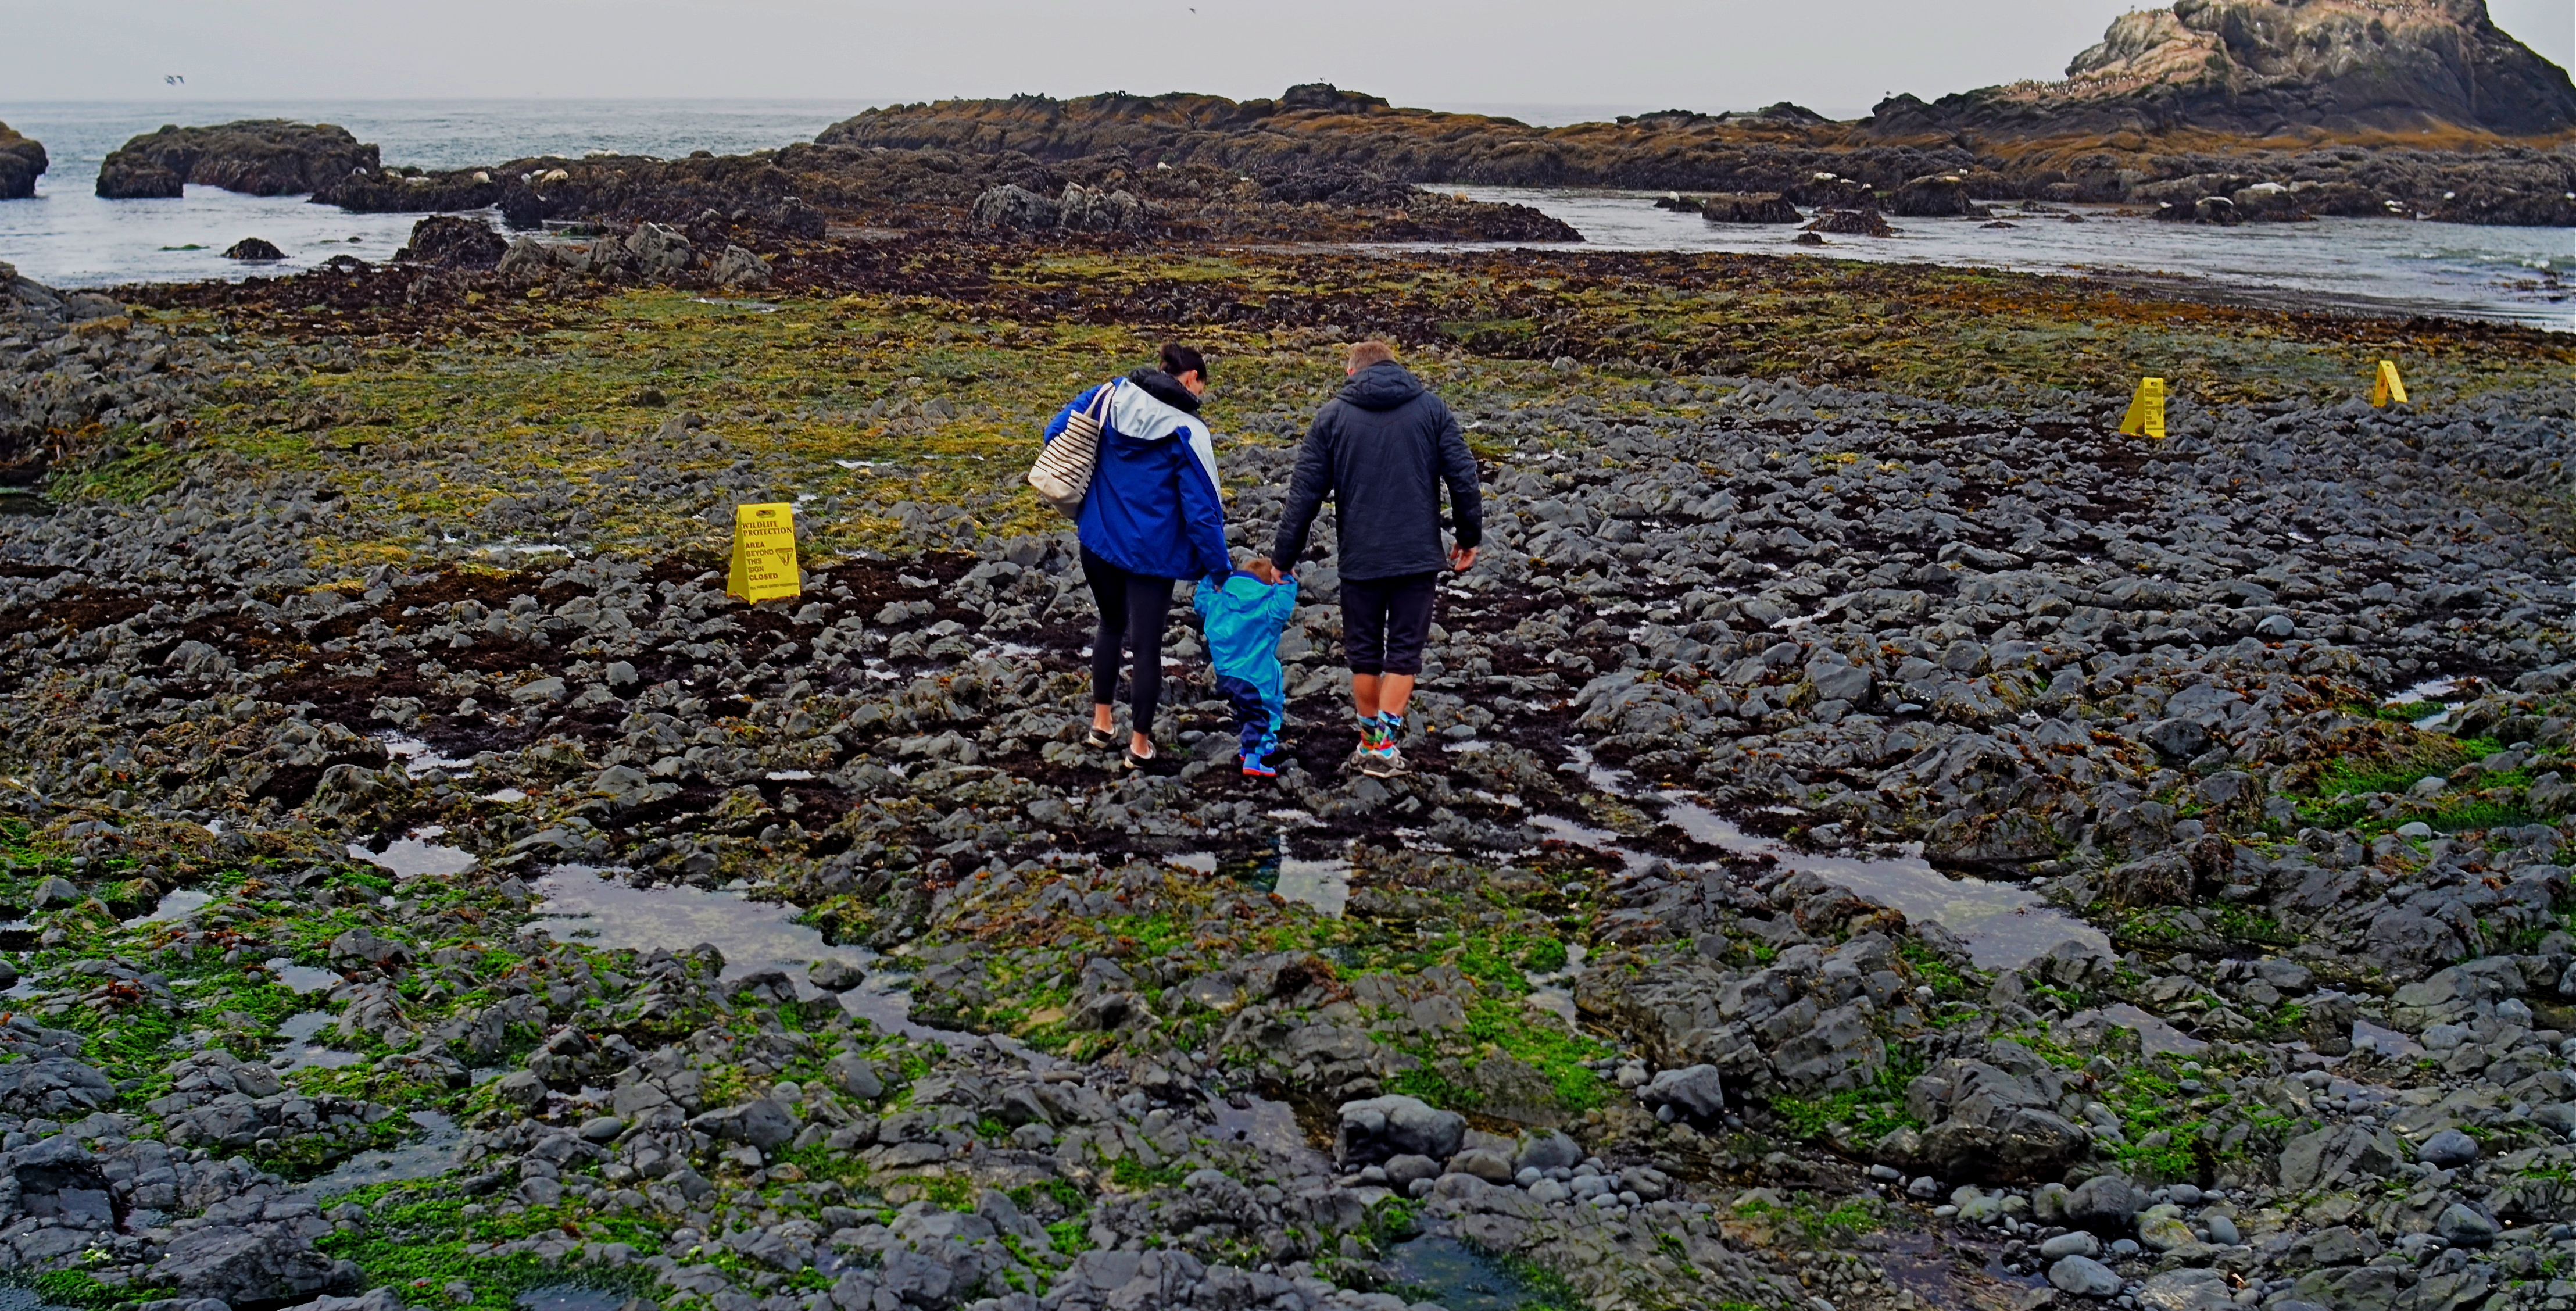
As surefire as leading lines can be, it’s also fun to experiment with other ways to convey the illusion of depth. The image seen here uses no obvious leading lines, and yet it achieves a reasonable effect of dimensionality. Several things can help “sell” the trick.
First and easiest is the choice of a 24mm lens. This optic qualifies as an “ultra-wide” and will always exaggerate the distance from front to back. Then there’s the detailed texture of rock and sand, whose particles shrink in size as the tide pool recedes toward the sea, and just as our mind knows it would in nature. As to focus, setting at infinity helps the eye look deeper into the shot, whereas just shooting only the family in sharpness might stop the audience at a shallower viewing point. Finally, the placing of the family at center and at the mid-point of the front-to-back distance means you have to “look into” the shot fairly deeply just to engage them, at which point your brain has already been dragged halfway to the rear of the shot.
And this is only one very elementary example of how you can effect the depth of a leading line image without….the leading lines. In some ways, photographic compositions are much like musical ones: both require orchestration and a willful conductor.
BOKEH ON A BUDGET
By MICHAEL PERKINS
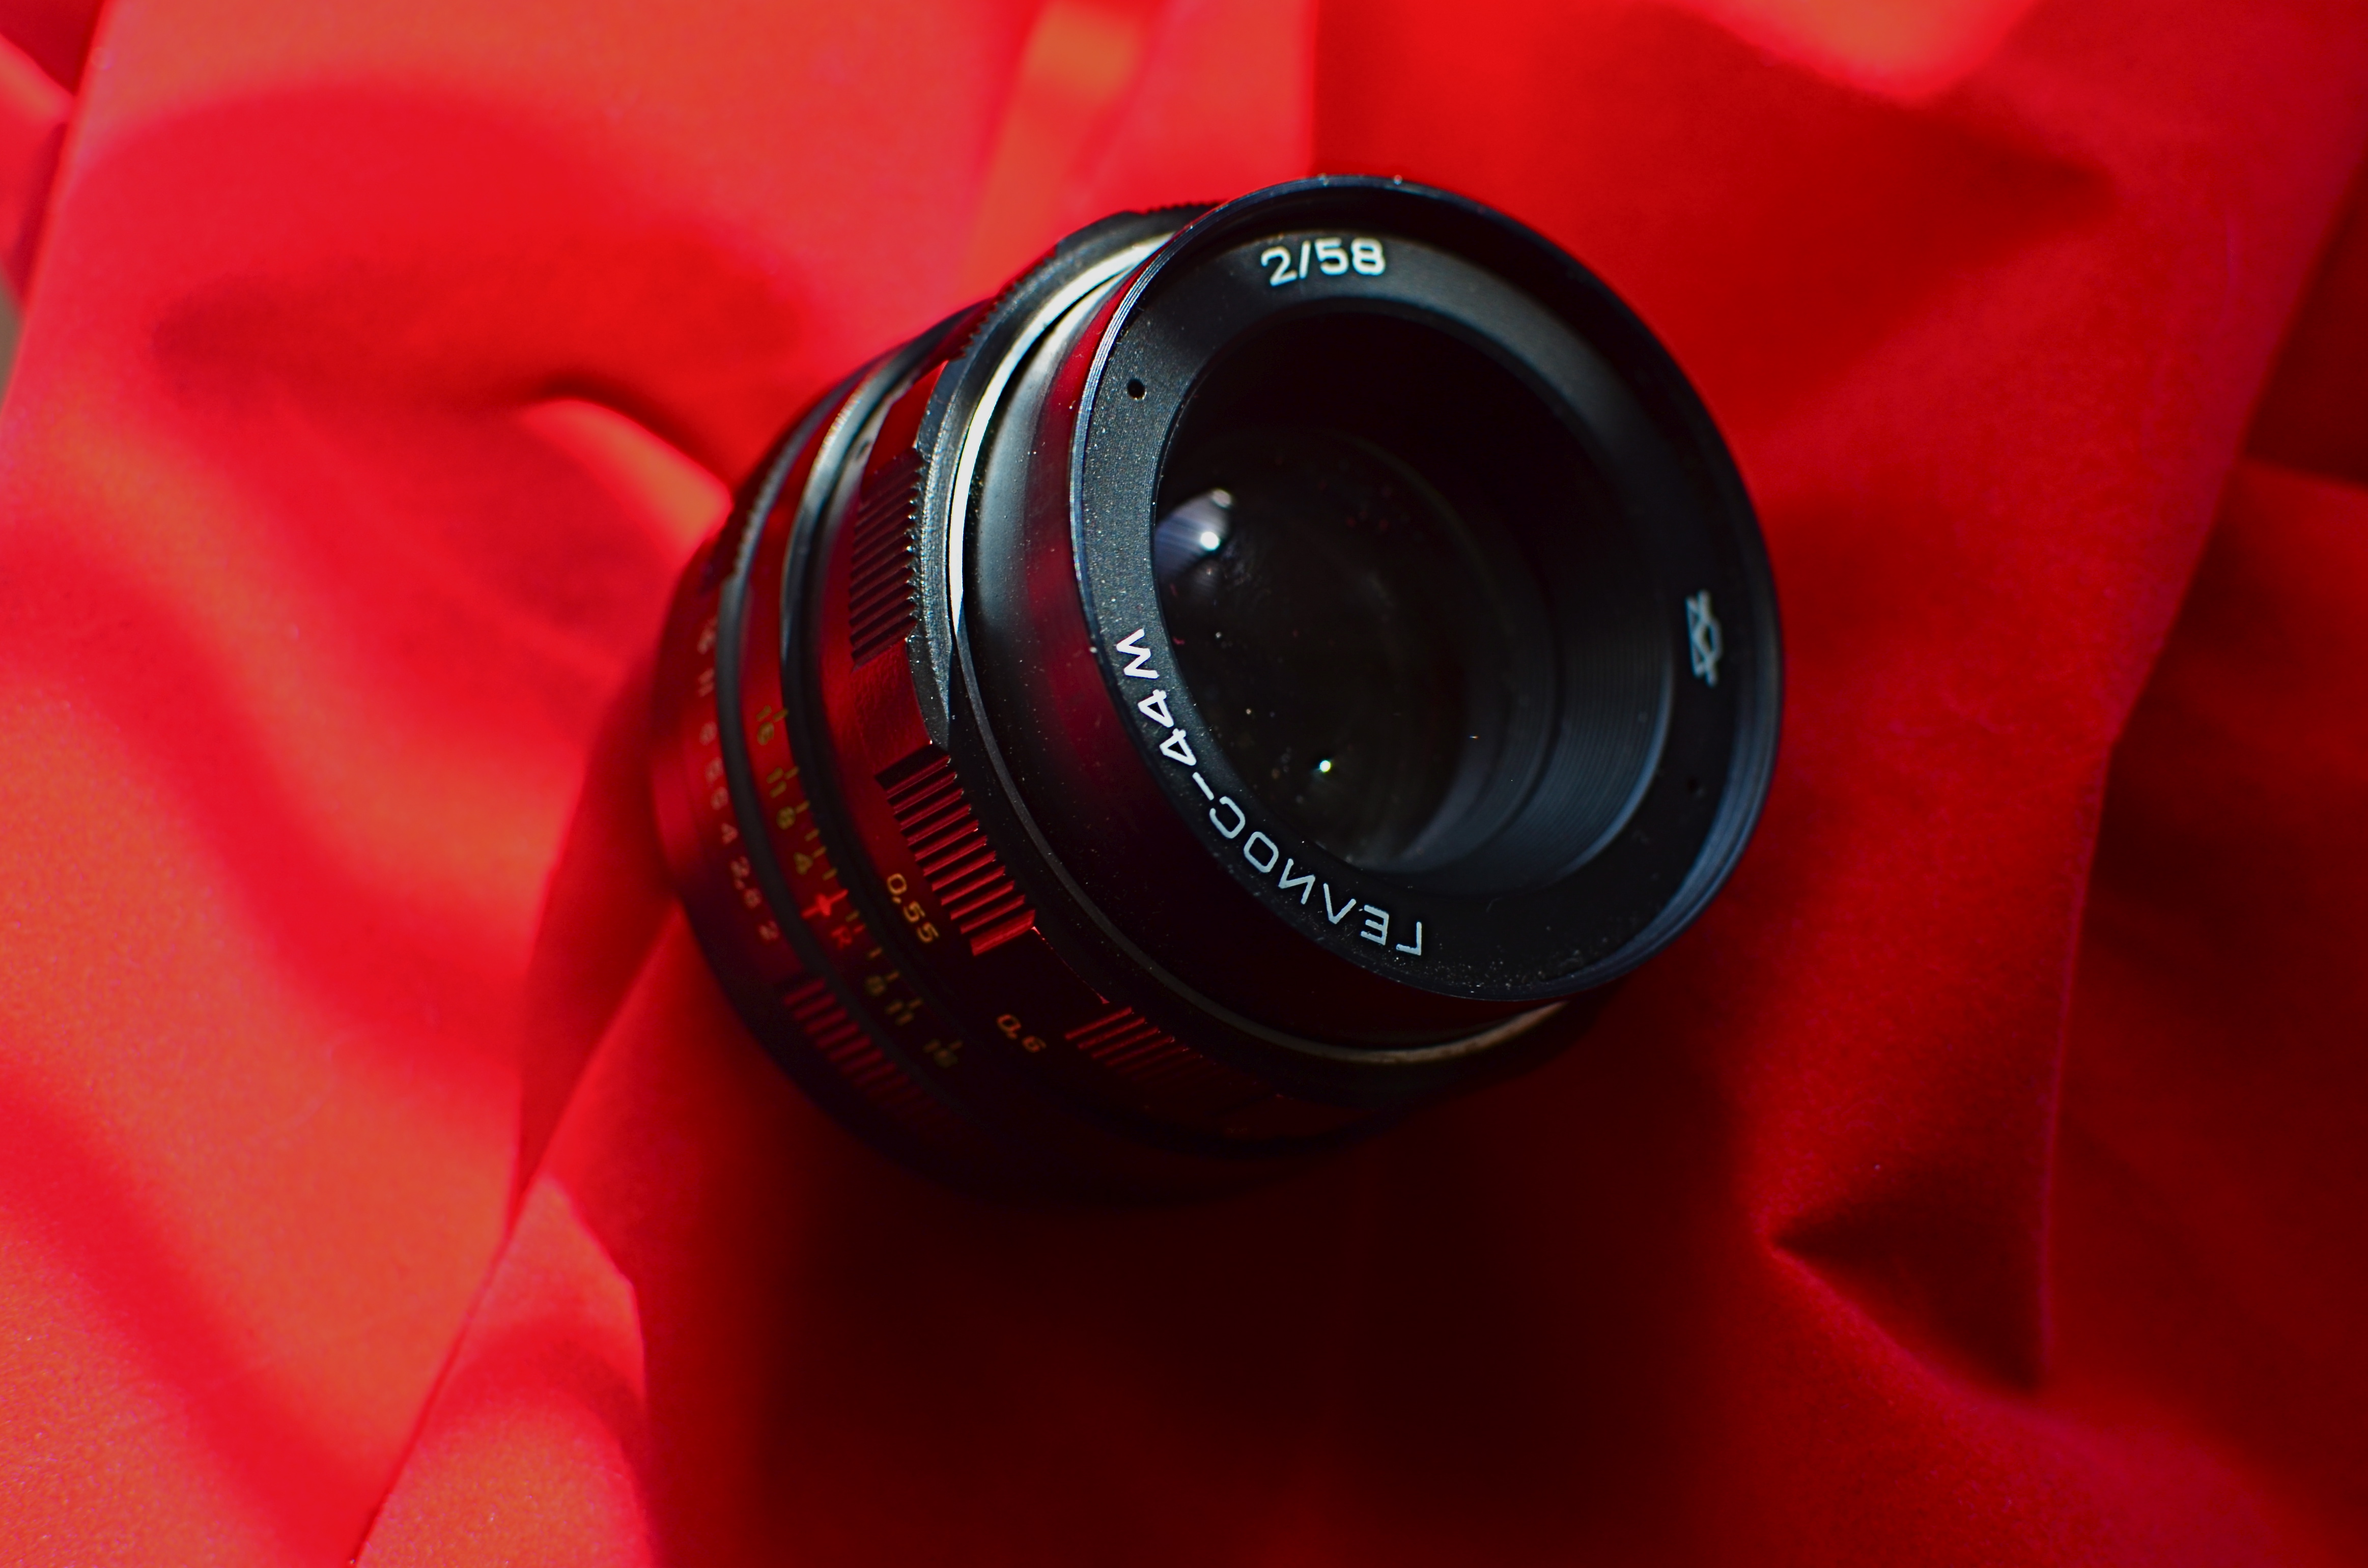
A Soviet–era Helios 44M.
THE EXCLUSIVITY AND ONE–UPMANSHIP which used to divide photographers into warring camps over lenses (it must be primes!) or cameras (I myself have always been a Leica man!) has met its match in yet another pompous arena of dubious distinction.
I’m speaking of the trendy and tawdry world of blur snobs.
You remember blur, right? All that stuff in your pictures that isn’t, you know, sharp? You wanted some of it in there to set your focused subject apart or pop it forward, so you set your depth of field appropriately. So we’re done now, right?
Wrong. Because you might not have the cool kind of blur in your pictures. Cool blur is called “bokeh”, because we said so, and its various swirls, refractions and currents means you must now master blur the way you once sought to master focus. The thing you once regarded as mere negative space is now incredibly artistic negative space. Or you’d better spend money until it is.
The world’s bokeh bullies eventually started to aggressively market glass guaranteed to deliver lots of it, for lots of dollars. The cool-blur movement revived interest in the 19th-century Petzval lenses, great, fast optics for portraits which, as a by-product of their slightly flawed design, delivered big-time swirly blur. Thing is, engineering new lenses to do that one “wrong” thing on purpose meant coughing up an astounding amount of scratch for a lens that is, essentially, a one trick pony. Repeat after me, children: hipness is never cheap.
Turns out that, instead of popping for anywhere from two to six hundred peppers for “cool insurance”, you can get the same effect from a lens that’s so globally plentiful that it can be had for under $35.00. Enter the humble Helios.

The Helios‘ “swirly” bokeh.
Helios lenses were among the most highly produced lenses in Soviet history, marching out of USSR factories pretty much non-stop from 1958 to 1992. They were based on several different Carl Zeiss Biotar designs, and, while mostly used on Russian SLRs, were also built for select Pentax models. One of the most popular, the 44M, seen here, was the kit lens for generations of cameras, shooting fully manual as a 58mm prime.
Shooting the Helio wide open at f/2, and with a decent separation between foreground and textured backgrounds, you’ll get a bokeh that looks like a gazillion little circles that spray into a swirl as they move toward the edge of the frame. As the rose image attests, it does look very nice, just not $600 worth of nice. You also need the patience of a brain surgeon to get used to nailing the focus. That and consistent access to large depositories of Crown Royal. But I digress.
Helios lenses are perfectly serviceable glass for general purposes, although they are a little soft at the open end. The Russian Federation, which, if you haven’t heard, is a little cash-strapped these days, is sitting on millions of these puppies, so prices are low, lenses can be easily adapted to most camera brands (mine came battle-ready for Nikon), and shipping is often free. For between 35 and 50 bucks, they’re an occasional guilty pleasure. On the other hand, hocking your houseboat or delaying heart surgery for the new toys marketed by the blur snobs to do the same thing is both needless and nuts.
SETTING THINGS STRAIGHT
By MICHAEL PERKINS
ONE OF THE MOST ELUSIVE EFFECTS IN ARCHITECTURAL PHOTOGRAPHY would seem to be the one most easily achieved: the look of a straight line, the foundation upon which an orderly image is built. However, the human eye is often more unreliable than assumed when it comes to reading and identifying that which is supposed to be “straight.”
We’ve all been confounded by optical illusions that present lines that are not, objectively, straight at all, even though our brains, based on our interpretation of the visual data, say they must be. However, we tend to dismiss this sensation as trickery, something we don’t have to sweat about in making a “real” picture. And that is probably a mistake.
Based on what kind of architectural design you’re shooting, what lens you choose, even where you stand, a straight line, either horizontal or vertical, can seem to bend or lean, making our “factual” images less than trustworthy.

Even setting up a shot on a carefully calibrated tripod and a bubble level can produce a result that looks as if it was manipulated. Of course, based on what look you desire, you may regard geometric reality as irrelevant, and deliberately engineer ” unreality” into a photograph. That’s why we make a distinction between taking a picture and making one.
As an example, the picture seen above was taken super-wide, at 18mm, to intentionally exaggerate the size of the room, making some verticals bow in while others register normally, and playing stretchy with the ceiling arches and floor horizon. The idea here was to distort the already extreme Art Deco accents and give them an extra funhouse quality. Shooting with a more conventional focal length like 35 or 50 mm would have made for straighter lines, but would also have sacrificed every other effect achieved at 18mm.
Bottom (straight or crooked) line: dimensions and angles are suggestions, not commandments. But it’s a lot easier to break rules creatively once you understand how they work.
HOLDING HANDS IN THE DARK
By MICHAEL PERKINS
ONE THING OF WHICH THE PHOTOGRAPHIC COSMOS IS NOT IN SHORT SUPPLY IS THE SELF-PORTRAIT. What might have been a specialized kind of image-making just a few scant years ago is now, in the mobile era, a flat-out obsession. We snap ourselves being happy, being moody, eating a cheeseburger, or giving that cheeseburger a thumbs up with friends, etc, etc. We make more photographs than ever of our faces, and, it could be argued, say less and less in the process.
I think that a good self-portrait, if it is to say or imply anything true about the life behind the face, requires a little prep time, or at least a pre-conceived notion of what one is trying to reveal about that person. That said, I think our concept of a selfie is, at the very same time that it’s overdone, is also far too narrow. Simply speaking, there are other parts of our physical envelope that convey information about who we are and what we’ve been in the world. The hands, for example.
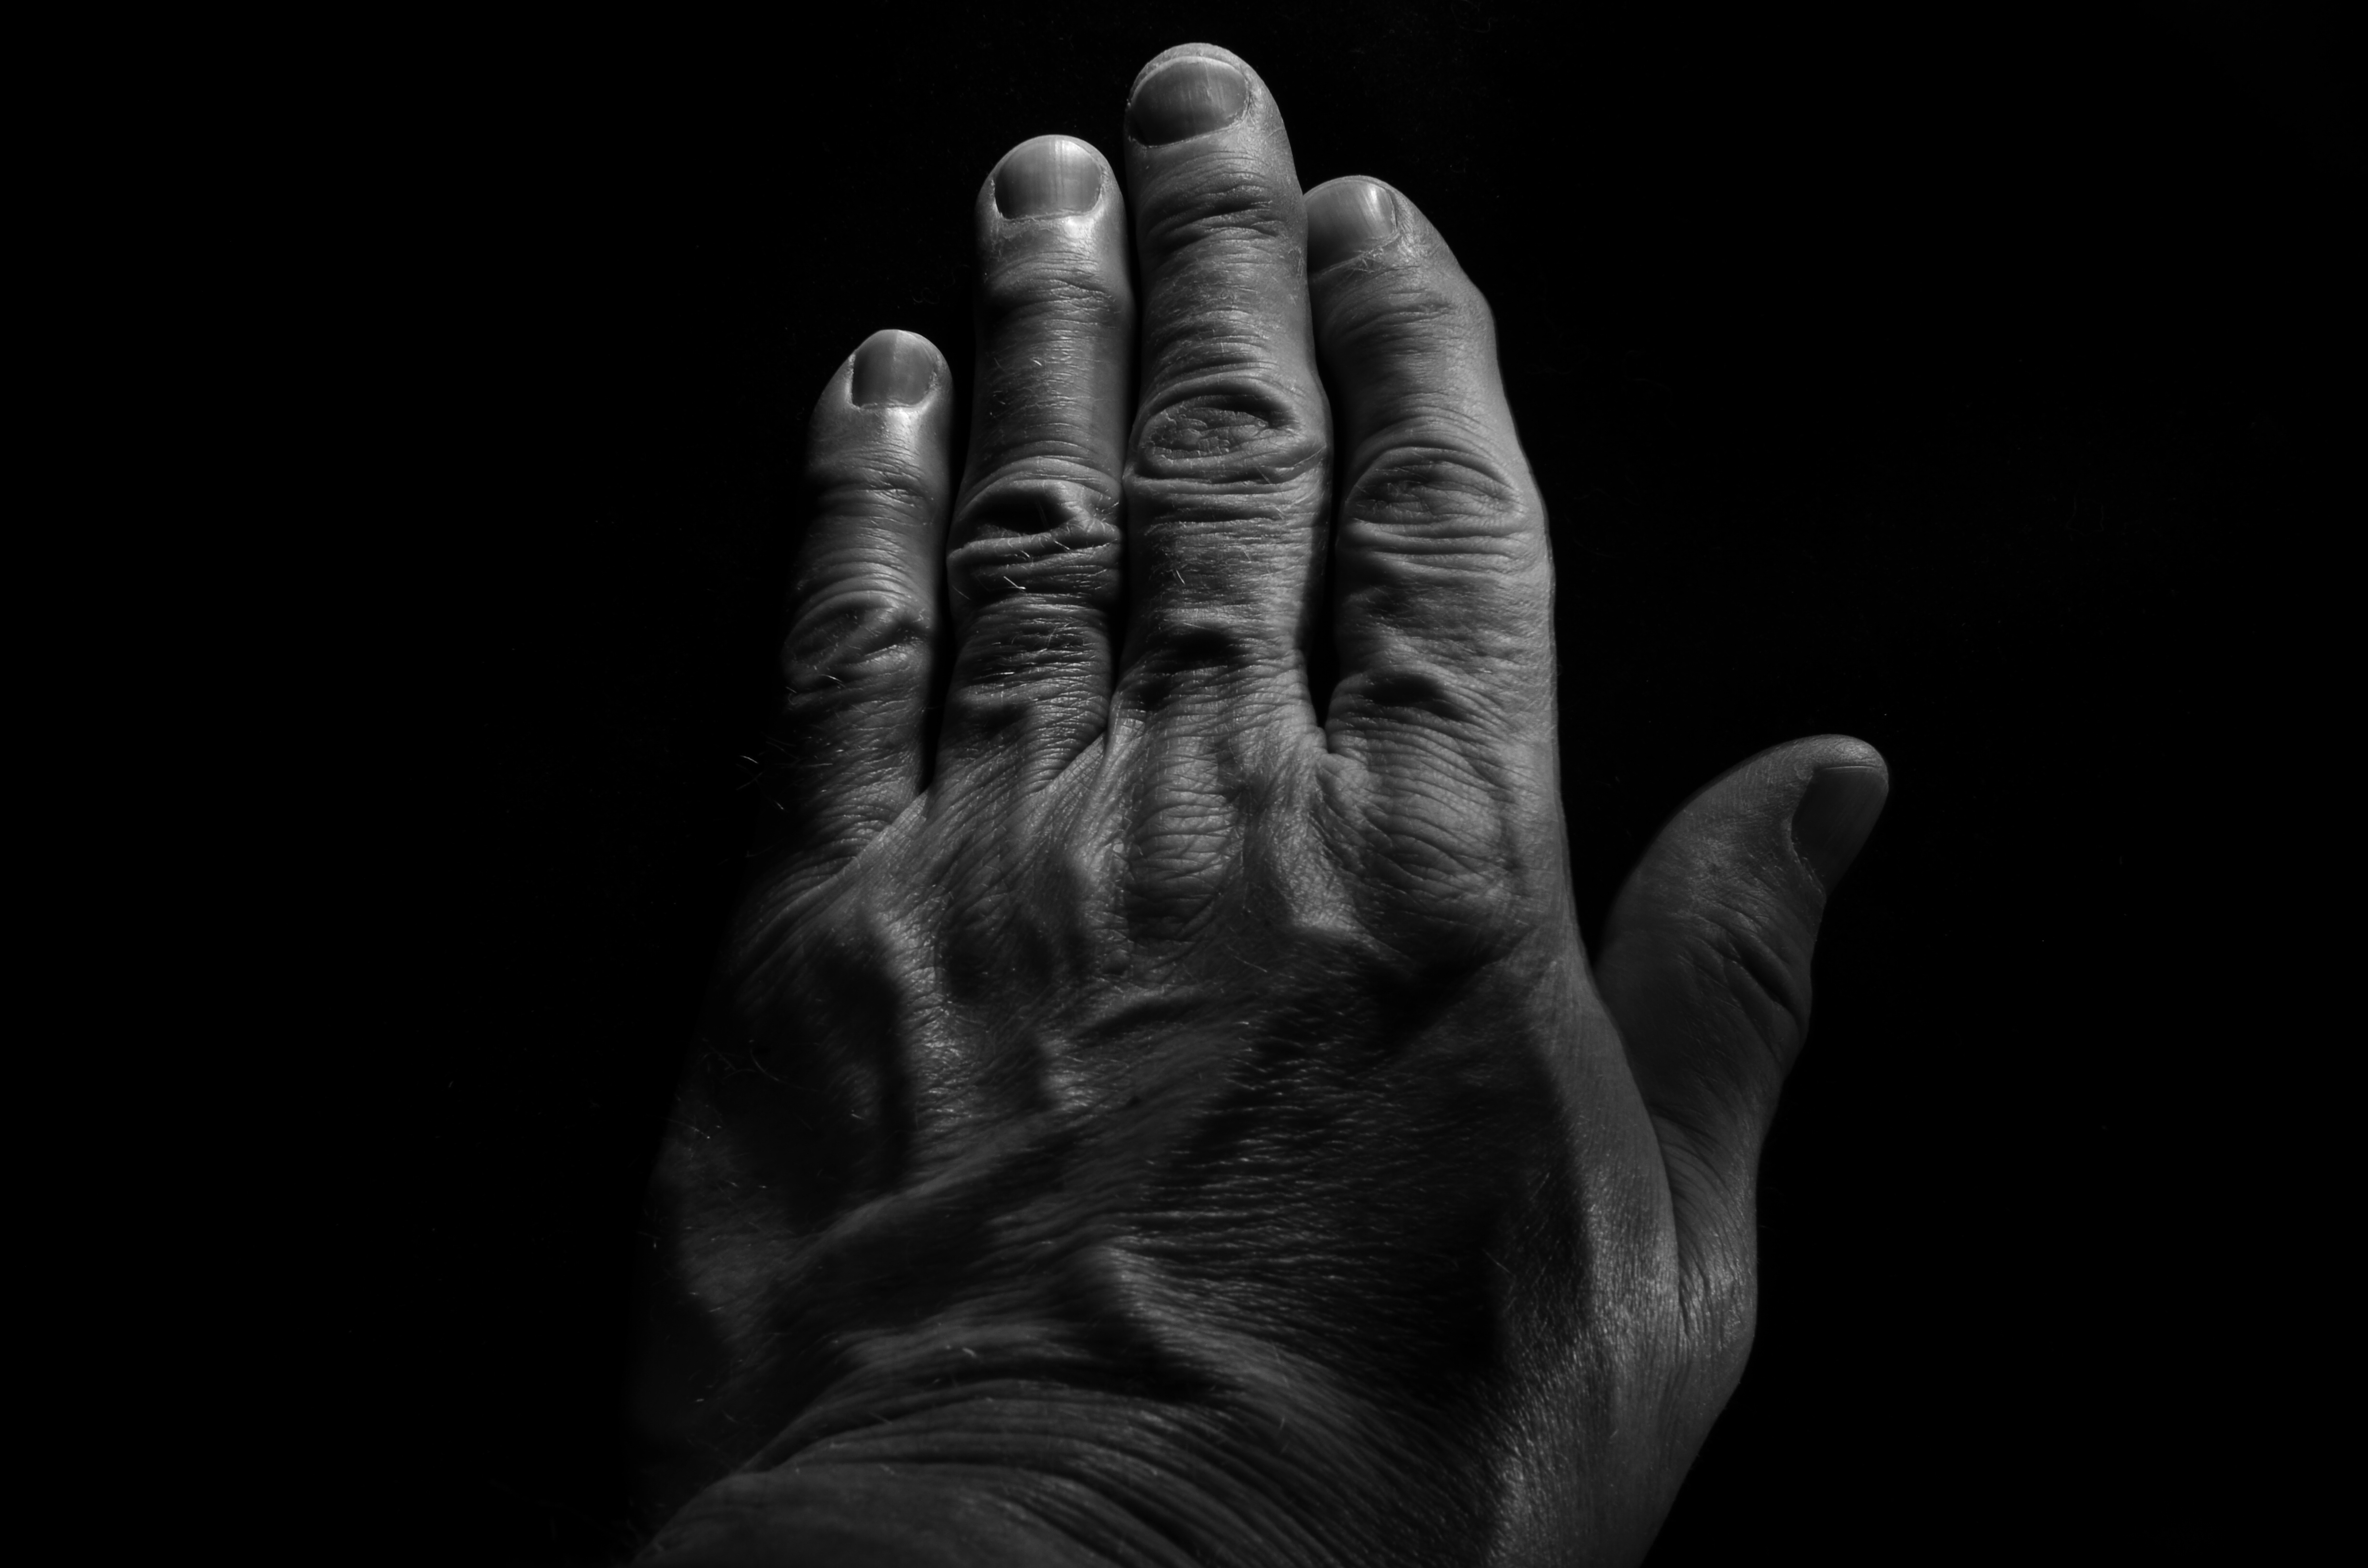
Pax Humana (2017). Hand-held LEDs used to “light-paint” in the dark can create interesting textures in human skin. 18 sec., f/16, ISO 100, 35mm.
If the eyes are the window to the soul, the fingers are the foot-soldiers who carry out the orders that the soul dreams up. The mind behind the face can certainly shine through a good facial portrait, but consider that the hands are the real agents of change in a person’s life. They lift: they move: they put plans into action. Moreover, hands bear the traceable time-stamps of all that agency. Each wrinkle and scar is a document of both deliberate action and unforeseen consequence. Hands belong in any serious study of a person’s life, no less than the face. The trick, as with photographing every other subject, is in getting the image you want.
I find, for example, that normal room light keeps a lot of fine detail from registering in an image, since human skin is highly reflective, causing the grain of the skin to wash out. One way to get around that is to use light painting, a technique we’ve discussed here before. Set up your composition and focus with the camera on a tripod in normal light, then leave everything in place until nightfall and make the image in a completely darkened room while experimenting with a range of exposure times. Your only illumination will be a small hand-held LED, such as a miniature key chain flashlight….nothing wide-beam or super-powered. Use a wireless remote to trigger your shutter, then “write” light paths over the hand, slowly tracking the LED over small areas until all have been “hit” before the trigger snaps back shut.
In the above example, I wanted greater contrast between the hills and valleys of my knuckles, veins, etc., and I wanted to minimize the shine-making effect of the light, so I lit from an angle, sideways from the tips of the fingers. That bumped up the pores and hairs into starker relief as well. Two things to remember: using short stabs of light, that is, turning the LED rapidly on and off, is better than a continuous beam, since you can pinpoint the effect more precisely. Also, using a very small aperture (f/16 here) provides maximum depth of field and enhanced detail. Other than that, it’s truly trial-and-error. This frame, as an example, is one of forty attempts, so it’s not a project you do on the fly. But this, I feel, is my hand, my real hand, its labors and history in full view. And it’s as much a portrait as any face can ever provide.
BLUR IS THE NEW SHADOW

Modern art lenses allow different parts of objects that are all in one focal plane to be selectively blurred.
By MICHAEL PERKINS
I’M INCREASINGLY FASCINATED BY PHOTOGRAPHS THAT SUPPRESS INFORMATION, choosing to selectively conceal details rather than merely delineate everything in the frame in the same exhaustively sharp detail. At the same time, I hate it when this technique is referred to as being “painterly”, as if, after all this time, photos are still striving for the same pedigree that daubers automatically inherit merely by picking up a brush. Photographs are not, and should not try to be, paintings, just as a shoe should not try to pass as a glove. Love the function of the art you have, and leave the mimicry to the mockingbirds.
The “painterly” tag used to be tied mainly to anyone shrouding their images in shadow, as if we were all bucking to be the next Rembrandt or Reubens. And certainly the use of darkness in photography creates a kind of mysterious minimalism, telling more by showing less. We linger over what’s left out of a photo, and the deliberate subtraction of detail simplifies a composition to its barest terms. When there is less to see, you eye goes like a laser to what remains. It’s a big, bright “this way, dummy” arrow pointing toward the heart of the picture.
In the same way, the current wave of photographers are using blur to punch up the impact of images. Any Google search of the phrase “blur my photos” unearths a wellspring of apps that allow any part of any frame to be selectively de-focused, in most cases (as happens with apps) after the picture is taken. Long regarded as the stuff of artifact or accident, blur is now being arranged, managed, and chosen as a tool to remove distracting detail from compositions, or to render them softer and more intimate. In the above image, separate elements of the structure, all of which lie generally in the same focal plane, can be selectively softened so that one can become dominant, while the other is abstracted. This particular shot is done with a Lensbaby Sweet 35 lens, which allows the “sweet spot” of focus to be rotated to any location the shooter desires, although there are many paths to similar results.
Both apps and lenses, which include newly reworked versions of old optics, offer a return to the randomness from which early photographers longed to escape. Lomography, the revival of flawed and cheap cameras from the film era, actually touts blur as a strength, an arty accent much to be desired. To be totally counter-intuitive about it, blur is edgy. Of course, some blur is just another kind of visual noise, and if it’s applied too carelessly or too much, it actually pulls the eye away from the main message of a picture. However, it’s thrilling just to see the sheer breadth of approaches that are suddenly available everywhere, most of them cheap, fast and easy. Blur can “sharpen” a picture just like darkness can “illuminate” one. It’s the new shadow.
I HOLD HERE IN MY HAND…..
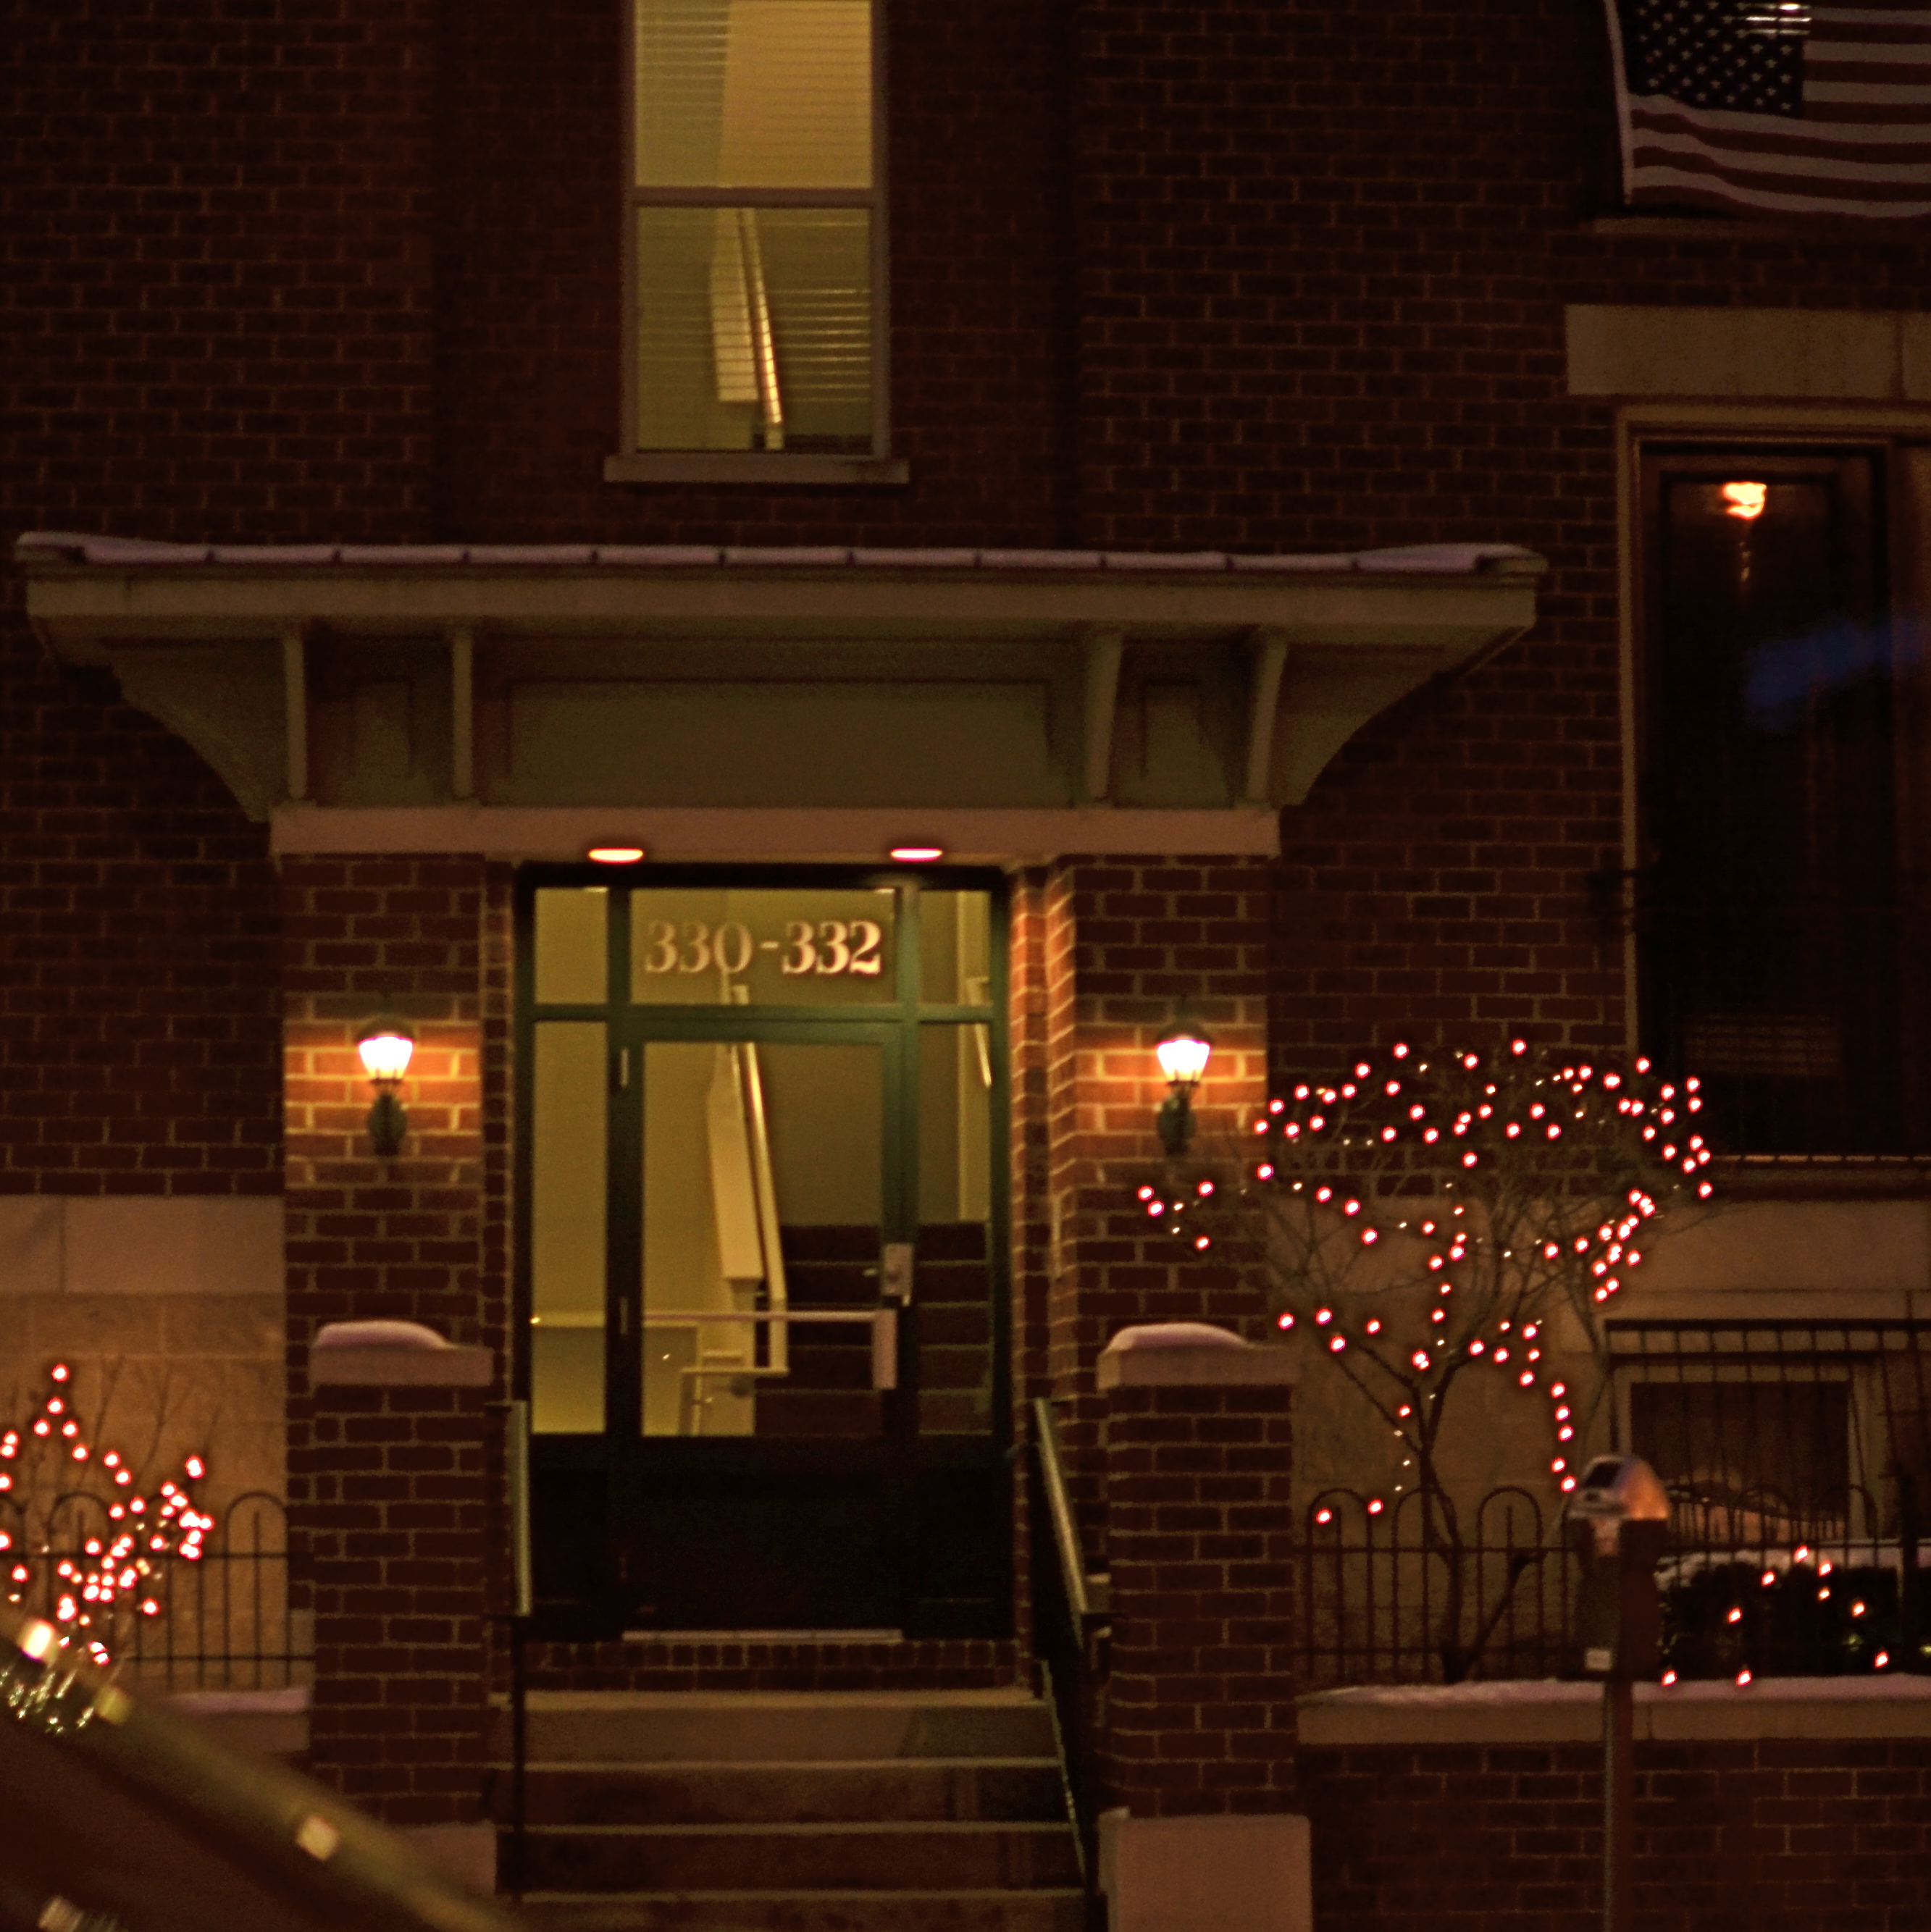
One Flight Up (2013) Handheld night shot, 1/100 sec., f/1.8, ISO 320, 35mm.
By MICHAEL PERKINS
NIGHT SHOTS IN CITIES SEEM TO BE A SIMPLE CHOICE BETWEEN HAND-HELD OR TRIPOD, but those are only the most basic decisions to be made, depending on the texture and mood you’re trying to build into your images. Of those two main choices, many more are opting for hand-held because of convenience and speed, bypassing interference from security people, passers-by, weird weather,etc. And, let’s face it: it’s easier than ever to deliver a readable night photo without the long exposures that used to absolutely necessitate a tripod, especially if you are not worried by the need to either use a wide aperture (thus shallow depth of field) or increased ISO (inviting more digital noise and a decidedly “smudgy” look in the deeper shadows. If you are in the hand-held camp, you’ve got plenty of company.
Tripod people are dedicated, patient, and doomed to travel less lightly, composing longer exposures in darkened conditions and sweating the unwanted artifacts, from wild pixels to smears of people and lights, that will be baked into shots lasting a few seconds or longer. But to rescue a ton of texture and detail from darkened buildings with a minimum of noise, there is no look like a well-modulated time exposure.
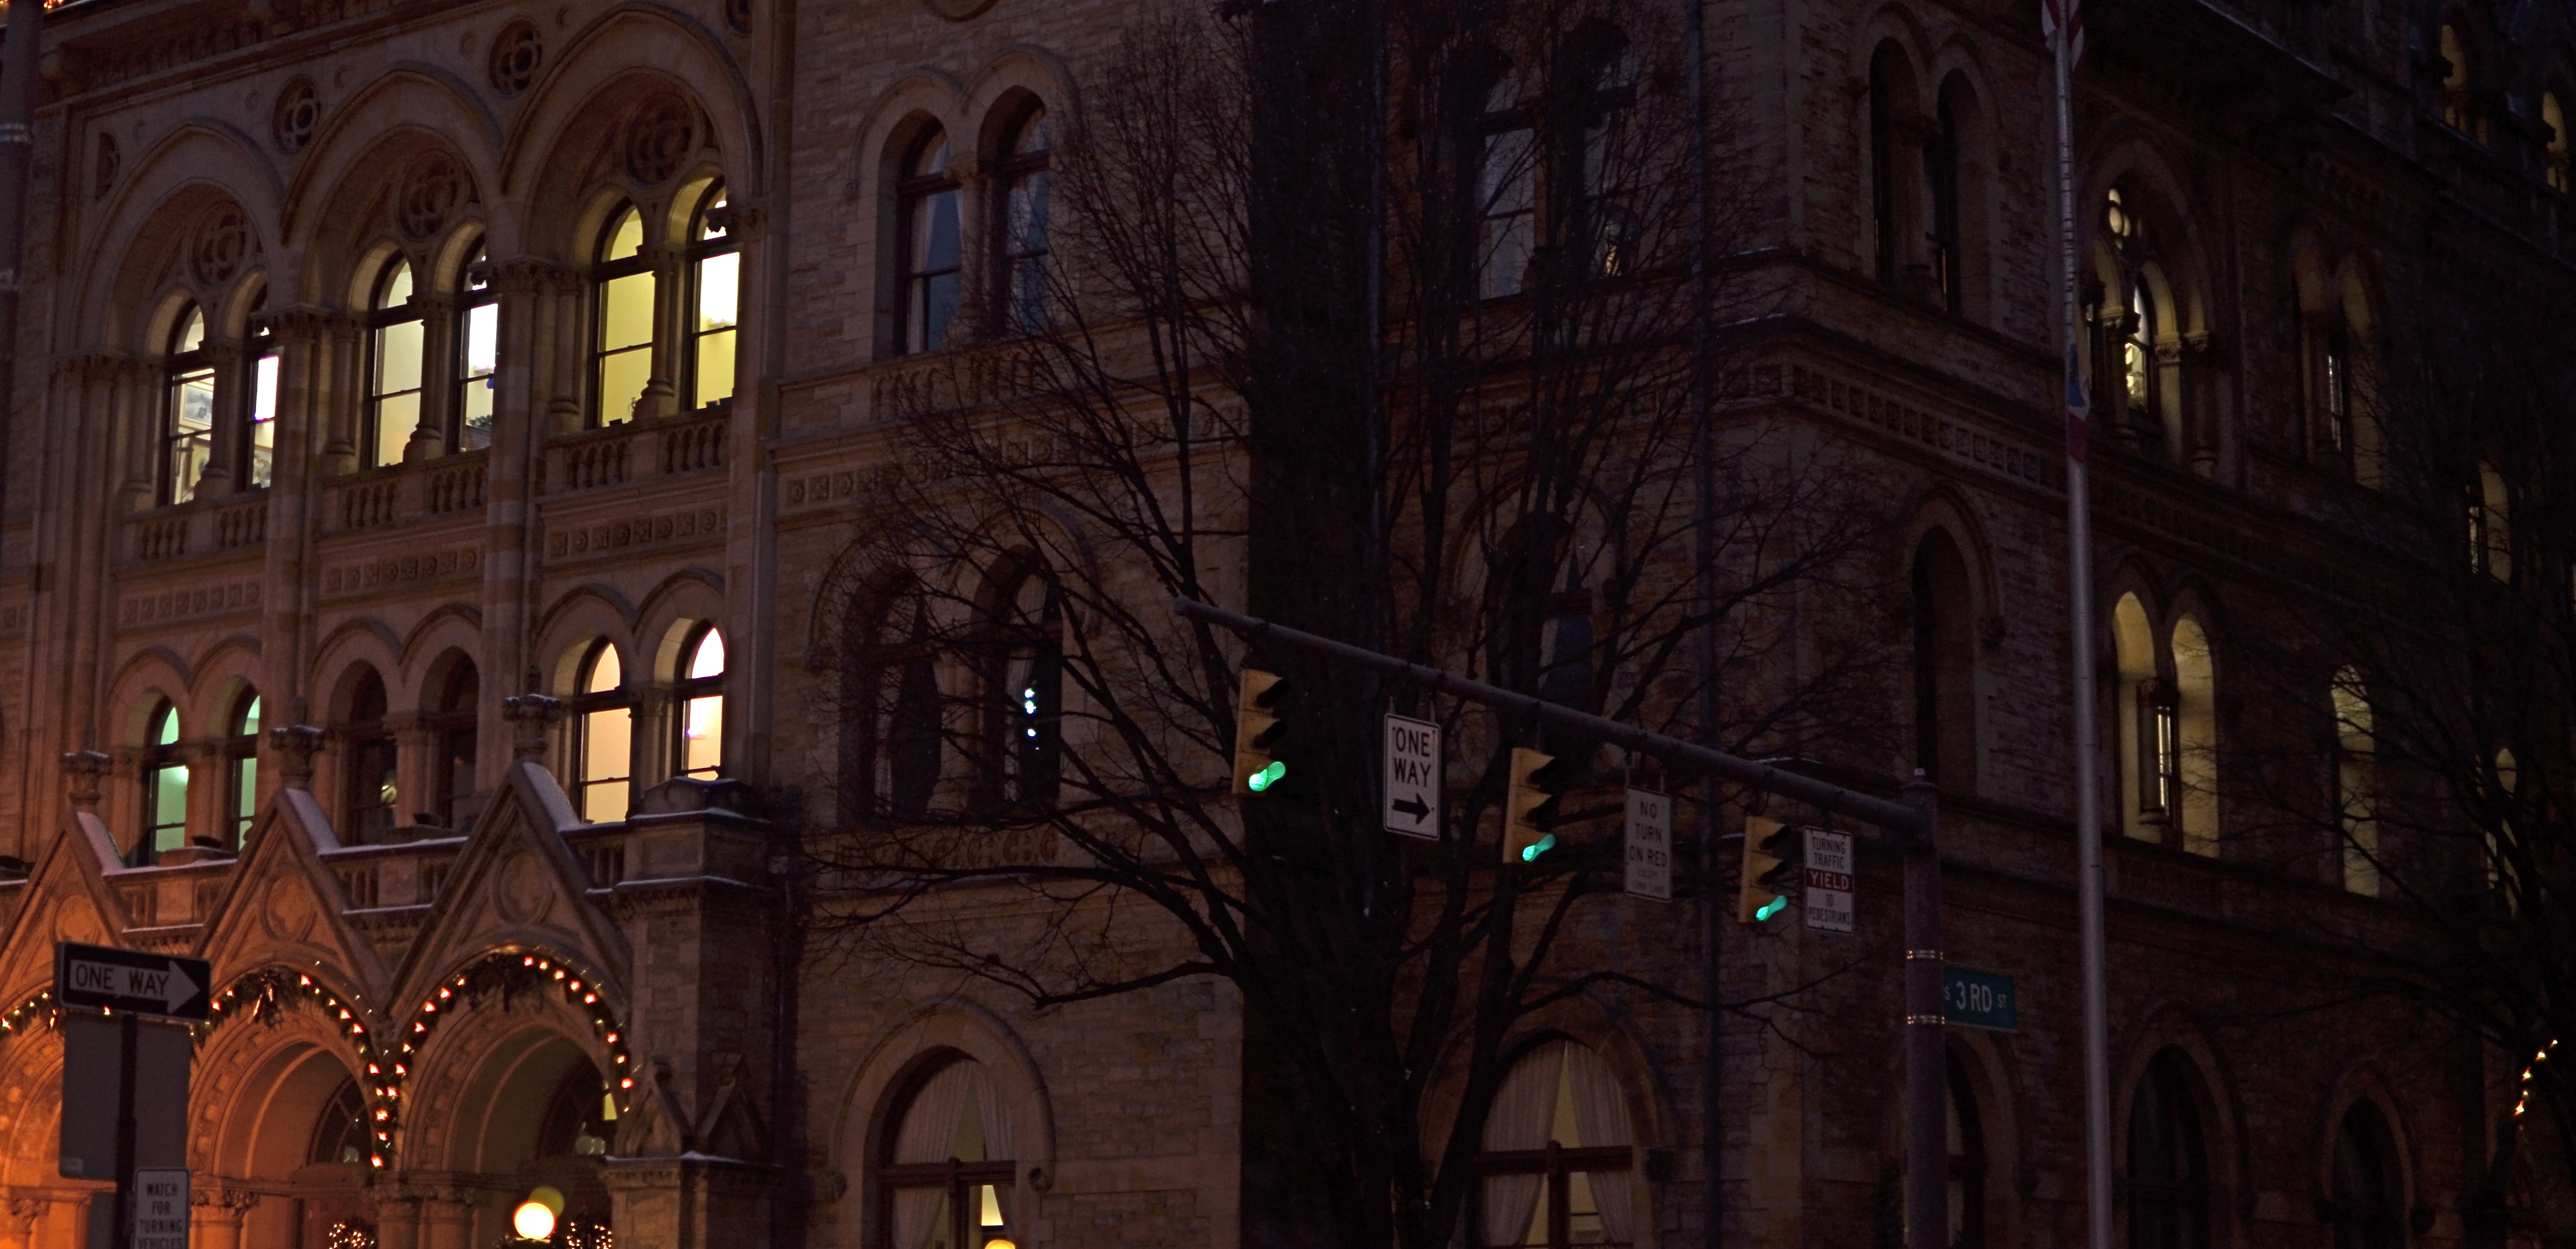
The Old Post Office (2013) 1/100 sec., f/1.8, ISO 230, 35mm.
Beyond these two big choices, however, lie the deeper, more subtle reasons we like to shoot cities at night. Some towns flood nearly every important building with light, much of it of the sodium-vapor variety, which is long on orange. And that can mean that a mysterious, brooding quality might be totally unattainable, either three-legged or hand-held, with no way to underexpose or suggest something not absolutely spelled out in neon, in even short exposures.
I personally love to to look for the more neglected sectors of cities, those “London after midnight” kinds of streets where dark means dark. I love to underexpose them a bit as well, ensuring that all the details of the structure are not revealed, all the better to let your mind wander. If my subject has prominently lit windows, I have to tweak and tease to render them in a kind of incandescent amber, but I decide in the moment whether the exterior should be pure black, blue-black, or even amber-black, as if the window light has spilled onto the surrounding textures. And, yes, I might decide that the more ashen, grainy look of high ISO is just what I’m looking for in that moment.
Tripods used to be a do-or-die proposition for night images, but the freedom of hand-held shots carries with it a whole distinct set of decisions, since there is no typical camera, no typical subject, and no typical result. The only thing that truly matters is what you want to see coming out of the camera, be it long shot or short snap.
THE EYES HAVE IT

How soft is too soft? Shot with a Lensbaby Sweet 35 optic at 1/30 sec., F/4, ISO 400, 35mm.
By MICHAEL PERKINS
WINDOW TO THE SOUL: that’s the romantic concept of the human eye, both in establishing our emotional bonds with each other and, in photography, revealing something profound in portraiture. The concept is so strong that it is one of the only direct links between painting (the way the world used to record emotional phenomena) and photography, which has either imitated or augmented that art for two full centuries. Lock onto the eyes, we say, and you’ve nailed the essence of the person.
So let’s do a simple comparison experiment. In recent years, I’ve begun to experiment more and more with selective-focus optics such as the Lensbaby family of art lenses. Lensbabies are unabashedly “flawed” in that they are not designed to deliver uniform focus, but, in fact, use the same aberrations that we used to design out of lenses to isolate some subjects in intensely sharp areas ( so-called “sweet spots”) surrounded by gradually increasing softness.
As a great additional feature, this softness can even occur in the same focal plane as a sharply rendered object. That means that object “A”, five feet away from the camera, can be quite blurry, while object “B”, located just inches to the side of “A”, and also five feet from the camera, can register with near-perfect focus. Thus, Lensbaby lenses don’t record “reality”: they interpret mood, creating supremely subjective and personal “reads” on what kind of reality you prefer.
Exact same settings as the prior example, but with a slightly tighter focus of the Lensbaby’s central “sweep spot”.
Art lenses can accentuate what we already know about faces, and specifically, eyes…that is, that they remain vital to the conveyance of the personality in a portrait. In the first sample, Marian’s entire face takes on the general softness of the entire frame, which is taken with a Lensbaby Sweet 35 lens at f/4 but is not sharply focused in the central sweet spot. In the second sample, under the same exposure conditions, there is a conscious effort to sharpen the center of her face, then feather toward softness as you radiate out from there.
The first exposure is big on mood, with Marian serving as just another “still life” object, but it may not succeed as a portrait. The second shot uses ambient softness to keep the overall intimacy of the image, but her face still acts as a very definite anchor. You “experience” the picture first in her features, and then move to the data that is of, let’s say, a lower priority.
Focus is negotiated in many different ways within a photograph, and there is no empirically correct approach to it. However, in portrait work, it’s hard to deny that the eyes have it, whatever “it” may be.
Windows to the soul?
More like main clue to the mystery.
DISTORTION WITH DISTINCTION
Perhaps the most famous “fisheye” image in pop culture.
By MICHAEL PERKINS
THE FISHEYE LENS, that ultra-wide hunk of glass whose images seem inscribed within a circle rather than a rectangle, have earned a bit of a bad rap among serious photographers over the years, perhaps because of either mis-use or over-use.
Let’s face it: of all the optical effects available to the average shooter, the fisheye shot is one of the most dramatic in its distortion of reality. It’s almost guaranteed to make your image about the look, which is where content starts to matter less than mere novelty.
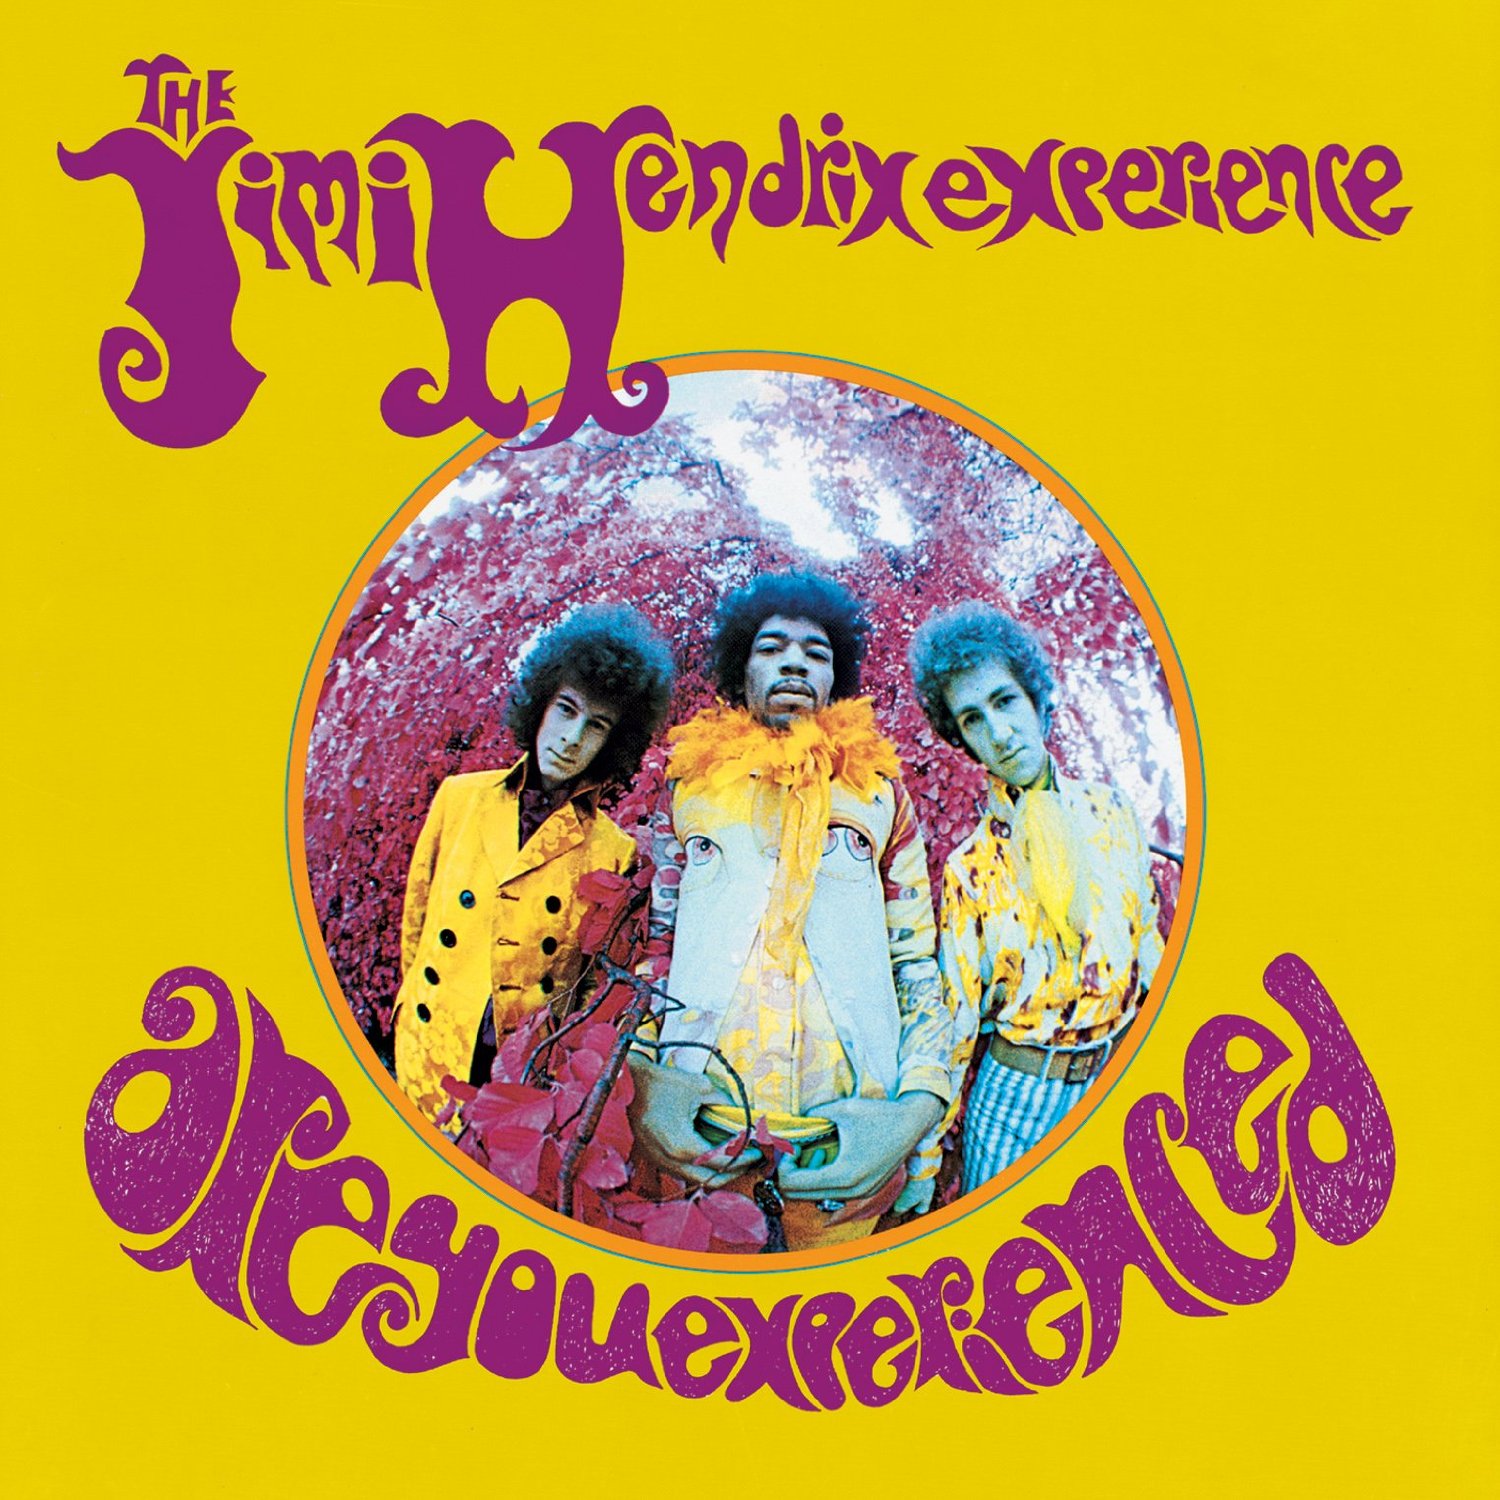
Fisheye fever saw its peak in the swinging ’60’s, when such shots were intended to suggest a kind of sensory dislocation, the visual equivalent of a psychedelic state. The cover of Jim Hendrix’ Are You Experienced was perhaps the most popular example of such “weird-for-weird’s-sake” photography, with main subjects sitting at dead center, surrounded by severe barrel distortion that radiated out toward the edge of the circle, making even close objects seem distant as they softened into a haze of chromatic aberration at the extremes. Far out, man.
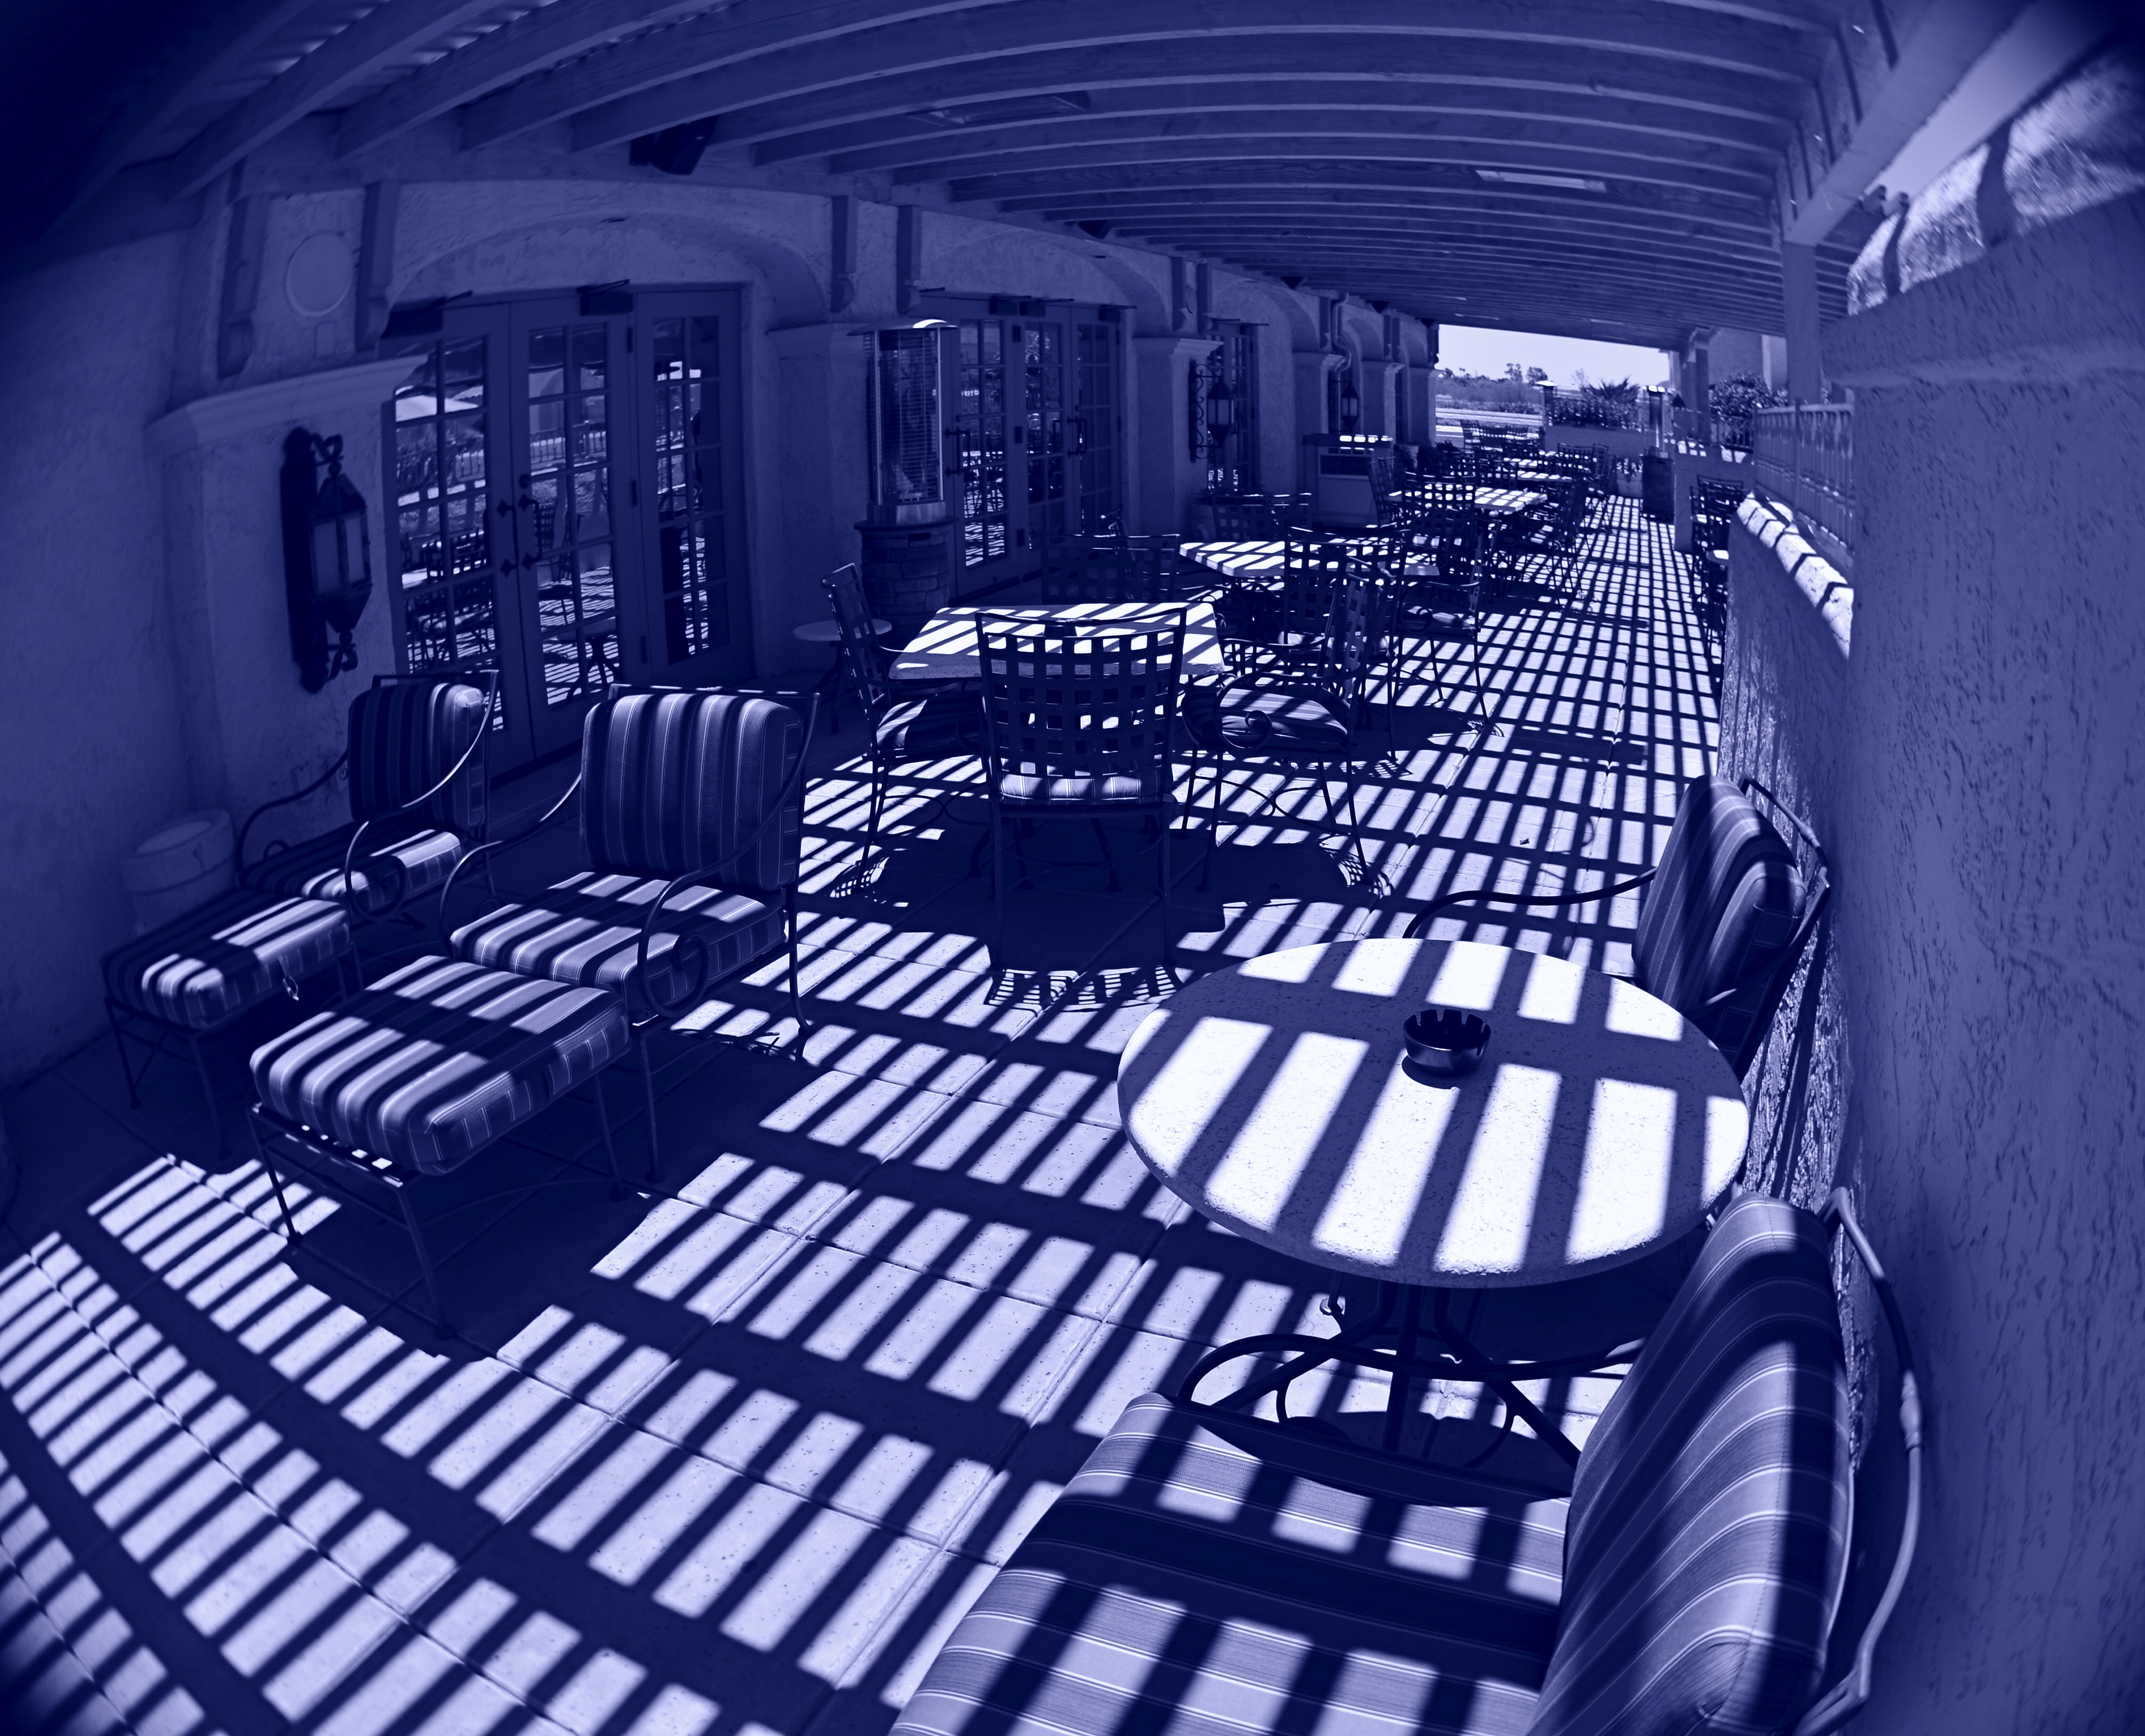
Cyan Veranda (2016). Curbing the extremes of the fisheye effect with composition and angle. This shot was made with a Lensbaby fisheye optic installed in a Lensbaby Composer Pro lens assembly, far less expensive than the classic “dedicated” fisheye.
These kaleidoscopic pictures tend to render such arbitrary boundaries as walls and horizon lines moot, and telegraph the photographer’s message that it’s all about getting your freak on. However, I think that fisheyes, when used like other wide-angles, can add graduated elements of distortion and distance exaggeration that need not be the only visual message in an image. Making a left or right edge the “center” of the shot, for example, can reduce the intense bending-in, while raising the camera up or down can render a horizon line almost normal, with a little tweaking for dramatic effect.
Ultra-wide images need not be all about the patented fisheye “look”, which can be, frankly, fatiguing, just as shooting in hazy focus or HDR might, were you to do nothing else. It’s the point at which an effect ceases to be a tool and starts to actually put barriers between your subject and your viewer, which is seldom good. What is good is that a “dedicated” fisheye (one which cannot deliver a standard image), still one of the most expensive pieces of glass available, is no longer a mandatory investment, since even lo-fi film cameras, entry-level art lenses and even phone apps can create the look cheaply and quickly, allowing one to dabble without adding on a second mortgage (beware the poor quality in the truly cheap ones, however). Optical tricks are, well, just that. Optical techniques can amplify, rather than disguise, your visual messages.
EQUATIONS

“Sharpness” can mean so many things to so many different photographers.
By MICHAEL PERKINS
EVERY CHANGE YOU MAKE IN THE CREATION OF A PHOTOGRAPHIC IMAGE also changes every other element of the picture.
You can’t alter a single element in a photo in isolation. Each decision you make is a separate gear, with its own distinctive teeth, and the way those teeth mesh with all the other gears in the photographic equation determines success in the final picture.
As an example, let’s look at sharpness, perhaps the big “desirable” in an image. The term sounds simple, but is, in fact determined by an entire raft of factors, among them:
A) Choice Of Lens. How uniform is the sharpness of your glass? Is it softer at the edges? Completely sharp at smaller apertures? Does it deliver amazing pictures at one setting while causing distortions or inaccuracies at another?
B) Aperture. The most basic predictor of sharpness, whether you scrimped or splurged on Item “A”.
C) Choice Of Autofocus Setting. Are you telling your camera to selectively sharpen a key object in an isolated part of your image, or asking it to provide uniform sharpness across the entire frame?
D) Anti-vibration. On some longer exposures (for example, on a tripod) this feature may actually be costing you sharpness. Protecting your shot against the hand-held shakes is good. Confusing a camera with active Anti-vibe on a stabilized shot may not work out as well.
E) Contrast. Some people believe that the sharpness of lines and textures is actually the viewable distance between light and darkness, that contrast is “sharpness”. Based on what you prefer, other big choices can be affected, such as the decision to shoot in color or black and white.
F) Stability. Deals with everything from how steady you grip a camera to what else besides yourself, from shutter triggering to SLR mirror shifting, can cause measurable vibration, and thus less sharpness.
G) Editing/Processing. This is where miracles occur. Sometimes. Other times, it’s where we try to slap lipstick on a pig.
We could go on, and so could you. And then consider that this quick checklist only deals with sharpness, just a single element, which, in turn, affects every other aspect of your pictures. Photography is a constant juggling act between technique, experience, experiment, and instinct. What you want to show in your images will dictate how much (or how well) you keep all those balls aloft.
CUT YOUR LOSSES
By MICHAEL PERKINS
ANYONE WHO’S SLOGGED THROUGH MORE A FEW OF THESE DISPATCHES knows all too well that I am a passionate preacher for shooting images completely on manual, not because it’s a more “pure” form of photography (and thus deserving of nobility and praise), but because I prefer to exercise as much personal control as possible. This, again, is not a quality judgement, since amazing pictures are made every day with the use of either complete or partial automodes. I just feel that I, personally, learn more by trying more, and manual settings place so much direct pressure on me to innovate and experiment that even my gross failures serve as education.
Sometimes. And other times they’re well, just gross.
The mode known in Nikon as Aperture Priority (“Av” on Canons) is the only semi-auto mode I use with any regularity, and always because I make an educated guess, before going on a shoot, about what conditions will likely prevail. AP allows you to manually dial in your aperture on those occasions when you want a uniform depth of field in everything you’re shooting, with your camera metering light on the fly and providing the shutter speed you need for a correct exposure. AP tend to be a rare bird for me because, in many cases, I am not shooting so fast that I can’t pause at least a few seconds between frames to dial in every exposure factor. However, there are cases when the technology gives you a decided edge.
Landscapes, especially in rapidly variable weather, call upon the shooter to react to conditions that could last, at best, for only seconds at a time. When skies are crystal clear and you have ample time to set up a shot, then, by all means, rely on your own experience shooting on full manual. If, however, you are moving and shooting quickly from dark to medium to extreme light and back again, then you might consider AP as a way to cut your reaction time in half. At this point, full manual may be costing you shots rather than making them better.

Last Embers (2016), taken on Nikon’s Aperture Priority setting. 1/640 sec., f/6.3, ISO 100, 35mm.
On the day the above image was taken, the town of Sedona, a miraculous array of red-tinged mountains in northern Arizona, was colored variously by a swiftly shifting broken cloud cover. One moment, the crest of a butte might take on a crimson glow, then be swallowed in shadow just moments later, with the gulch next door temporary hyper-lit in the same fashion. The clouds over Sedona were also backed by a decent headwind, shortening the stretches between scene changes even more. Moreover, the sunlight added a ton of contrast to the clouds themselves, making the sky a more attractive compositional component, with typically indistinct shapes rendered more sharply (because contrast is sharpness, right?).
As a result, the combination of light you see in this shot lasted exactly fifteen seconds, so, if I had paused to shoot a couple of trial frames on manual, just to try to nail the lighting, I likely would have missed this moment completely. Again, at this point, assist modes ain’t a compromise; they’re strategy.
The best practice is to anticipate, as much as possible, where you’ll be shooting and what the “game on the ground” is likely to be. Fashion shooters, journalists and other pros swear by Aperture Priority as insurance against lost shots. You may almost certainly find that to be true for some situations yourself . But the name of the game is Get The Picture, so, at the end of the day, the mode that makes you smile is the “right” mode. And don’t let nobody tell you no differnt.
THE GENTLE WELCOME
By MICHAEL PERKINS
But soft! What light through yonder window breaks? —Shakespeare
OKAY. AS IT TURNS OUT, IN THE ABOVE LINE, ROMEO WAS ACTUALLY RHAPSODIZING about his main squeeze, rather than ideal photographic conditions. Still, I often think of the quote when a sudden shaft of gold explodes from behind a cloud or a sunset lengthens shadows, just so. I have lots of But, soft! moments as a photographer, since light is the first shaper of the image, the one element that defines the terms of engagement.
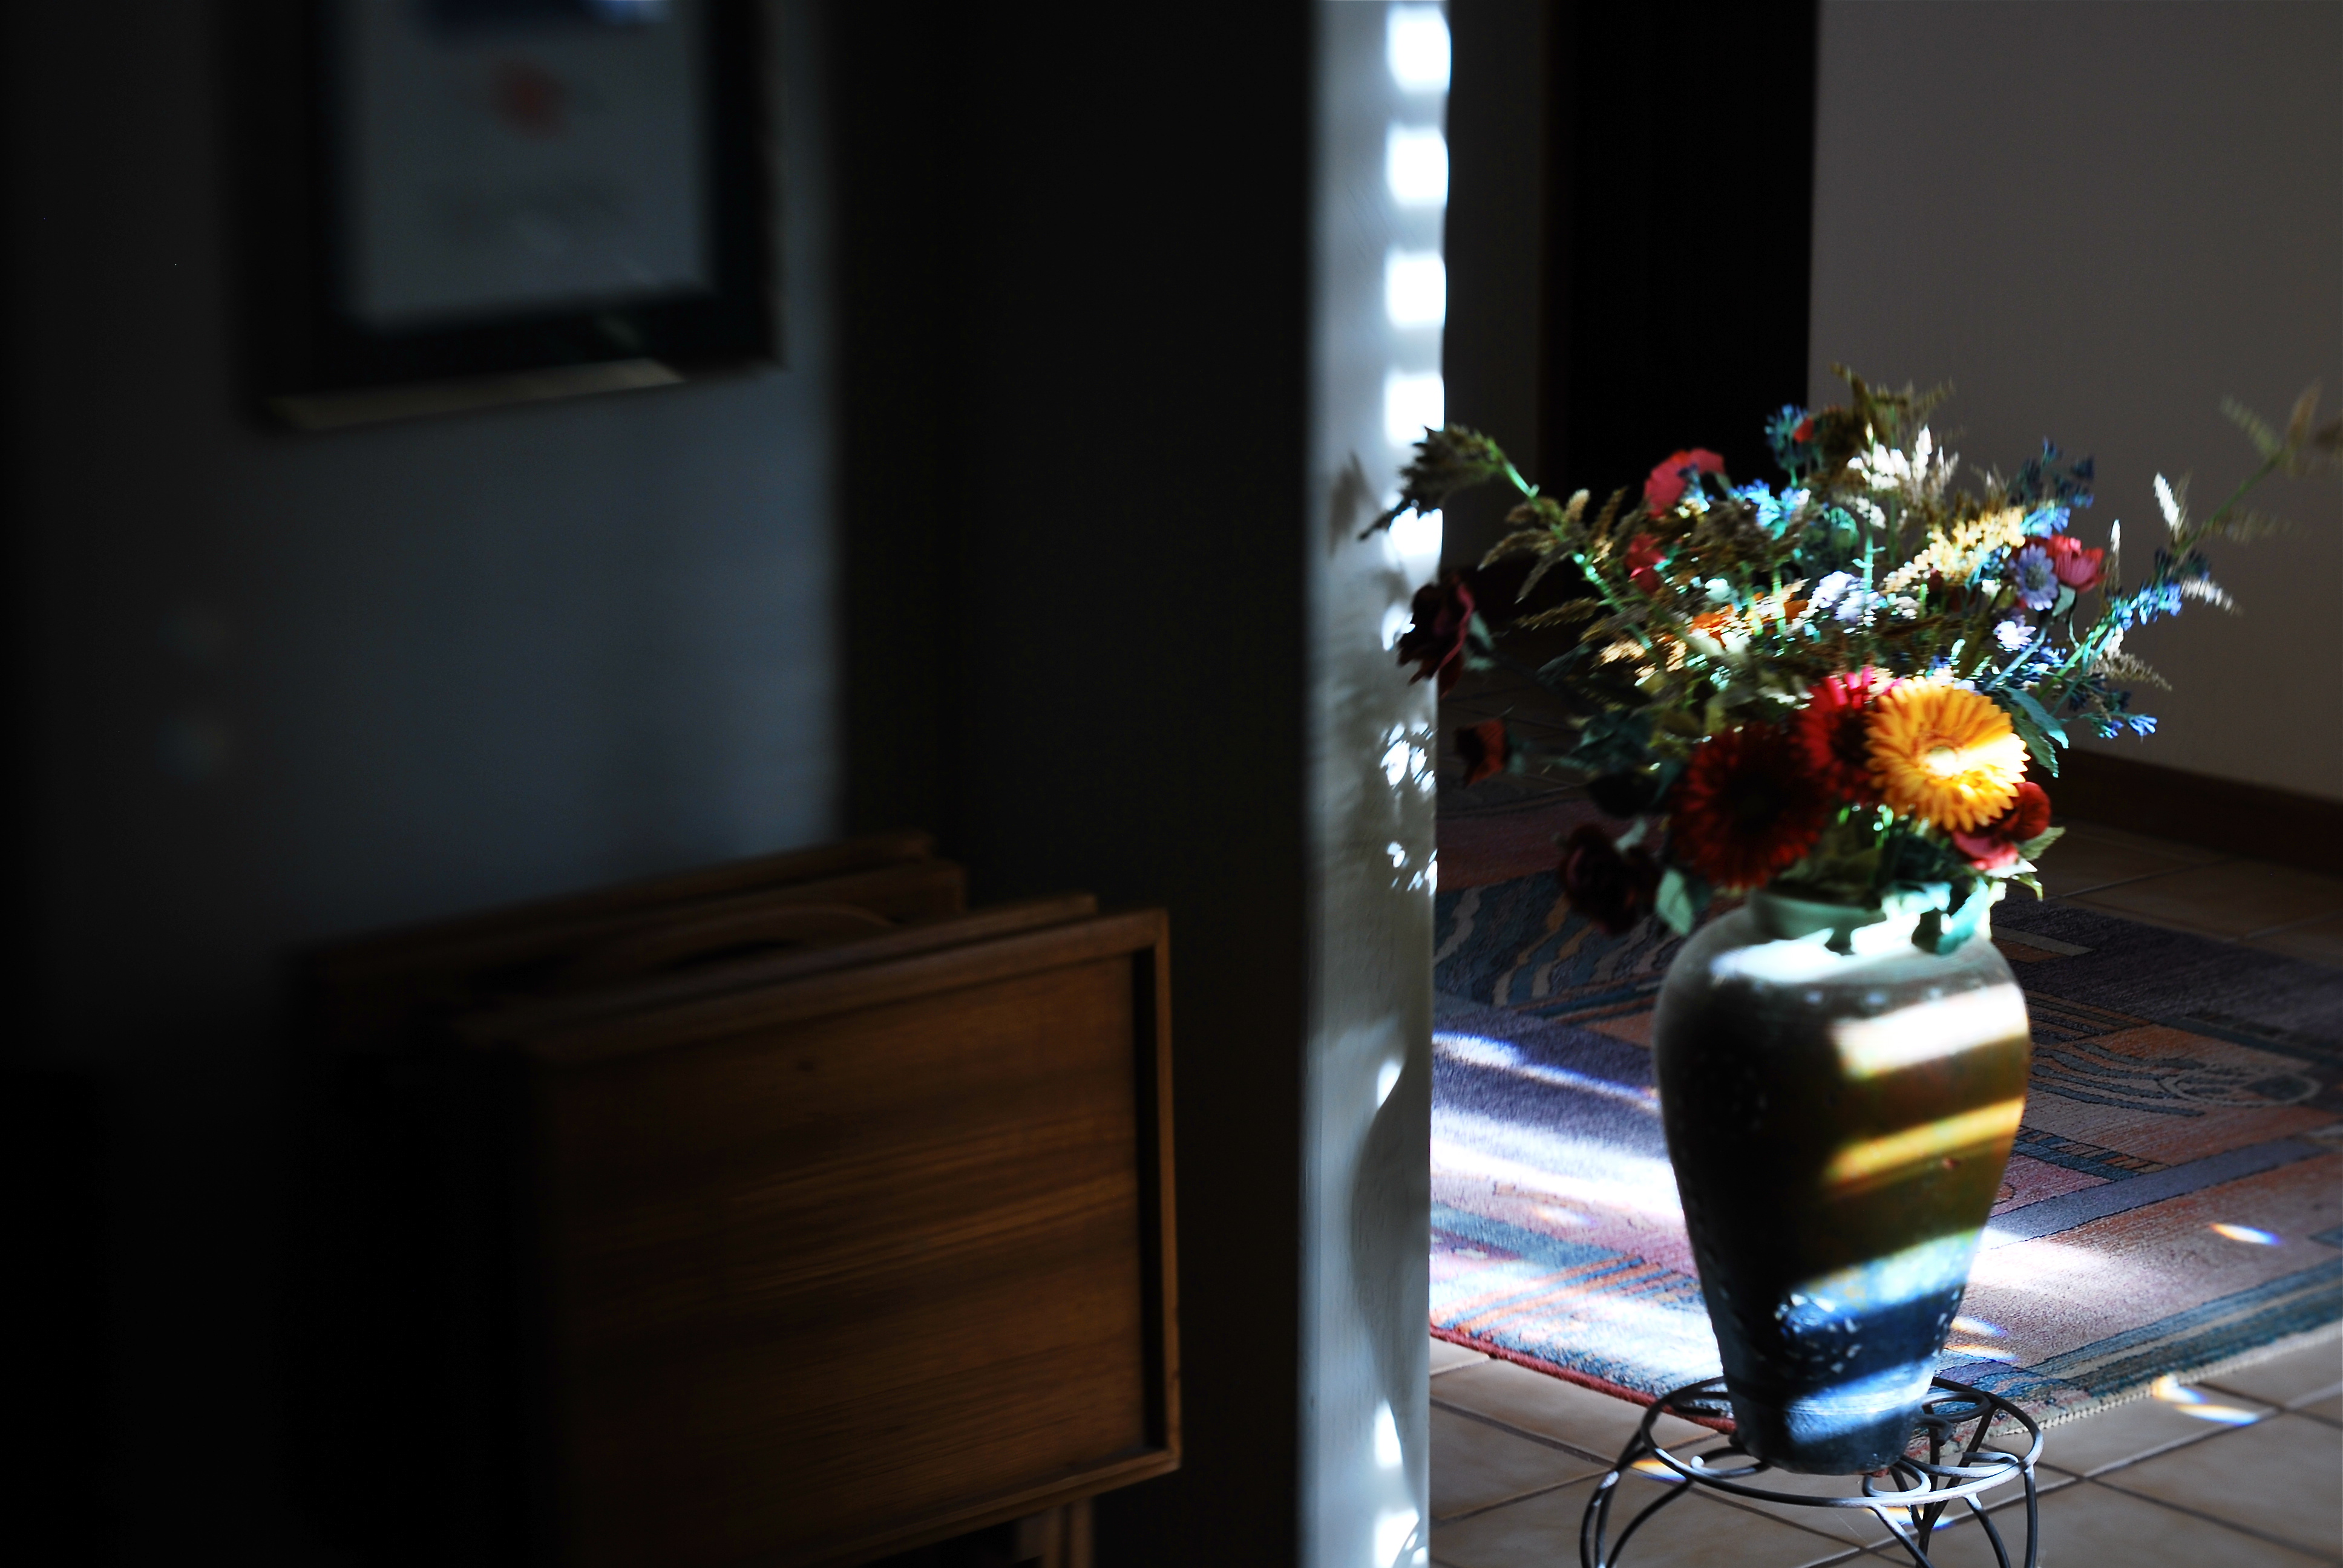
Selective focus on the cheap: image made with the economical Lensbaby Spark lens. 1/40 sec., f/5.6, ISO 100, 50mm.
After light, for me, comes focus. Where it hits, where it peaks, where it falls off, and how all these aspects shape a composition. Soft or selective focus especially seems more intimate to me, a gentle welcome to share something special between picture and viewer. In recent years, focus has become almost as fine-tune-able as light itself, with the introduction of new, affordable alternatives to expensive “tilt-shift” lenses, which allow the selective blurring of elements within the frame. For example, the revolutionary Lensbaby products are now helping shooters make their own choices on where the focal “sweet spot” should occur in a picture, and at a fraction of the cost of a true tilt-shift. It’s a fiscal shortcut that makes it possible for almost anyone to learn how to create this effect.
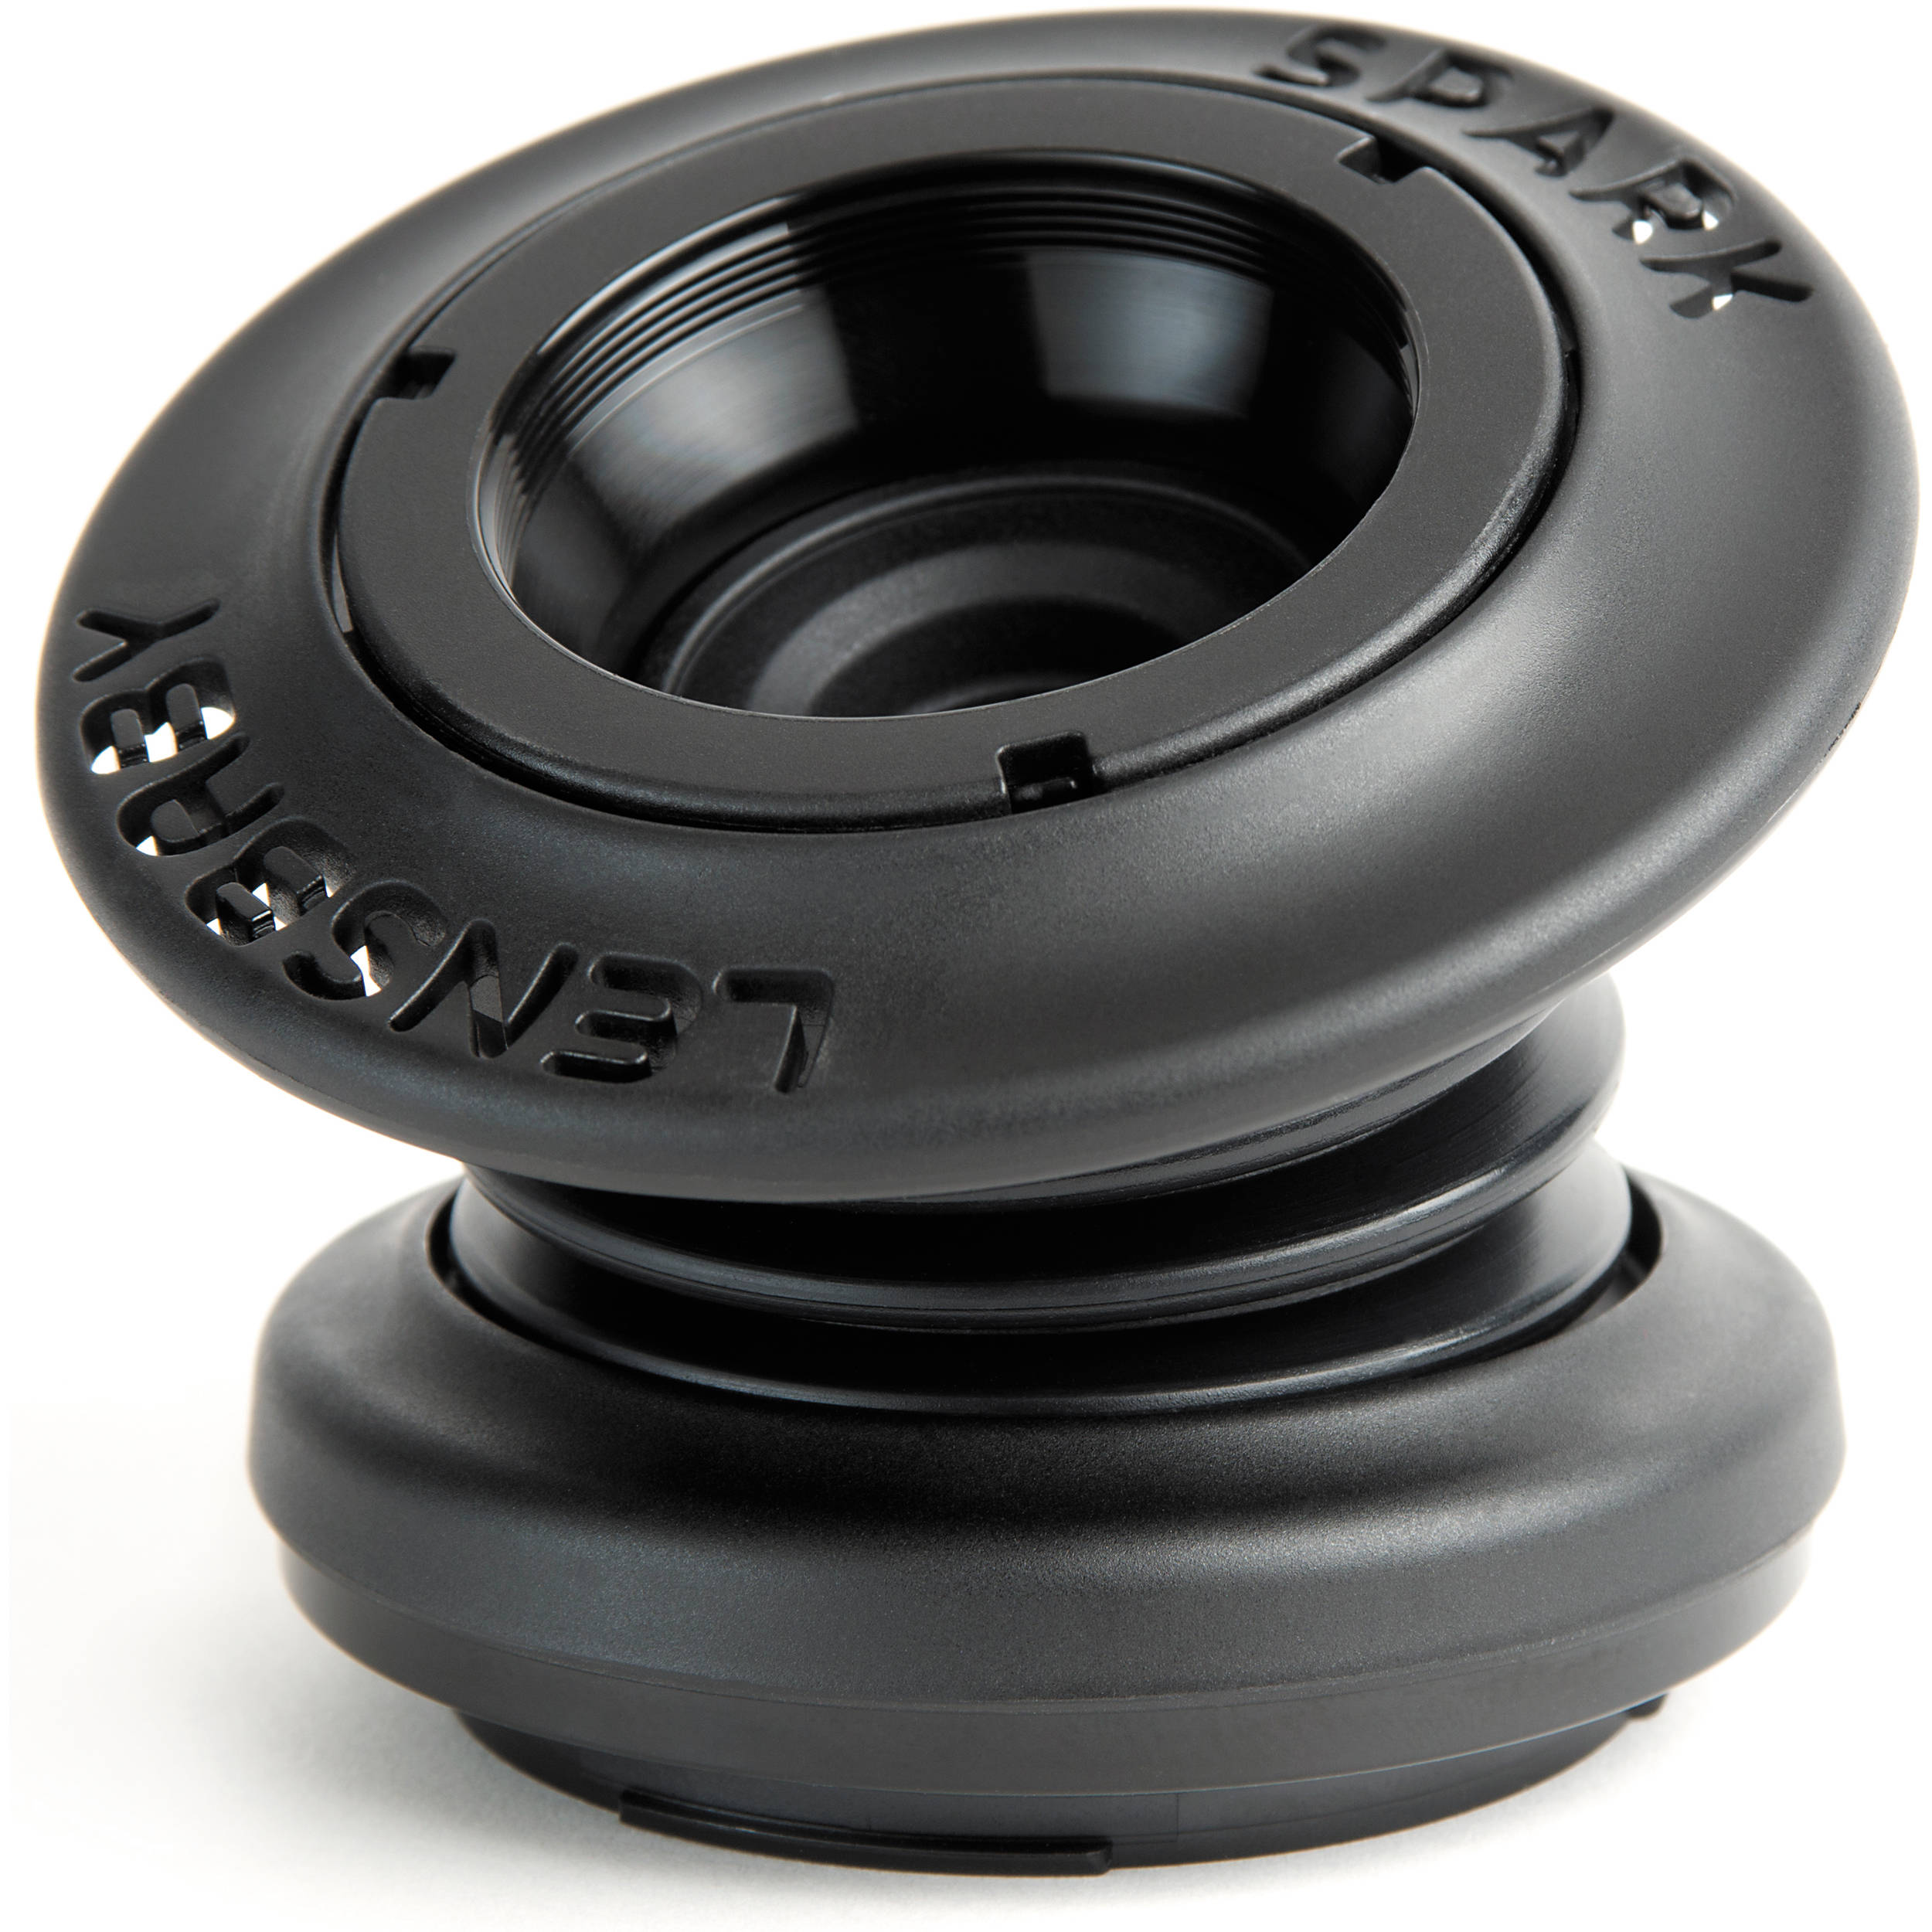
Focus on the Lensbaby Spark is achieved by squeezing the lens bellows until focus registers wherever you want to place it.
Some Lensbabies can run to several hundred dollars and have precise systems for dialing in the part of a photograph that will, through sharp focus, attract optimum attention to a subject, gently blurring the image on all sides around that point. However, for those with steady fingers and shallow pockets, the company’s gateway drug, coming in at around $90, is the Lensbaby Spark, a springy bellows lens that snaps onto your DSLR in place of a regular lens and can be compressed around the edges to place the focal sweet spot wherever you want it.
The Spark takes more muscle control and practice than the more mechanical Lensbaby models, but it’s a thrifty way to see if this kind of imaging is for you. Just squeeze the fixed f/5.6, 50mm lens until the image is sharp at the place you want it, and snap. Some DSLRs allow the Spark to be used on aperture priority, but for most of us, it’s manual all the way, with a lot of trial-and-error until you develop a feel for the process. The company also sells several insert cups so that you can choose different apertures. Pop one f-stop out, pop another one in.
For those of you who like to custom-sculpt focus and light, the gauzy, intimate effect of the Lensbaby will in fact be a gentle welcome. Finally, it’s one more component that could be either toy or tool. Your shots, your choice.
THE BEST KIND OF SECOND-GUESSING

You don’t need a dedicated macro lens to shoot this image. Just maximize the average glass that you have. 1/100 sec., f/2.8, ISO 100, 35mm.
By MICHAEL PERKINS
I TRY MY BEST TO ANTICIPATE EXACTLY WHAT KINDS OF SHOTS I will be taking in a given photo situation. This helps minimize the delay and hassle of changing gear in the field by heading out with a single lens that will do most of what I want. It saves me lugging along every hunk of glass I own on a project (trying vainly to be ready for anything), and makes me far more familiar with the real limits of whatever lens I decide will be my primary go-to for the day. Not a perfect plan…still, a loose plan is better than totally trusting to instinct or luck.
You can, of course, plan too generally and accidentally limit yourself. For example, on a day in which you’re to shoot a ton of landscapes, it’s easy to assume you’ll want an ultra-wide lens to capture those vast vistas. However, if something amazing appears on a far horizon and you can’t zoom any closer than, say, 55mm, you’ve suddenly got the wrong lens. Moreover, if your day takes you inside a dark cave, and your ultra-wide can’t shoot any faster than f/3.5, you’re likewise hamstrung to some degree.
In the above image, I decided, as I often do, to spend the entire day with a 35mm prime, a lens which affords me more latitude in more situations than any other glass I own. Of course, I can’t zoom with that lens, so I have to be reasonably sure that anything I want to shoot with it can be framed by simply walking closer or farther away. The 35 can open up to f/1.8, so it’s great in the shade, or where I want a shallow depth of field, and that can make it a viable, if modest, close-up lens…not true macro, but a good tool for selective subjects just a short distance away (in this case, about five feet). Also, shooting with the biggest image file setting available allowed me to crop away up to 75% of my original, as I did here, and still maintain good resolution. However, is the 35 of any value if I suddenly spy a bald eagle on the wing 300 yards away? Not so much.
But it’s not about finding a universal, one-lens-fits-all solution. It is about anticipating. The most valuable habit you can develop before every sustained shoot is to mentally rehearse (a) what kind of situations you’re likely to encounter and (b) what you want to be able to do about it. That sounds absurdly simple, but it really is about taking as many obstacles out of your own path before they even appear as obstacles. In other words, practice getting out of your own way.
THE ONLY REAL PRIORITY
By MICHAEL PERKINS
THERE ARE MANY VALUABLE SERVICES OUR CAMERAS WILL RENDER without our consent or participation. Without even considering how many people shoot on full automatic 100% of the time, there are a hundred small calculations that these marvelous devices make to prevent the kind of errors in judgment that used to routinely trip us up, from autofocus and white balance, face detection and contrast control. However, there is a variable percentage of decisions on which we should really take personal action, despite the camera’s best efforts to, in effect, save us from ourselves.
In iffy light situations, for example, several key “semi-auto” modes are truly handy in helping us compensate for grey days or dark corners. One of these is called aperture control, in which you dial in the f-stop you want, based on your preferred depth of field, leaving the camera to set the shutter speed needed to properly expose at that aperture. At first blush, this seems to be a great short cut, and is in fact a neat option for people who are “running and gunning”..shooting lots of frames in a very quick time span. However, what looks like cutting your work in half can also mean cutting the legs off your creativity.

Aperture priority would have worked too hard to make this exposure “balanced”, which was the opposite of what I wanted.
In the above situation, I had a severely overcast day in a lushly green Japanese garden. Without shadows for contrast, I would need colors to be as deep as possible to bring off the mood I was going for, so a slightly underexposed look seemed to be in order. Dialing in f/5.6 as a desired D.O.F. in aperture priority was giving me very slow shutter speeds as the camera tried to give me an ideal exposure. This made a handheld shot a little tougher and gave me way too much high color to suggest anything quiet or moody.
Going to full manual, I dialed in a shutter speed that would render the greens nice and deep, around 1/80, and bumped up the ISO a tad as insurance. It was true that I was shooting a lot at the same f-stop, but not so fast that I would have to surrender fine control by shooting in aperture priority for mere convenience’s sake.
I love some of the protections against my own folly offered by today’s devices, but I just can’t go completely driver-less and feel that I am taking enough responsibility for my results. Hey, if I blow it completely, I can still explain a lousy shot in two simple words.
“…stupid camera…”
UP CLOSE AND POISONAL
Gee, this 300mm telephoto shot has it all. Terminal mushiness, hazy washout, crappy contrast. Who could ask for anything more? You could.
By MICHAEL PERKINS
THERE MAY BE A STATISTICAL TABLE SOMEWHERE that breaks down the percentage of photographers who use telephoto lenses consistently versus those who only strap one on for special occasions, but I have never seen one. Of course, I’ve never seen a three-toed sloth either, and I’m sure they exist. Fact is, there are always enough telephoto newbies (or “occasional-bies”) out there to guarantee that many of us make some pretty elemental mistakes with them, and come home with fewer jewels than we hoped for. I should know, since I have produced many such “C-minus” frames, like the image seen above. For a better understanding of everything I did wrong here, read on.
If telephotos just had to deliver magnification, and otherwise worked the same as standard lenses, they wouldn’t produce so many problems. In fact, though, they need to be used in several very different ways. For one thing, zooming in exponentially increases not only the chance of camera shake but the visible results of camera shake. A little bit of tremble at 35mm may go undetected, with little discernible effect on sharpness, while the very same amount of shake at 300mm or above creates a mathematically greater amount of instability, rendering everything soft and mushy.
This means that handheld shots at the longer focal lengths are fundamentally harder to do. Solutions can include faster shutter speeds, but that cuts light at apertures of f/3.5 and smaller, where light is already diminished. You might get around that with a higher ISO, which may not produce acceptable noise on a brightly lit day, but you must experiment to see. If you simply must have longer exposures, you’re pretty much onto a tripod, and, if workable, a cable release or wireless remote to guarantee that even your finger on the shutter doesn’t create a tremor. Remember, you’re talking about very minor amounts of movement, but they’re all magnified many times by the lens.
Some people even believe that a DSLR’s process of swinging its internal mirror out of the way before the shutter fires can create enough vibration to ruin a shot at 400mm or further out. In such case, many cameras allow you to move the mirror a little earlier, so that it’s stopped twitching by the time the shutter opens. Lots of trial and error and home-bred calculus here.
One of the factors fouling many of my own telephoto shots comes from shooting at midday near major cities, adding both glare and pollution to the garbage your lens is trying to see through. Colors get washed out, lines get warped, sharpness goes bye-bye. For this, you might try shooting earlier, taking off your haze filters (’cause they cut light) and seeing if things come out clearer and prettier.
Telephotos are a fabulous tool, but like anything else you park in front of your camera, they introduce their own technical limits and challenges into the mix. Seldom can you get results by just swinging your subject into view and hitting the shutter. Get comfortable with that fact and you will find yourself taking home more keepers per batch.
THE FASTEST MAN ALIVE
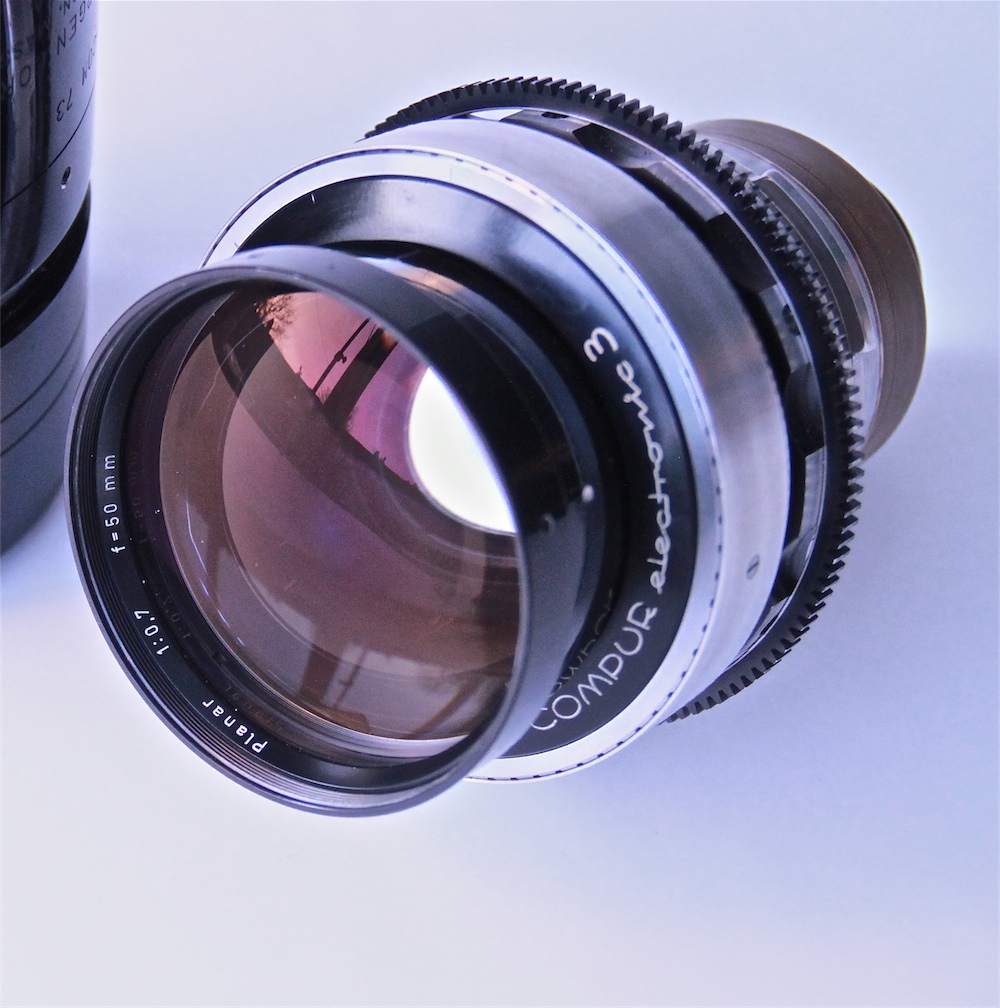
The Mutant: Stanley Kubrick’s unbeatable light sucker, the Zeiss 50mm f/0.7 lens.
By MICHAEL PERKINS
IF THE SUPREME BEING IS CORRECTLY QUOTED, as having proclaimed, at the dawn of time, “Let There Be Light!”, then photographers, since the beginning of their own Creation, have more specifically pleaded, “let there be more light.” Indeed, incredible leaps in imaging technology over the last two centuries have taken us from ten-minute daguerreotype exposures to sharp, bright images snapped in thousandths of a second, and, still, the fight for more light and faster lenses continues unabated.
Between here and there, a few photographers have made their mark by pushing this envelope a little farther than the rest of us. One of them, however, tore that envelope to shreds, and his achievement in this area has never been surpassed, or even matched, by any of his peers.
That man’s name is Stanley Kubrick.
Before he began his directing career in the early 1950’s, Kubrick had years of experience under his belt as the youngest staff photographer for Look magazine, second only to Life as the premier photo-dominant national news weekly. Years before he wielded a Leica IIIf on that job, he had spent his early childhood learning the ins-and-outs of his own Graflex, one of the monster machines that battle-hardened newspaper photogs lugged to crime scenes and fires in dozens of “B” movies (stop the press). By his early ’30’s, Kubrick had amassed a personal collection of lenses and cameras that he would continue to modify and alter for use in his feature films, and by the ’70’s, he was ready to take a giant step attaining a kind of nirvana in the use of available light.

Hey, anyone got a match? The Zeiss delivers Kubrick’s candles-only visions for Barry Lyndon (1975).
As he prepared to adapt William Thackeray’s novel of 19th karmic komeuppance, Barry Lyndon, to the screen in 1974, Kubrick pondered filming the interior scenes of the story’s powdered-wig salons with no lighting whatever beyond that of candle power. Now, we’re not using the term “candle power” to refer to the measurement of light. No, I’m referring here to actual candles, and nothing else. To do so, he would have to have gear that simply did not exist in the gear closets of any major studio, or, in fact, the entire movie industry. To become the fastest man alive, lens-wise, he would have to go shopping at the same place NASA shopped.
Most commercial lenses available at the time opened no wider than around f/1.4, enough to give you and me more than enough light-gathering power for dark times around the house but far too slow to operate on a movie set without a huge battery of kliegs and floods to boost the illumination. However, Kubrick had heard that NASA had developed a lens specifically designed to allow scientists to get sharp images on the dark side of the moon, a Zeiss 50mm with a focal length of …gasp…f/0.7. Zeiss made just ten of these mutants. Six went to Houston. The company kept another one for a rainy day. And the remaining three were gobbled up by Stanley Kubrick.
Taking the aforementioned benchmark of f/1.4 as the 1970’s yardstick for “man, that’s fast”, the ability to open up to f/0.7 represented a quantum leap of at least two-and-a-half stops of extra light (check my math), allowing Kubrick’s film to be, absolutely, the only cinema feature to date to be lit exclusively by ambient light. Of course, it wasn’t all sugar cookies and Kool-Aid, since that also meant working in a range of focus so shallow that only selective parts of actors’ faces were in sharp registration at any given time, giving the players the extra problem of remembering how little their heads could move without screwing up the shot. It was the only thing that could force even more re-takes than Kubrick’s renowned mania for perfection. We’re not talking a fun shoot here.
The resulting, soft, soft, soffffft look of Barry Lyndon is intimate, delicate, and absolutely gorgeous (click the image for a slightly larger version). Practical? Not so much, but for the specific mood of that material, spot on. Critics of the final film either hailed the technique as a new benchmark or sniggered at what they regarded as a showy gimmick. Of course, audiences avoided the film like Jim Carrey fleeing vaccines, so the entire thing remains, for many, a kind of grandiose Guiness-book stunt. Still, while ever-faster lenses and films eventually allowed directors much greater freedom, Uncle Stanley’s claim as fastest gun still merits its place in the hall of frame.
As a strange post-script to the story, several companies have recently boasted that you, too, might rent the same kind of hack-hybrid that Kubrick had fashioned to support the light-sponging Zeiss glass, their ads suggesting that you might secure the needed funding with the sale of several of your more expendable internal organs. Cheap at the price. The Lord got all the light he wanted pretty much on demand. The rest of us have to curse the darkness and, well, light another candle.
MAKING LIGHT OF THE SITUATION
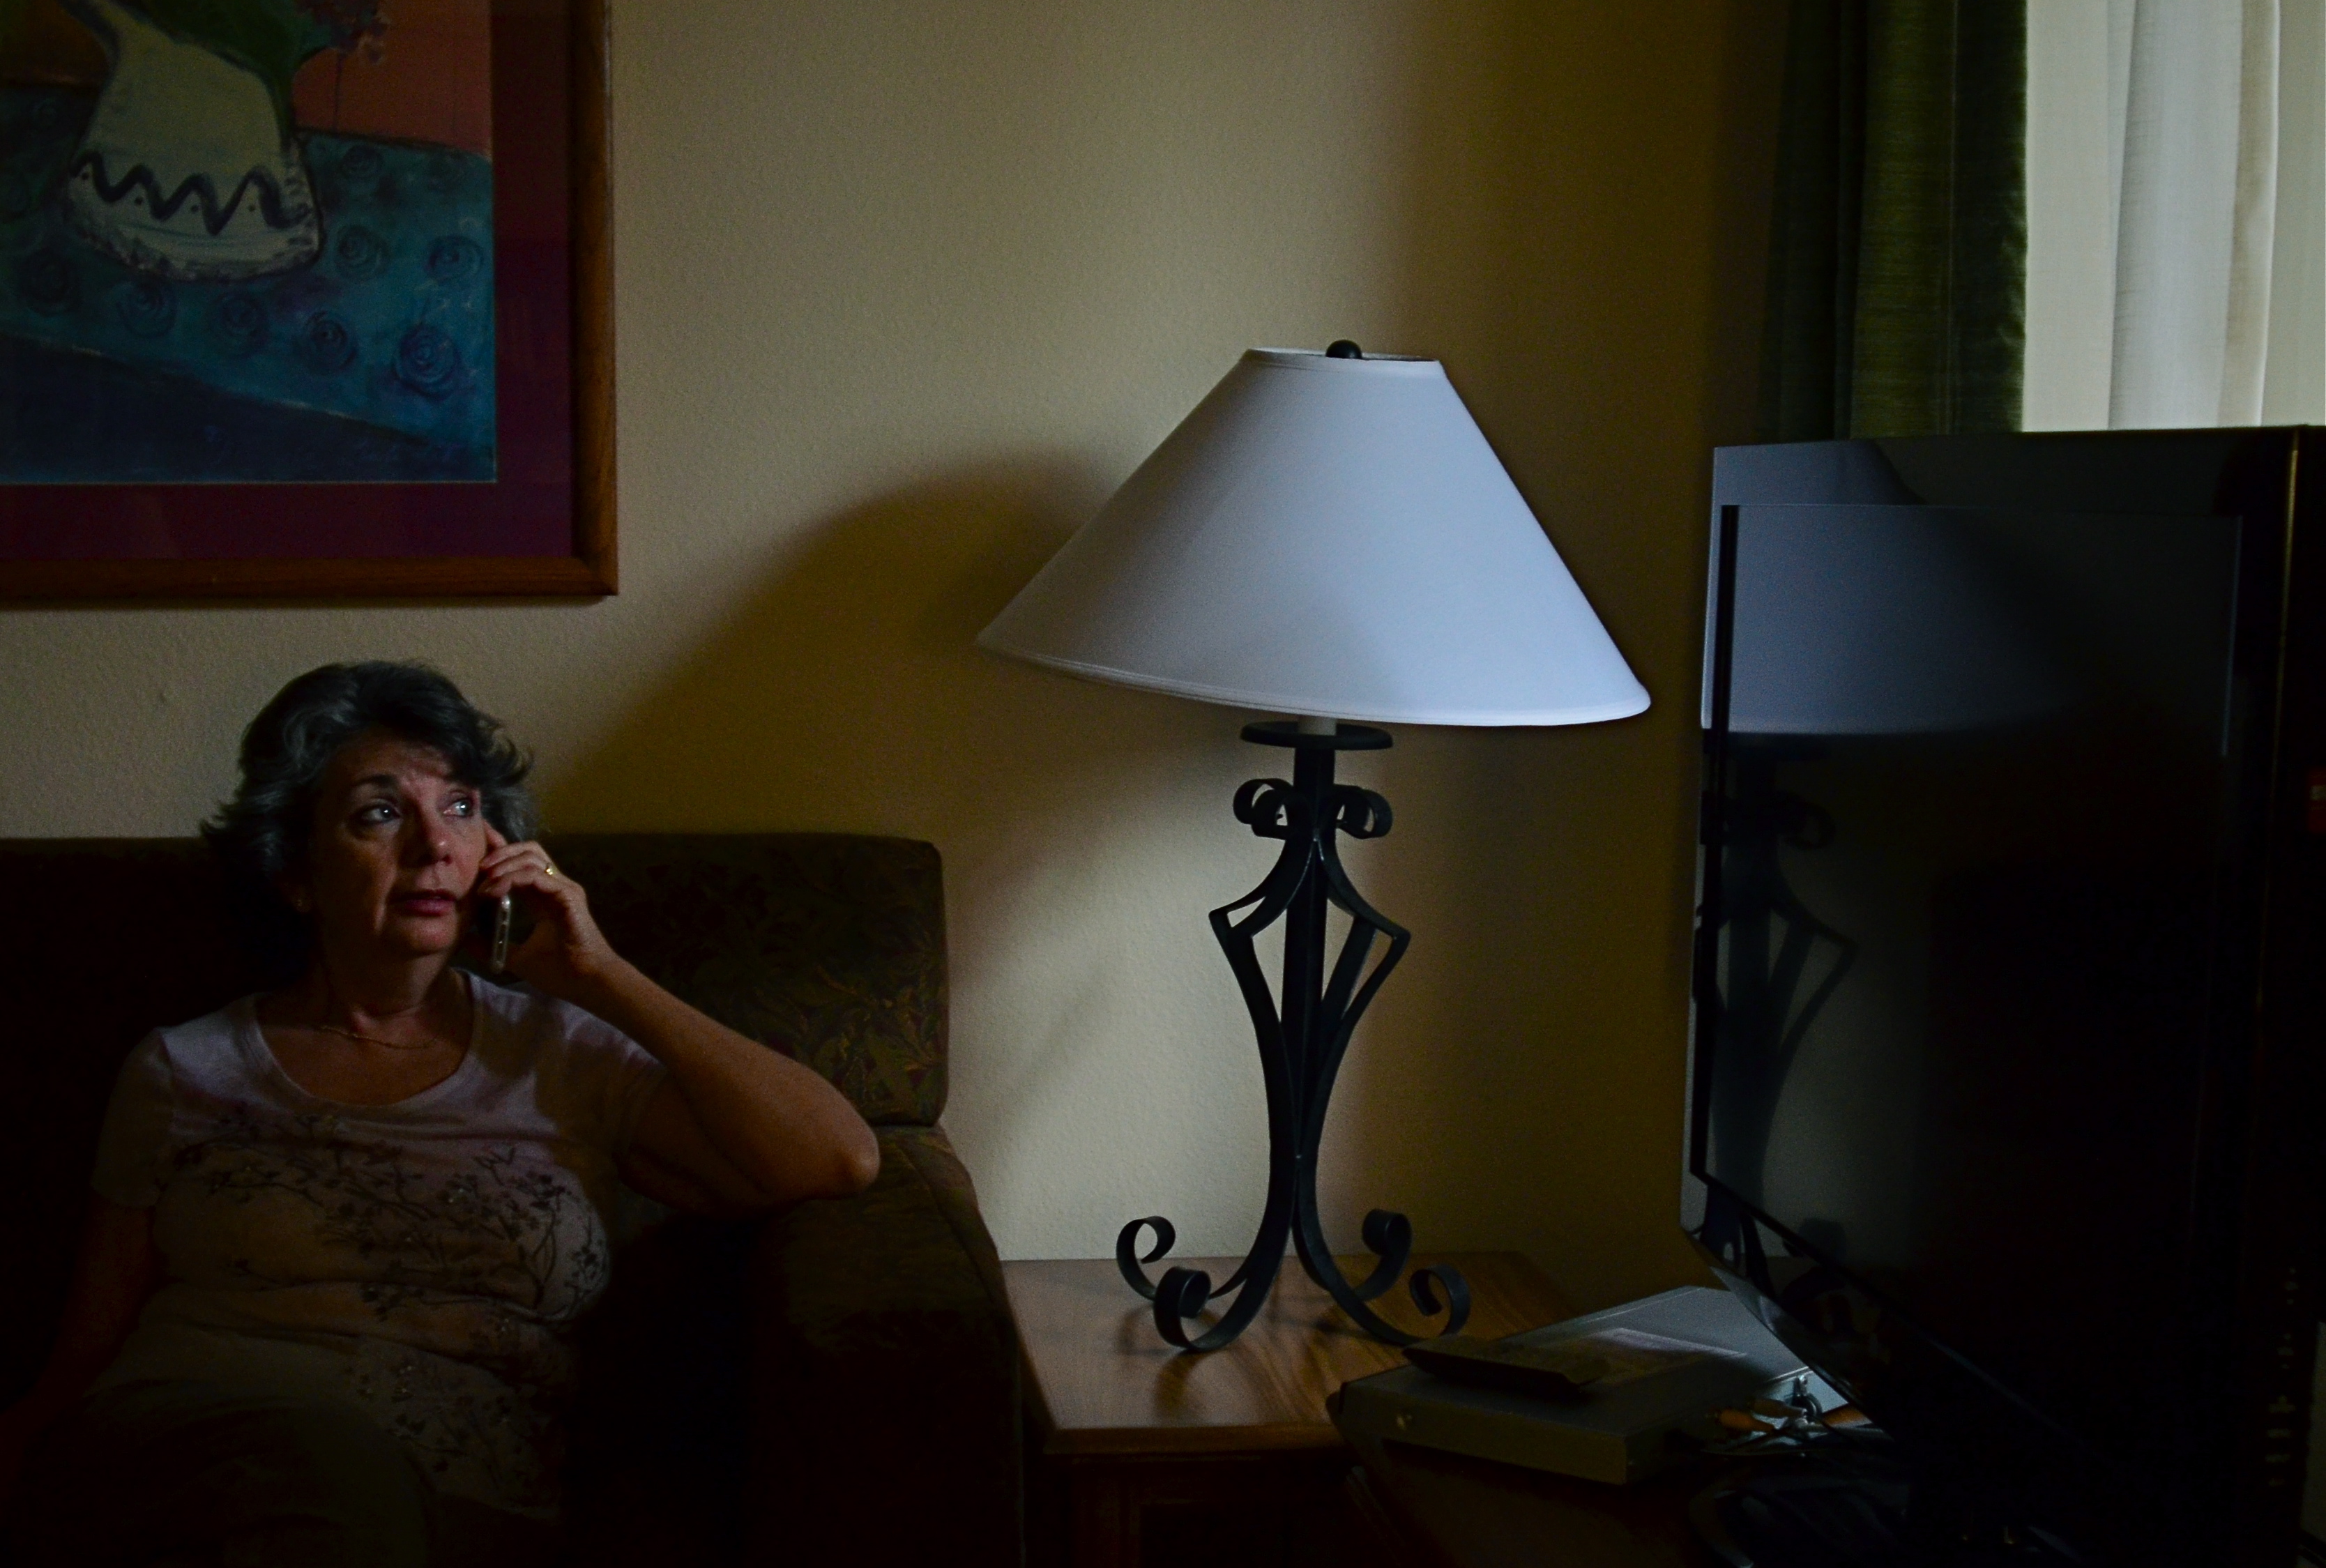
One lady, one source of light, one shot: 1/40 sec., f/1.8, ISO 640, 35mm.
BY MICHAEL PERKINS
IN PORTRAITS, PHOTOGRAPHERS SOMETIMES HAVE TO SUBSTITUTE INTIMACY FOR TECHNICAL PERFECTION. We understandably want to come as near as possible to meticulously modulated light in telling the story of a face, and so we try to ride the line between natural, if inadequate light, and light which is shaped so much that we dull the naturalness of the moment.
It’s a maddening tug of war. If we don’t intervene, we might make an image which is less than flattering, or, worse, unfit for publication. If we nib in too much, we get a result whose beauty can border on the sterile. I find that, more often than not, I lean toward the technically limited side, choosing to err in favor of a studied snapshot rather than a polished studio look. If the face I’m shooting is giving me something real, I worry more about throwing a rock into that perfect pond with extra tinkering.
If my subject is personally close to me, I find it harder, not easier, to direct them, lest the quality I’m seeing in their natural state be replaced by a distancing self-consciousness. It puts me in the strange position of having to wait until the situation all but gifts me with the picture, as adding even one more technical element can endanger the feel of the thing. It’s times like this that I’m jammed nose-up against the limits of my own technical ability, and I feel that a less challenged shooter would preserve the delicacy of the situation and still bring home a better photograph.
In the above frame, the window light is strong enough to saturate the central part of my wife’s face, dumping over three-fourths of her into deep shadow. But it’s a portrait. How much more do I need? Would a second source of light, and the additional detail it would deliver on the left side of her head be more “telling” or merely be brighter? I’m lucky enough in this instance for the angle of the window light to create a little twinkle in her eye, anchoring attention in the right place, but, even at a very wide aperture, I still have to crank ISO so far that the shot is grainy, with noise reduction just making the tones flatter. It’s the old trade-off. I’m getting the feel that I’m after, but I have to take the hit on the technical side.
Then there was the problem that Marian hates to have her picture taken. If she hadn’t been on the phone, she would already have been too aware of me, and then there goes the unguarded quality that I want. I can ask a model to “just give me one more” or earn her hourly rate by waiting while I experiment. With the Mrs., not so much.
Here’s what it comes down to: sometimes, you just have to shoot the damned thing.
POCKET PALS
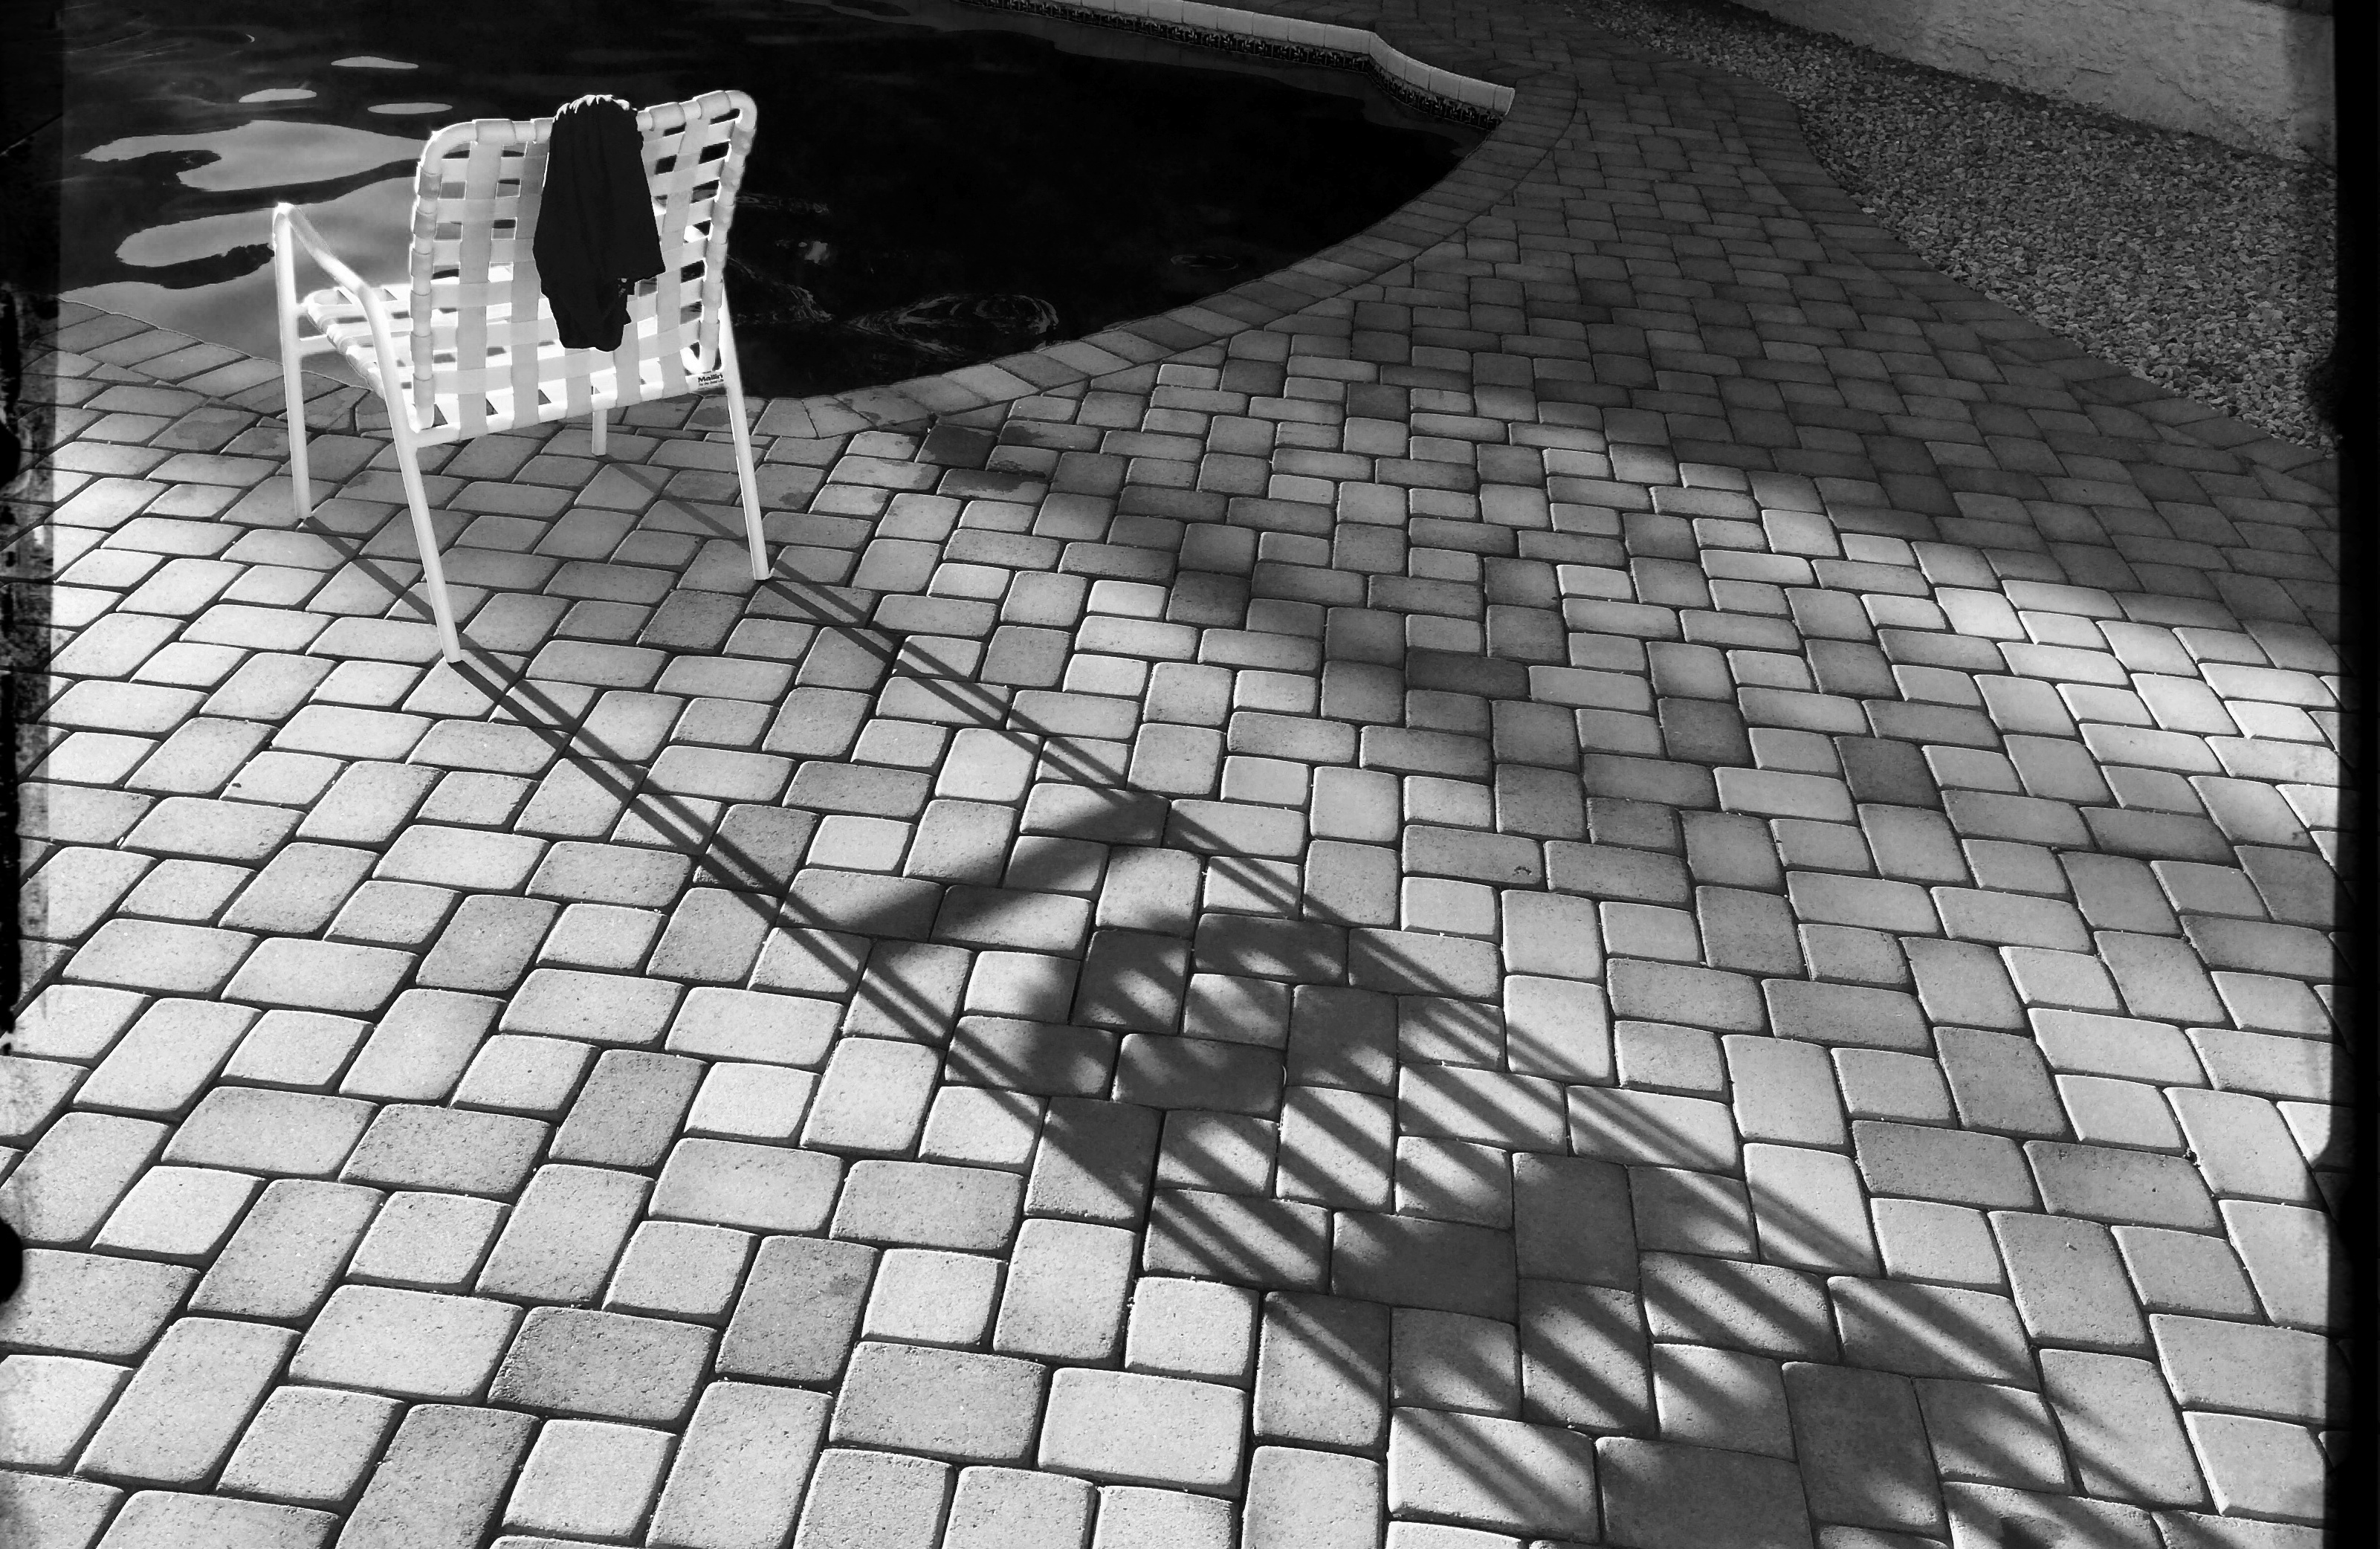
A color shot converted in the app Alt-Photo, using its simulated red filter for super-contrasty monochrome.
By MICHAEL PERKINS
QUICK, DO YOU KNOW WHO MADE THE HAMMER IN YOUR KITCHEN DRAWER? Let’s assume that it’s not a Sears Craftsman, but something you bought on the spot when you just needed, like, a hammer. Yeah, I’ll wait.
Follow-up question: does your off-brand Thor-wacker drive nails any less efficiently than a Sears? Or is it really all in the wrist?
In photography, sometimes tools is just tools. Cellphone apps comprise one of the the most glutted product markets ever, and, while some products do rise to the top and/or international prominence, there are gobs of different players out there to help us solve the same old problems, i.e., composition, exposure, color range, special effects. Those are the basics, and you need not be loyal to any predominant type-A app when, by the time I type the rest of this sentence, forty more guys will have served up their own solution for the exact same need. Go with what works. Add, subtract, adopt, dump, delete, and adore as needed.
Most cel camera apps, toolwise, are closer to a Swiss Army knife than a scalpel, blunt instruments that either apply an effect all-on or all-off. Single click, caveman-level stuff. Still, even the casual cel photog will pack a few of them along to do fundamental fixes on the go, and I recently noticed that I had acquired a decent, basic utility belt of bat-remedies, including, in no particular order:
Negative Me. Just what it says. Converts positive images to negative. Not something you’ll use a lot, but..
Simple DOF. A quick calculator that measures near, far and infinite sharpness based on distance, aperture and lens.
Fused. Instant double exposures, with about ten different blending formulas.
Soft Focus. Sliders for sharpness, brightness, color saturation. Instant glamor for portraits.
Timer Cam. Get in the photo.
Instants. Genuine fake Polaroid borders around your landscape or square images. Because we can’t give up our hipster groove.
AltPhoto. Best simulations of older classic film stocks from Kodachrome to Tri-X, as well as red filter, toy camera and antique effects.
Tilt-Shift Focus. Narrow the sharp areas in your images from a pinpoint to a basketball.
Flickr. Direct link to the mother ship
Pic Stitch. Framing templates for collages of two or more images. Drag and drop simplicity.
Use of these gimcracks ranges from the (yawn) occasional to the (yes!) essential, and your mileage may vary. Thing is, it’s truly a buyer’s (and user’s) market out there. Gather your own gold and click away.
