EVERYTHING OLD IS….. OLD AGAIN
By MICHAEL PERKINS
PHOTOGRAPHY IS NOW SOMEWHAT LIKE THE OLD GOD JANUS, whose two faces looked into the past and the future at the same time. No longer just an emerging art, the practice of making images with light now packs enough historical baggage that, even as we anticipate and adapt to the newest technology, we turn backward toward the comfort of technologies past. We love what’s coming but we can’t quite let go of what’s been.
That’s how you get somewhat ironic observances like this month’s Worldwide Pinhole Day, a celebration of the experience of making a photograph with the most minimal technology available…..that is, an actual bored hole in the front of a light-tight box, the aim being to take a picture without a lens. WPD is marked globally by field trips, competitions, workshops, and a bit of a cottage industry for the special pinhole gear, all of it aimed at delivering the same experience that the first snappers had when photography was the exclusive domain of tinkerers. Certainly the principle works: the pinholes are so incredibly small (often requiring very long exposures) that they actually register distant objects in fairly sharp focus, although sharpness isn’t really the goal. The idea, in the main, seems to be to conduct a successful science experiment that results in a picture, although high-end pictorial quality isn’t really the goal, either. If you’re only casually interested, various ready-made pinhole attachments are sold so you can adapt digital-era cameras to this nineteenth-century method. However, even greater authenticity and enjoyment is said to be had by shooting on 35mm roll film or 5×7 sheet film, or even making the camera itself from scratch, using cardboard boxes, coffee cans, or, as I recently saw, the inside of a plastic Star Wars tie fighter toy.

Kitchen Komtemplation, 2019. Taken with a Lensbaby pinhole optic, its aperture set at about f/177, a 1/5 sec.exposure time at an ISO of 640 (allowing a handheld shot), and a focal length of 35mm.
The entire thought process behind such time-travel faddism is fascinating. Unlike the first photographers, who constantly worked to expand and improve the leading tech of their time, we have reached a stage where making a picture is so mechanically simple that we find it fun to needlessly complicate, or even degrade the process again. In my own view, the more advanced cameras have become over the years, the less I’ve had to futz with the problem of how to take the photo, shifting the emphasis onto the why of it all, which is where I want it. Every scientific advance has been designed to make cameras more intuitive, imaging media more responsive, and everything generally more fool-proof. Now, however, we are far enough away from those balky first iterations of photography to develop a nostalgic fondness for them. Such is human nature.
I’m sure that, somewhere, there are festivals where the idea is to shoe your own horse, learn to darn your own socks, or field-dress the deer you just personally brought down with bow and arrow. Thing is, though, for most of us, modern life no longer requires so much effort from us merely to stay alive, which allows us to focus on the finer points of the experience. But, from our more advanced standpoint, we strangely think it’s quaint to add more accident, more randomness, more error and more uncertainty into the making of what turn out to be essentially inferior photographs, even though it has never been easier to make good ones. This is where we start to leave the realm of Art and enter the world of The Science Fair.
At one point in my son’s youth, I wrapped copper wire around an oatmeal box and scratched a hunk of germanium crystal to show him how to produce a primitive radio signal. It worked well enough to snag him a merit badge, but on the way home, he was right back to listening to his Sony Walkman. Because it sounded a helluva lot better than a wired-up Quaker Oats cannister. And while I acknowledge that artistically elegant images can be made with very rudimentary tools (of course, any image of my wife will automatically be a better picture, as seen above), pinhole images are hard to compose, expose or control in any proactive way, and thus predisposed to a high failure rate. If you’re personally wired to accept whatever the universe hands you, then the pictures that accidentally come out of your coffee can will no doubt be something of a scientific marvel, ablaze with the spark of discovery. As for me, I find that my own lack of vision or talent already interferes with my pictures far more than it should. I don’t need to further compromise my work with disobedient gear. It may be amazing, but it ain’t satisfying.
OPEN AND SHUT CASE
By MICHAEL PERKINS
ANYTIME I HEAR A PHOTOGRAPHER EXPLAIN HIS TECHNIQUE in sentences that start with “I always”, my hackles raise…just a little.
You’ve heard people point to stylistic routines that they never break, as if that rigidity were itself a guarantee of consistent excellence. I always shoot in natural light. I always shoot RAW. I always use a red filter…. you get the idea. Let’s agree that there is no gear or procedure which works wonderfully all the time. Every choice we make as photographers means, well, unchoosing other choices. Sometimes that’s a winning strategy. Sometimes it just bespeaks our insecurity or inflexibility.
One of the “always” boasts that’s prominent among users of very fast lenses is, “I always shoot wide open” (at the largest possible aperture), as if that’s some miracle prescription. In terms of exposure range, If you’re shooting at around f/2 (or wider, if you’ve laid out a small fortune), you’ve certainly elected to suck in as much light as your lens will allow, and often, that can give you a tremendous advantage over slower lenses. But it comes at a cost.

Distant subjects shot at the widest apertures will be decidedly softer.
At widest apertures, your depth of field, the area of sharpest focus, will be extremely shallow. Now, if you are shooting a portrait at close range and are okay with your background registering as a blur, this can be great, but if the mountain in the background is as important as the girl in the foreground, f/2 will not get that done. Another thing to factor into a shallow DOF shot is manual focusing (in case your autofocus throws a hissy fit). That will require even more time and patience to nail the shot…..which is okay in a casual setting but impractical in fast-moving situations, like street work or sports.
But let’s talk upside. Like mountain ranges? Wide open at F/2, our theoretical lens will, at around 250 feet from the nearest part of a landscape subject, be effectively sharp to infinity. However the result will be measurably softer than, for example, a telephoto shooting at f/8 or slower. One last caveat: using f/2 for everything could also generate additional chromatic aberration or color fringing, in case either of those are deal breakers for you.
The point here is that no setting, no lens, no trick can cover every situation with equal results. If that were true, someone would have already devised a universal high-end point-and-shoot that we could all buy, and the golden age of Gear Wars would end. Till that day, all we have is judgement….creative decisions weighed against all available options.
It means making pictures on purpose, an intention that is the dead opposite of “I always…..”
“LEVON”
By MICHAEL PERKINS
MANY PHOTOGRAPHERS ARRIVE AT WHAT I CALL a minimalist reset, evolving in their technique to the point at which they can do more varied work with fewer tools. This process leads many to designate a personal “go-to” lens, the chunk of glass that solves nearly every problem on a given shooting day by itself. I’ve tried to take this a step further, going from ” what one lens do I most need today?” to “what one lens can I probably use for everything, nearly every day?”, a lens so flexible that I’d actually have to have a very good reason not to use it on any given day. To express it another way, instead of thinking of a “go-to” lens, I’ve tended to work toward finding a “leave-on” lens.
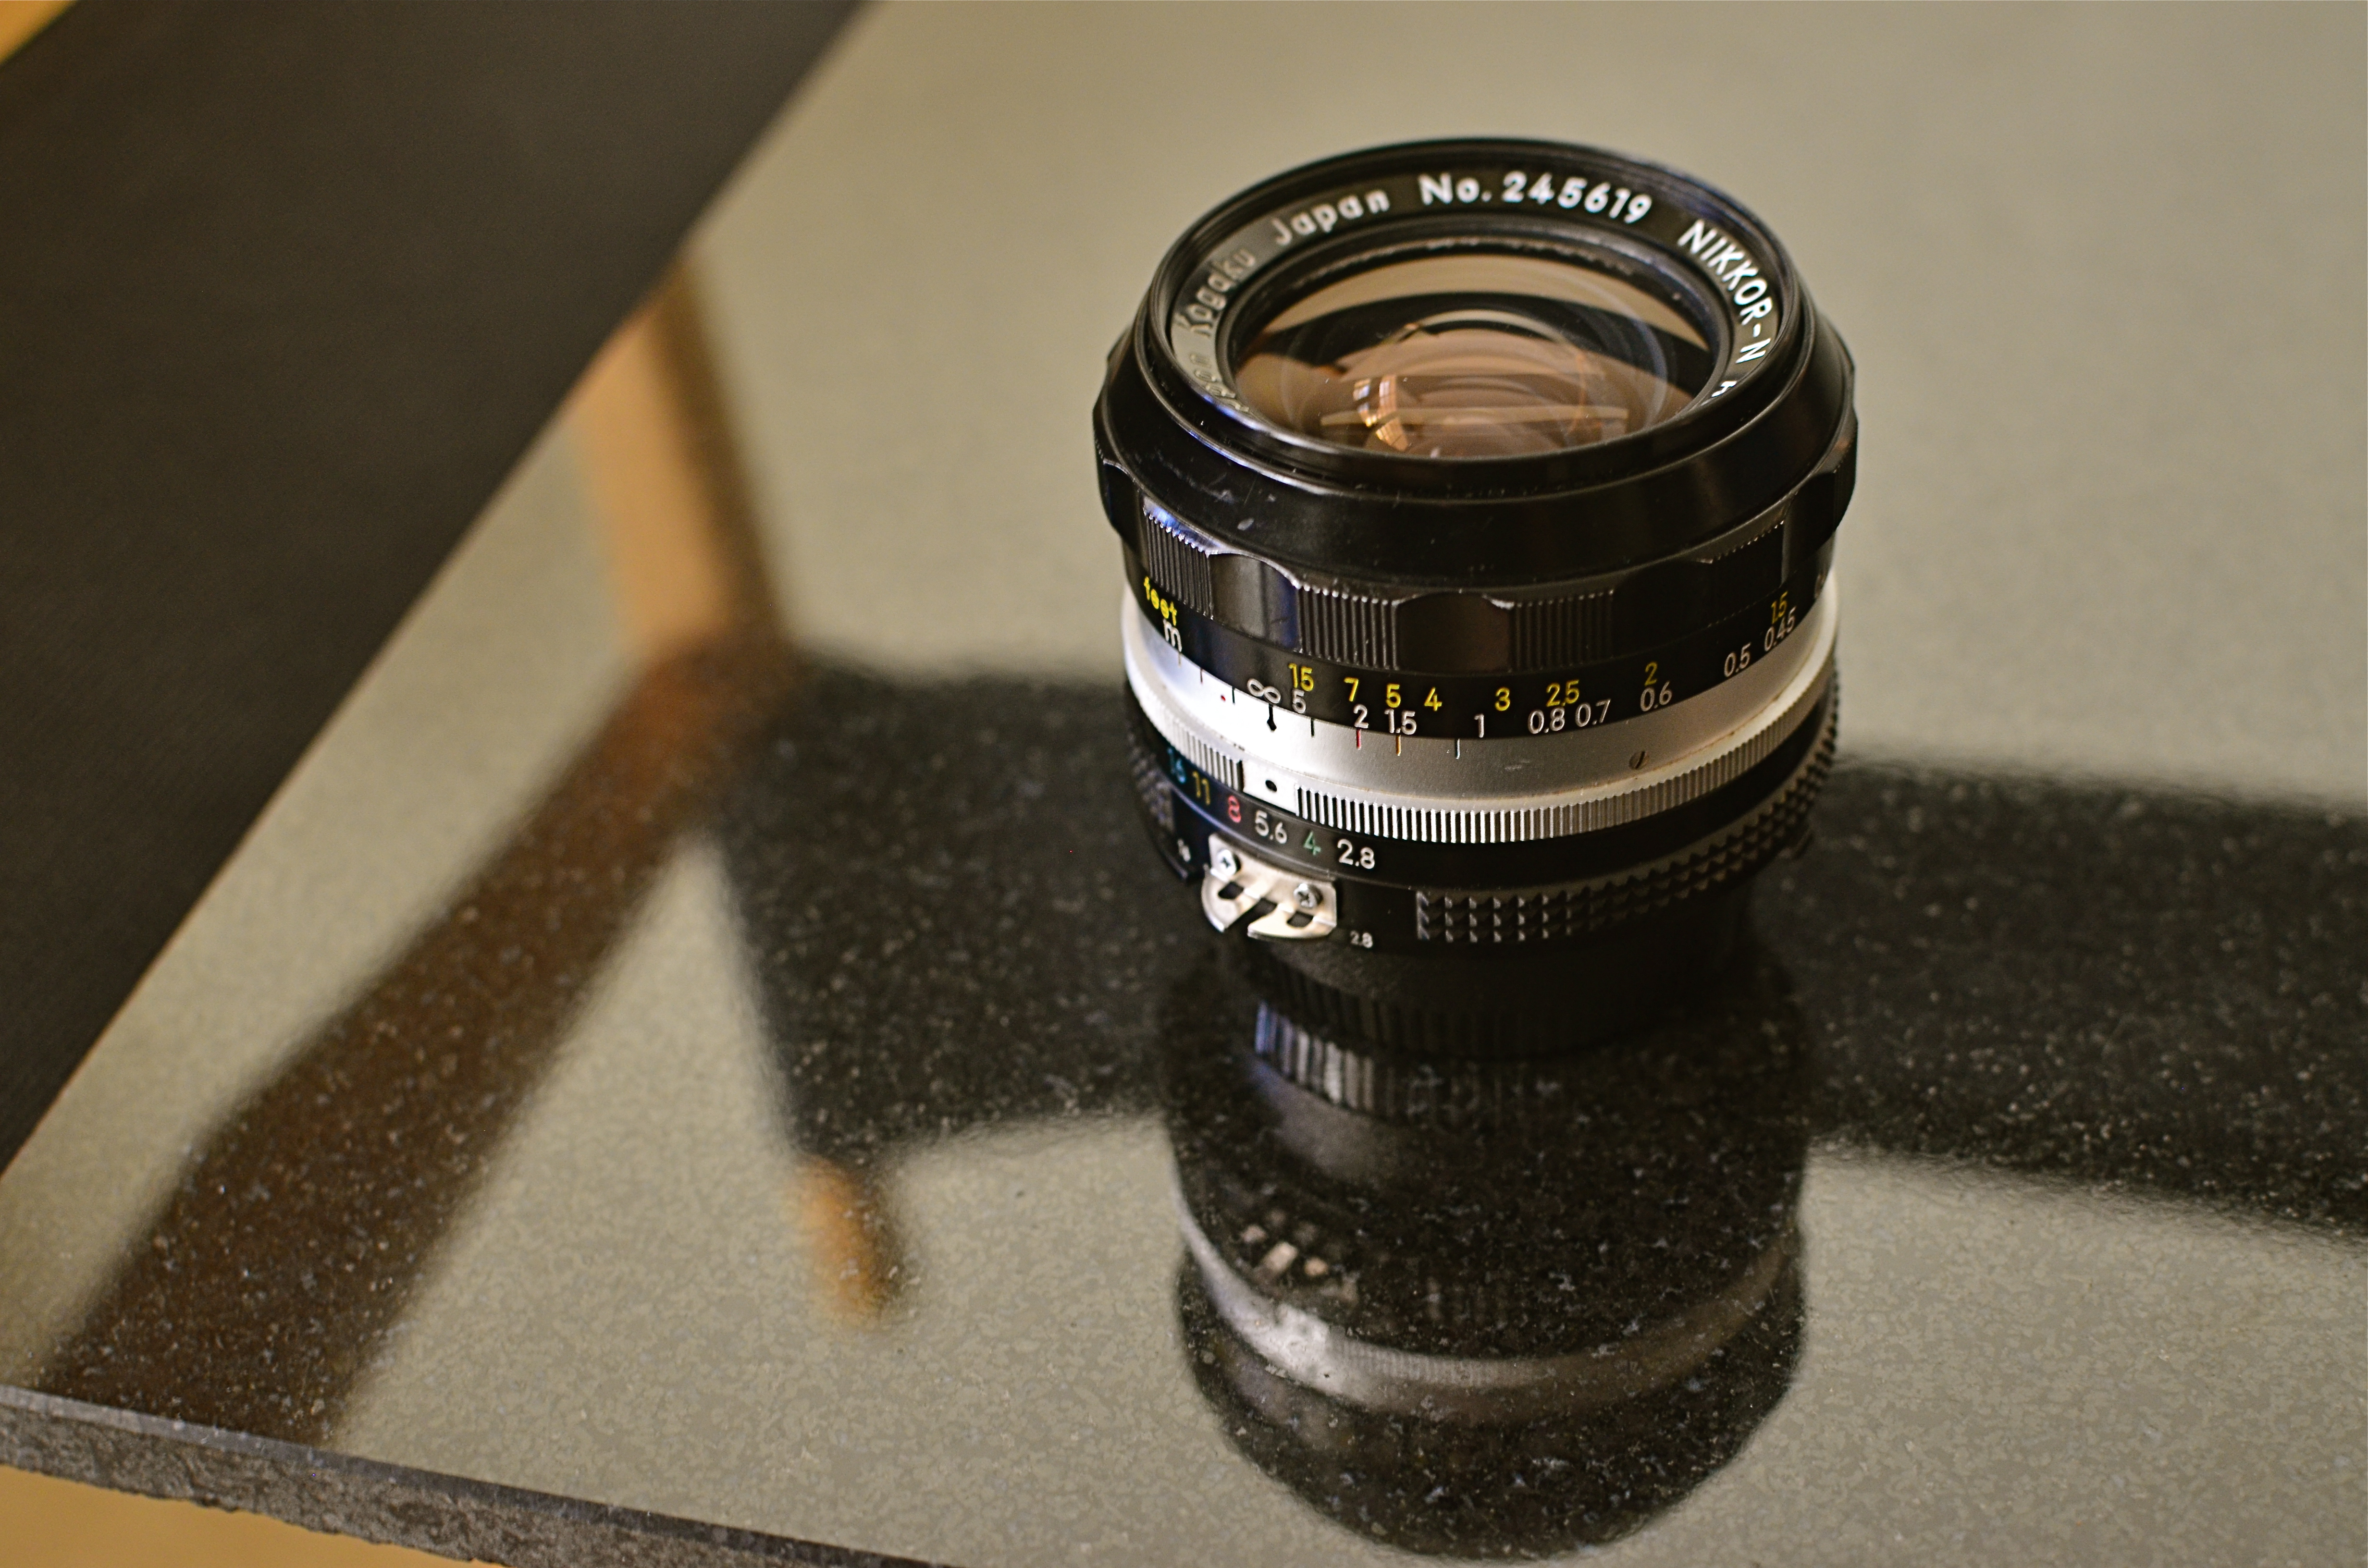
My “Levon” is the venerable Nikon 24mm f/2.8, in production continuously from 1967 (about when mine was made) to the present as a metal-barreled, fully manual lens. There is a cheaper, plastic autofocus version also available, but optics are generally the same. That is to say, damned sharp and damned fast. Both lenses are extremely compact and thus easy to lug about.
24mm is correctly called an “ultra-wide angle”, but I originally switched to it from something even wider, the ubiquitous 18-55mm “kit lens” most Nikons ship with these days. Doing a lot of shooting in big cities with crowded streets, I originally thrilled to just how much the 18 could cram into a frame. Eventually, however, I came to hate the severely in-bent slant on tall structures, and the fact that the 18, wide open, is pretty slow, at a max aperture of f/3.5. With the 24, I still get plenty of more natural-looking width and another fat half-stop of light in the bargain.
Handheld night scenes make up about a third of my urban shooting, and, here again, the 24 is Mikey’s Best Friend. Its manual focusing means my camera never spazzes in search of a focus lock in the dark, allowing me to actually shoot faster. And city scenes can be sharp even wide open at f/2.8, giving me crisp results from 12 feet all the way to just under 50, and from 17 feet pretty much to infinity. Combine that with a fairly low ISO like 800, and I can even keep the grain down.
Being a prime lens, the 24mm can’t zoom, but outside of occasional nature work, I seldom need a telephoto, so you don’t miss what you don’t use: another reason to leave the 18-55 home. Besides, primes, being optically simpler, are usually sharper, meaning it looks better than the kit lens dialed to 24mm. Finally, Levon is not a macro, but focuses at just one foot out, so some modest close-up work is feasible.
Standard disclaimer: this analysis is offered not to claim that any one lens is perfect for any one person. It’s just an exercise to show how, for the way I shoot, I have been able to do over 75% of my typical work without swapping out glass. I gain speed, ease, and flexibility in the process, and, if you conduct your own experiments, chances are you too can progressively spend less time fiddling and more time shooting.
“….and it shall be Leave-On…”
THE GOLDEN HALF-RULE
By MICHAEL PERKINS
THE STREET-HARDENED CRIME PHOTOGRAPHER ARTHUR FELLIG (1899-1968), who adopted the pseudonym “Weegee” was often asked the secret of his success as the journalist who best captured the stark essence of mobster arrests, gruesome murders, and various other manifestations of mayhem and tragedy. He had answered the “how do you do it” question so many times that he developed a uniform shorthand response which passed into photographic lore and stamped itself onto the brains of all future street shooters. The secret: “f/8 and be there.”
The “f/8” part spoke to the fact that Weegee, who seldom shot at any other aperture, was more interested in bringing back a usable picture than in creating great art. In the days before autofocus, shots taken on the fly at medium distance would almost always be reasonably sharp at that depth of field, no matter how sloppy the shooter’s finer focusing technique. Besides, since he was capturing sensation, not romance, why bother with subtle nuance? Weegee’s pictures were harsh, brutal, and grimy, just like the nether worlds they depicted. They were known for their high contrast and for the atomic blast of hard flashgun light he blew into the faces of society mavens and thugs alike. We’re talking blunt force trauma.
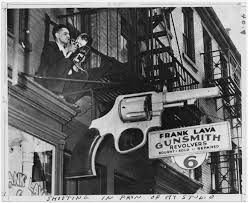
Familiar with action on both ends of guns, Arthur “Weegee” Fellig was the ultimate chronicler of America’s dark side.
The second half of Weegee’s golden rule was far more telling for any photographer purporting to be an effective narrator. When Fellig spoke of “being there” he was not only referring to arriving on a crime scene ahead of any competition (which he guaranteed by grabbing early bulletins from the police-band radio in his car and having a mobile darkroom in his trunk), but in being mentally present enough to know when and what to shoot, with very little advance prep. The bulkiness of the old Graphlex and Speed Graphic press cameras (the size of small typewriters) meant that shooting twenty frames in as many seconds, as is now a given with reporters, was technically impossible. Time was precious, deadlines loomed, and knowing when the narrative peak of a story was approaching was an invaluable instinct, one which distinguished Weegee from his contemporaries. Opportunities were measured in seconds, and photogs learned to nail a shot with very little notice that history was about to be on the wing.
There will always be arguments about the finer points of focus and exposure, with most debates centering on the first half of Weegee’s prime directive. However, for my money, the urgency of being ably to identify immediacy and grab it in a box far outweighs the niceties of art. Many a Pulitzer Prize-winning image is under-exposed or blurs, while many a technically perfect picture actually manages to drain a scene of any human emotion. Make it f/8, f/4, hell, take the damned thing with a pinhole if need be. But be there.
SHOTS AREN’T SEEDS
By MICHAEL PERKINS
I AM TRULY THANKFUL FOR MY PHOTOGRAPHIC FAILURES. And it’s right that I have a benevolent attitude toward the pictures I’ve muffed, since there are so many of them. As a photographer, you pray for the kind of analytical ruthlessness that you need to separate wheat from chaff and label your duds as duds….no excuses, no explanations, no magical thinking that, left in a drawer long enough, these rotten seeds will someday bloom into roses. Once you can call your own stuff worthless, you’re truly on the road toward making something….well, less so.
I have just spent a week giving the (overdue) pink slip to my last and largest remaining archive of really, really bad pictures from the twilight of the film era, about 400 35mm slides that I have been hauling around the globe since the late ’90’s, and none of which, surprisingly, have blossomed into masterpieces since the last three times I pulled them out, shrieked, and sealed them back behind brick walls. Funny how that happens.

The (somewhat less than) Mighty Argus 3D film camera of the late ’90’s. shown here with its print viewer. Jealous?
This errant tonnage represents my first attempts with 3D photography, which involves a huge learning curve, not to mention a pound and a half of heavy-duty study. At the time I began this journey, very few stereoscopic cameras were available for sale, and the ones that produced the effect the best were also the most technically limited. The Argus/Loreo 3D, my toy of choice, was, in fact, a point-and-shoot 35mm with only two apertures, since the additional depth of field at f/11 and f/18 produced the best stereo illusion. The Argus was produced to create 4 x 6 prints (which you actually had to pay to have printed, remember), each featuring two side-by-side images viewed through a prism holder. It was not intended for high-end art use, since the lenses were frozen at 1/100, there were no additional optics available, and a usable result could only be achieved outdoors, in full daylight.
Worse, I stubbornly decided to shoot slide film in the thing, thus creating a whole separate set of problems for myself. First, were processors supposed to produce both images in the same slide? Well, sure, yeah, they could do that, but how was I going to view them? No worries! Turns out that other fools like me had also shot so-called “half-frame” stereo slides over the decades, and some of the viewers made to serve them were still on Ebay. Of course, I was shooting daylight slide film at 100 ASA in all conditions, and I didn’t yet know enough (or have enough money) to instruct processors on how to “push” the slide film an extra stop or two just to make them a trice lighter, so most of my shots were murky mysteries even Sherlock Holmes couldn’t decipher.
Worse, anyone shooting stereo must learn to compose for the depth effect, something you can only master by taking lots of lousy pictures (I did) or agreeing to take pictures of boring garbage just to attain said effect (did that, too). Add to this that you only had half of a 35mm frame in which to compose and you start to see what a raging success the whole enterprise was destined to be. At one point, I even went so far as to slice the twin images apart, re-jigger them in super-wide slide mounts, find an antediluvian projector that projected those kinds of slides ($$$), then search the globe again for viewing glasses that would allow me to see the projected slides in 3-d. Getting tired yet?
So, farewell to scads of badly composed, boring and unviewable slides, a grim reminder of how expensive and unwieldy large projects were in the film era. Post-script: I eventually thrived by learning to make my own View-Master reels (still expensive and work-intensive, but there’s a reason the format has been around nearly seventy years). At least the entire fiasco finally made a real editor out of me, teaching me a most valuable mantra: bad is bad is bad is bad. Some seeds will never become roses.
POUNDING NAILS WITH A SCREWDRIVER

Ten feet out with a 56mm that shoots like an 85mm. Little cramped.
By MICHAEL PERKINS
IF YOU HAD ONE OF THOSE DADS WHO PURCHASED A SET OF “DO IT YOURSELF” ENCYCLOPEDIAS in the 1950’s, hoping to become some kind of amalgam of Edison and St. Joseph The Carpenter, you no doubt encountered some sort of Page One admonition to always get “the right tool for the job”. In other words, don’t use a screwdriver to pound nails. I successfully resisted the seductive gospel of Being Handy Around The House, but then found, in photography, that the same rule applies, at least as regards lenses. Right glass, right results, right?
Of course, unless you habitually lug the accumulated wisdom of 200 years of shutterbugging and its attendant gear along with you on a daily basis, you’re likely to get into situations where the lens you have readily at hand won’t allow you to do the thing you just decided to try. It’s back at the hotel, back in the parking lot, back at Alpha Centauri, wherever. Thing is, the thing you want is here, right in front of you, leaving one simple chance. Shoot or don’t.
Nearly the same front to back distance, but at a slight diagonal.
I recently wandered, on a weeklong practice run for a new Lensbaby Velvet 56, a manual prime lens that equates, on a full sized DSLR sensor, to about 85mm or so. Perfect for portraits, but very, very cramped for general street work. The Velvet, as its name implies, imparts a soft, gauzy layer over top of a sharp image at apertures wider than about f/5,6. From there to the upper stops, it behaves like a regular prime without the softer effect. The temptation is strong to limit its use to flattering portraits. But that vanishes, however, when you see what marvelous cushiness it confers on the hard textures you find in buildings. It creates a romantic, dreamy look for concrete, plaster, and stone, and so, since I had no other lens at the ready on this particular walkout, I decided to try a few street shots with it.
First problem: this thing can make a tight composition look absolutely claustrophobic. One cure is to walk way back to open up the shot; another is to try a diagonal or oblique angle to widen things out. Of course, since 85mm is treading close upon telephoto territory, the front-to-back information will be somewhat compressed; the distances which seem natural to your eye from 35 to 50 mm seem smashed in at 85. However, since we are shooting for the velvety effect with this lens, compromise is already the name of the game, so angle of composition becomes a partial fix. The feel from ten feet away, seen in the head-on top shot, seems pretty confined, whereas in the second shot, taken about twelve feet at a slight diagonal, the shot is snug but not uncomfortable.
The Velvet 56 is actually remarkably versatile, since, in addition to serving as a great portait lens and a nice landscape glass, it also macro-focuses to about 5 inches, allowing you to work more and switch out less. As always, it’s not so much what a given lens was primarily designed for but what you choose, perhaps out of desperation, to do with it.
Turns out some screwdrivers make pretty fair hammers, after all….
THE EYES HAVE IT

How soft is too soft? Shot with a Lensbaby Sweet 35 optic at 1/30 sec., F/4, ISO 400, 35mm.
By MICHAEL PERKINS
WINDOW TO THE SOUL: that’s the romantic concept of the human eye, both in establishing our emotional bonds with each other and, in photography, revealing something profound in portraiture. The concept is so strong that it is one of the only direct links between painting (the way the world used to record emotional phenomena) and photography, which has either imitated or augmented that art for two full centuries. Lock onto the eyes, we say, and you’ve nailed the essence of the person.
So let’s do a simple comparison experiment. In recent years, I’ve begun to experiment more and more with selective-focus optics such as the Lensbaby family of art lenses. Lensbabies are unabashedly “flawed” in that they are not designed to deliver uniform focus, but, in fact, use the same aberrations that we used to design out of lenses to isolate some subjects in intensely sharp areas ( so-called “sweet spots”) surrounded by gradually increasing softness.
As a great additional feature, this softness can even occur in the same focal plane as a sharply rendered object. That means that object “A”, five feet away from the camera, can be quite blurry, while object “B”, located just inches to the side of “A”, and also five feet from the camera, can register with near-perfect focus. Thus, Lensbaby lenses don’t record “reality”: they interpret mood, creating supremely subjective and personal “reads” on what kind of reality you prefer.
Exact same settings as the prior example, but with a slightly tighter focus of the Lensbaby’s central “sweep spot”.
Art lenses can accentuate what we already know about faces, and specifically, eyes…that is, that they remain vital to the conveyance of the personality in a portrait. In the first sample, Marian’s entire face takes on the general softness of the entire frame, which is taken with a Lensbaby Sweet 35 lens at f/4 but is not sharply focused in the central sweet spot. In the second sample, under the same exposure conditions, there is a conscious effort to sharpen the center of her face, then feather toward softness as you radiate out from there.
The first exposure is big on mood, with Marian serving as just another “still life” object, but it may not succeed as a portrait. The second shot uses ambient softness to keep the overall intimacy of the image, but her face still acts as a very definite anchor. You “experience” the picture first in her features, and then move to the data that is of, let’s say, a lower priority.
Focus is negotiated in many different ways within a photograph, and there is no empirically correct approach to it. However, in portrait work, it’s hard to deny that the eyes have it, whatever “it” may be.
Windows to the soul?
More like main clue to the mystery.
EQUATIONS
“Sharpness” can mean so many things to so many different photographers.
By MICHAEL PERKINS
EVERY CHANGE YOU MAKE IN THE CREATION OF A PHOTOGRAPHIC IMAGE also changes every other element of the picture.
You can’t alter a single element in a photo in isolation. Each decision you make is a separate gear, with its own distinctive teeth, and the way those teeth mesh with all the other gears in the photographic equation determines success in the final picture.
As an example, let’s look at sharpness, perhaps the big “desirable” in an image. The term sounds simple, but is, in fact determined by an entire raft of factors, among them:
A) Choice Of Lens. How uniform is the sharpness of your glass? Is it softer at the edges? Completely sharp at smaller apertures? Does it deliver amazing pictures at one setting while causing distortions or inaccuracies at another?
B) Aperture. The most basic predictor of sharpness, whether you scrimped or splurged on Item “A”.
C) Choice Of Autofocus Setting. Are you telling your camera to selectively sharpen a key object in an isolated part of your image, or asking it to provide uniform sharpness across the entire frame?
D) Anti-vibration. On some longer exposures (for example, on a tripod) this feature may actually be costing you sharpness. Protecting your shot against the hand-held shakes is good. Confusing a camera with active Anti-vibe on a stabilized shot may not work out as well.
E) Contrast. Some people believe that the sharpness of lines and textures is actually the viewable distance between light and darkness, that contrast is “sharpness”. Based on what you prefer, other big choices can be affected, such as the decision to shoot in color or black and white.
F) Stability. Deals with everything from how steady you grip a camera to what else besides yourself, from shutter triggering to SLR mirror shifting, can cause measurable vibration, and thus less sharpness.
G) Editing/Processing. This is where miracles occur. Sometimes. Other times, it’s where we try to slap lipstick on a pig.
We could go on, and so could you. And then consider that this quick checklist only deals with sharpness, just a single element, which, in turn, affects every other aspect of your pictures. Photography is a constant juggling act between technique, experience, experiment, and instinct. What you want to show in your images will dictate how much (or how well) you keep all those balls aloft.
SALVAGING THE FEEL
By MICHAEL PERKINS
EVEN IF YOU ARE IN THE HABIT OF PACKING A CAMERA ALONG WHEREVER YOU GO, you can only predict some of the conditions you might encounter in a given shooting situation. If you’ve guessed well, you can be ready (depending on how much gear you have with you) for about 75% of the shots you may want to take. What’s left, make no mistake, is a mixture of guesswork and luck, the kinds of shots where you adapt on the fly.
Night shots employ a completely different set of skills from daylight shots. What looks mysterious and romantic to your eye may be a mushy muddle to your camera, and that forces a lot of sudden sorting-out of your choices. On the night of the above shot, taken along the shoreline in Ventura, California, I had not planned on shooting anything at all after nightfall. I loved the deeper blues of the sky as they played just before sundown, and I was especially enjoying watching local kids playing against the darkening surf. Following a few dozen clicks up and down the beach, I walked back inland a block or so to join my wife and some friends at a nearby restaurant, considering myself done for the day.
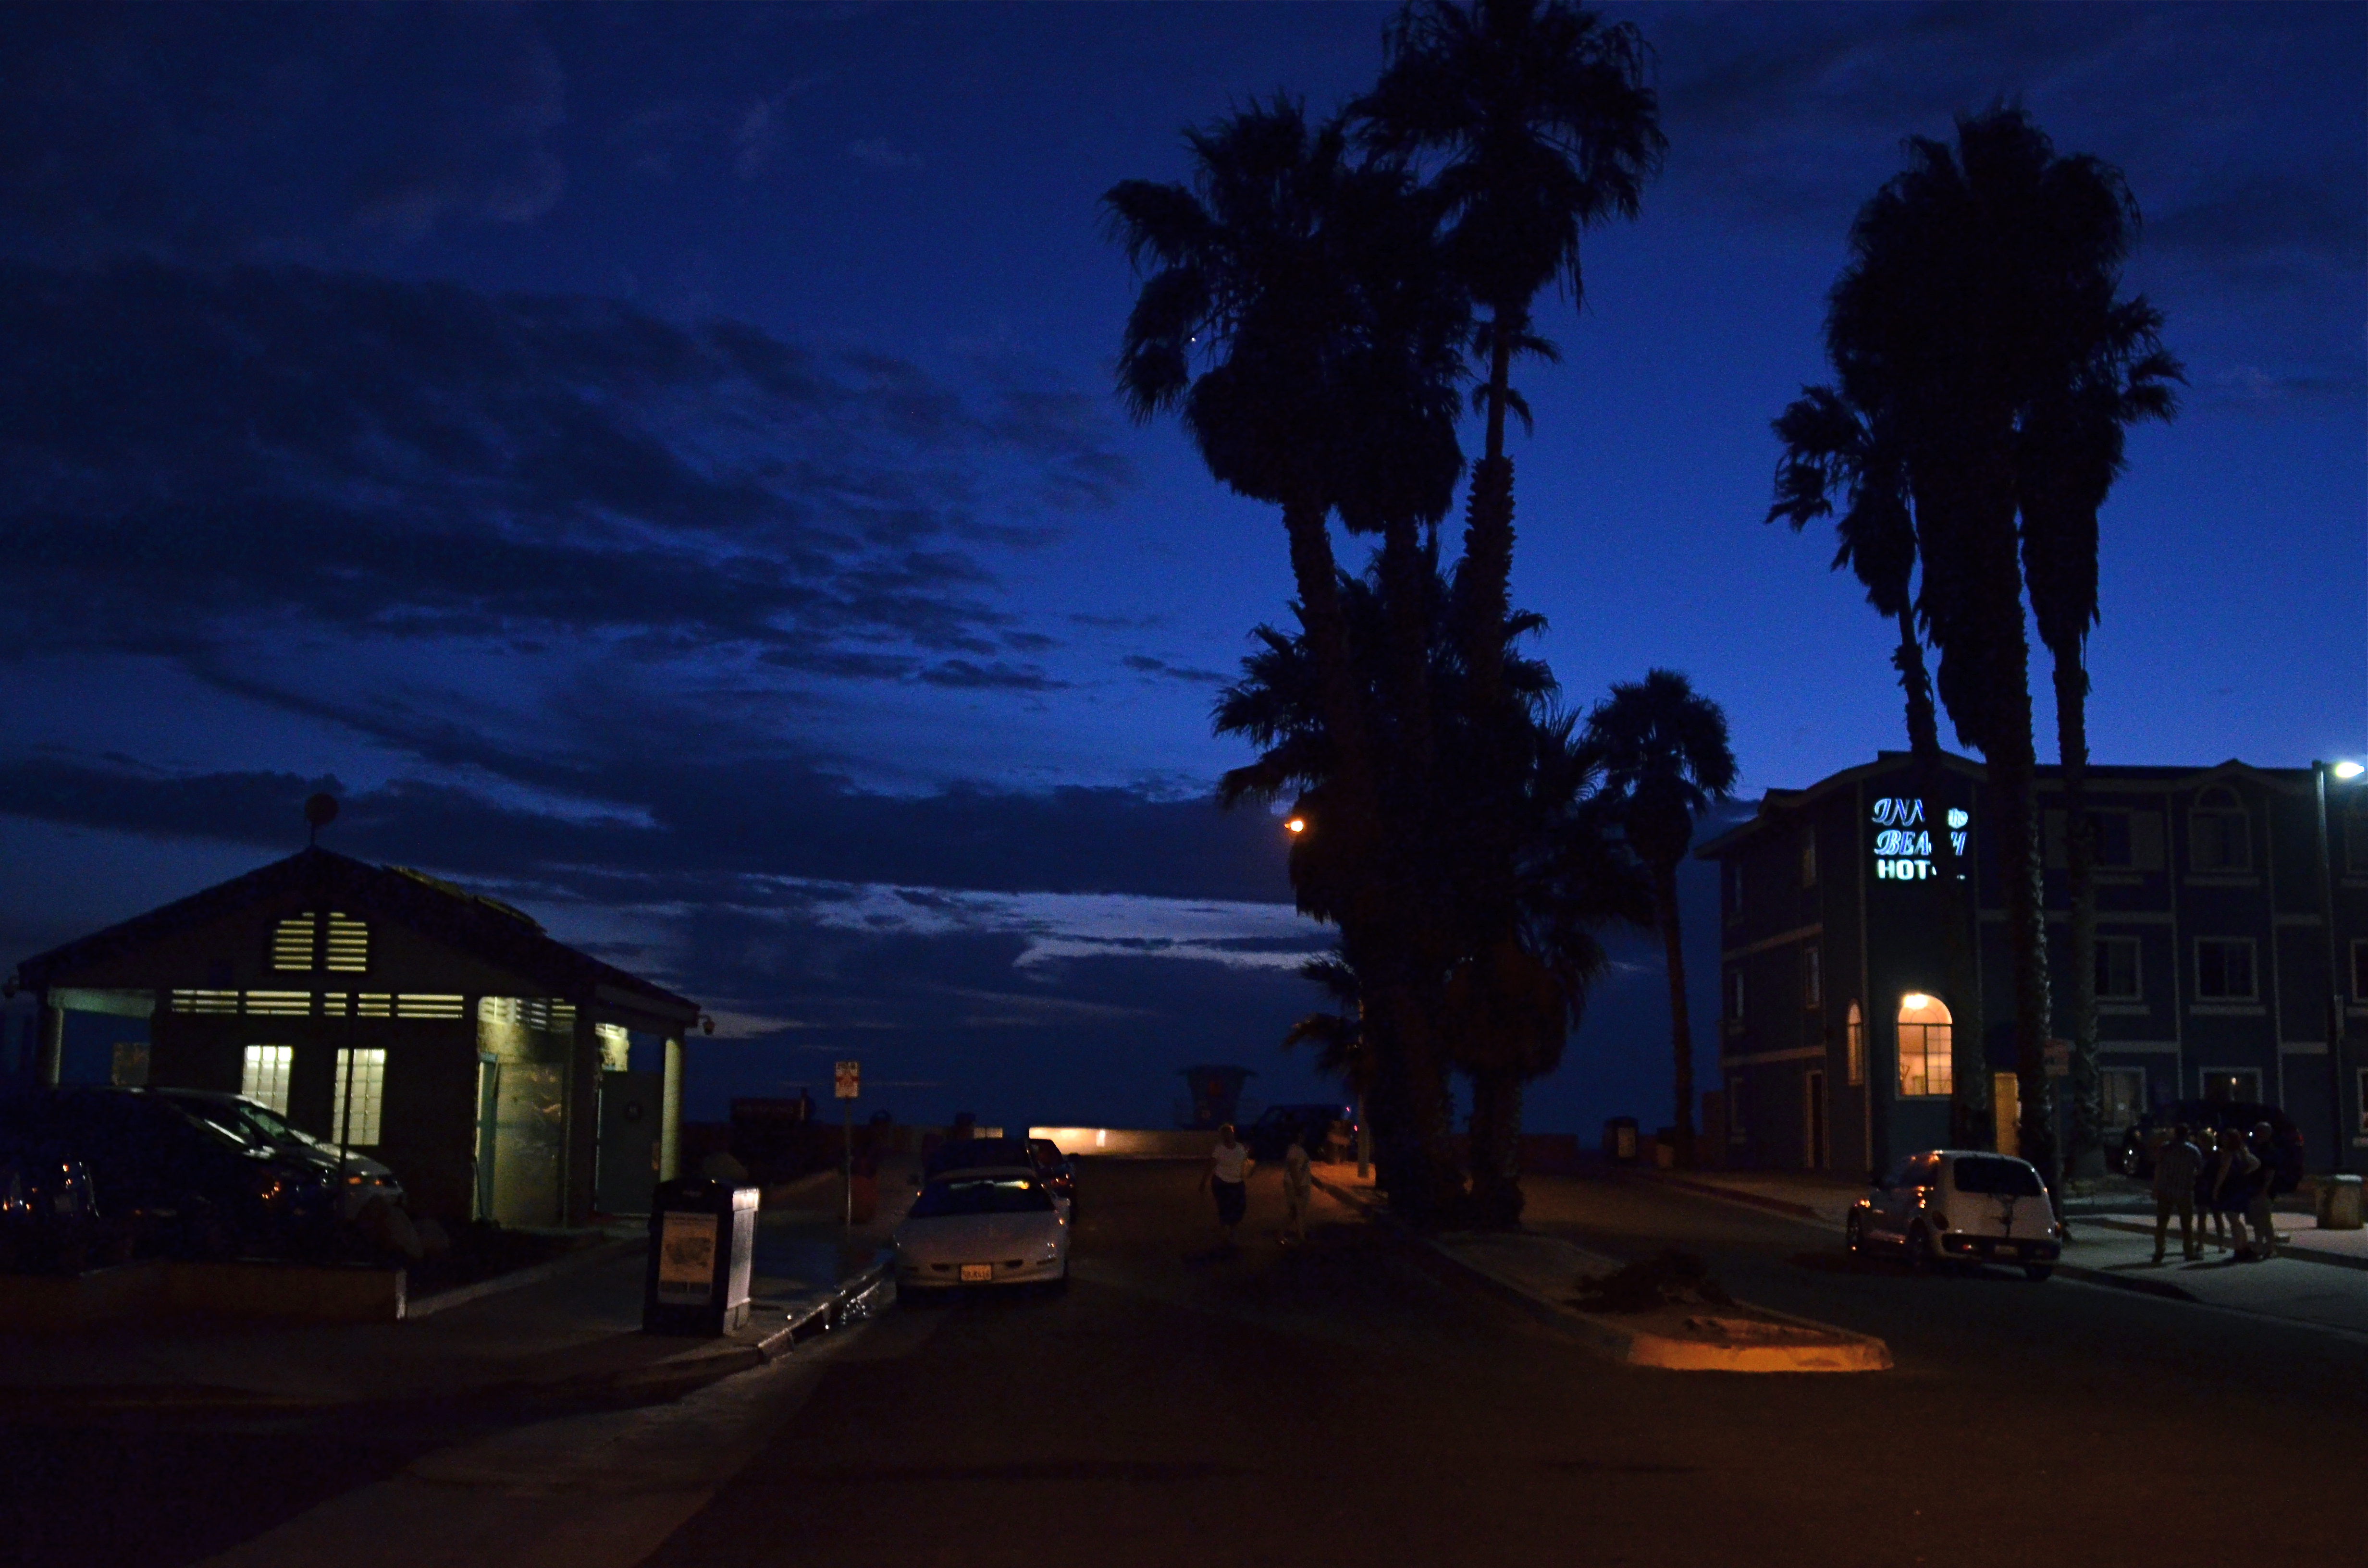
Here Comes The Night (2015). 1/40 sec., f/2.8, ISO 1600, 24mm.
That all changed after dessert, when we walked back onto the street that led down to the shore. I had a 24mm prime lens with me, which had been perfect for the wide-angle coastline stuff, but could also shoot wide open to f/2.8….fairly fast. As the night colors were already deepening, however, I realized that 2.8 was still going to mean shooting as slow a shutter speed as I could hand-hold and jacking the ISO up to a level that I normally tend to avoid. Those were the basic facts on the ground: now it was time to weigh the trade-offs.
Local traffic was swift enough for me to know that, even though I could hand-hold a shutter as slow as 1/15, there would be more than enough soft detail in a shot taken at f/2.8 without risking even more blurring from cars and walkers, so I settled at 1/40 and allowed the ISO to go to 1600 rather than lose the shot entirely.
Obviously, a tripod-mounted time exposure would have delivered a much crisper, more detailed shot, especially at f/11 or above, but I had what I had. And if you’re stuck with the somewhat mushier texture of a wide aperture, you have to determine where you envision the real impact of the image you’re planning. Is it in the fine-tuned detail or the overall atmosphere? There will be times when just salvaging the feel outweighs sharpness as a consideration, and, for me, this was one of those times.
SAVING FACE
Looking West, 2016. A portrait shot with a Lensbaby Composer Pro, an effects lens with a moveable “sweet spot” of selective focus.
By MICHAEL PERKINS
THE CREATIVE USE OF SHARPNESS is one of the key techniques in photography. From the beginning of the medium, it’s been more or less conceded that not everything in an image needs to register at the same level of focus, that it can be manipulated to direct attention to the essence of a photograph. It’s always about telling the viewer to look here, ignore this, regard this as important.
This selective use of focus applies to the human face no less than to any other element in a composition. It’s strange that photography drew so strongly on painting in its early years without following the painter’s approach to portraits…..that is, that individual parts of a face can register in different degrees of sharpness, just like anything else in the frame. From the earliest days of photo-portraiture, there seems to have been an effort to show the entire face in very tight focus, de-emphasizing backgrounds by hazing them into a soft blur. It took a while before photography saw itself as a separate art, and thus this “always” rule only became a “sometimes” rule over a protracted period of time.
The Pictorialism fetish of the early 20th century, which avidly imitated the look of paintings, went completely the other direction, generating portraits that were almost uniformly soft, as if shot through gauze, or, you guessed it, painted on canvas. In recent years, shooters have begun a new turn toward a kind of middle stance, with the selective use of sharpness in specific parts of a face, say an eye or a mouth. It’s more subtle than the uniform crispness of olden days, and affords shooters a wider range of expression in portraits.
Some of this has been driven by technology, as in the case of the Lensbaby lenses, which often have a tack-sharp “sweet spot” at their center, with everything else in the frame fanning outward to a feathery blur. Additionally, certain Lensbabies, like the Composer Pro, are mounted on a kind of ball turret, allowing the user to rotate the center of the lens to place the sweet spot wherever in the image he/she wants. This makes it possible, as in the above shot, for parts of objects that are all in the same focal plane to be captured at varying degrees of sharpness. Note that, while all of the woman’s face is the same distance from the camera, only her eyes and the right side of her face are truly sharp. This dreamlike quality has become popular with a new breed of portraitists, and, indeed, there are already wedding photographers who advertise that they do entire events exclusively with these kinds of lenses.
The face is a composition element, and, as such, benefits from a flexible approach to focus. One man’s blur is another man’s beautification.
THE GENTLE WELCOME
By MICHAEL PERKINS
But soft! What light through yonder window breaks? —Shakespeare
OKAY. AS IT TURNS OUT, IN THE ABOVE LINE, ROMEO WAS ACTUALLY RHAPSODIZING about his main squeeze, rather than ideal photographic conditions. Still, I often think of the quote when a sudden shaft of gold explodes from behind a cloud or a sunset lengthens shadows, just so. I have lots of But, soft! moments as a photographer, since light is the first shaper of the image, the one element that defines the terms of engagement.
Selective focus on the cheap: image made with the economical Lensbaby Spark lens. 1/40 sec., f/5.6, ISO 100, 50mm.
After light, for me, comes focus. Where it hits, where it peaks, where it falls off, and how all these aspects shape a composition. Soft or selective focus especially seems more intimate to me, a gentle welcome to share something special between picture and viewer. In recent years, focus has become almost as fine-tune-able as light itself, with the introduction of new, affordable alternatives to expensive “tilt-shift” lenses, which allow the selective blurring of elements within the frame. For example, the revolutionary Lensbaby products are now helping shooters make their own choices on where the focal “sweet spot” should occur in a picture, and at a fraction of the cost of a true tilt-shift. It’s a fiscal shortcut that makes it possible for almost anyone to learn how to create this effect.
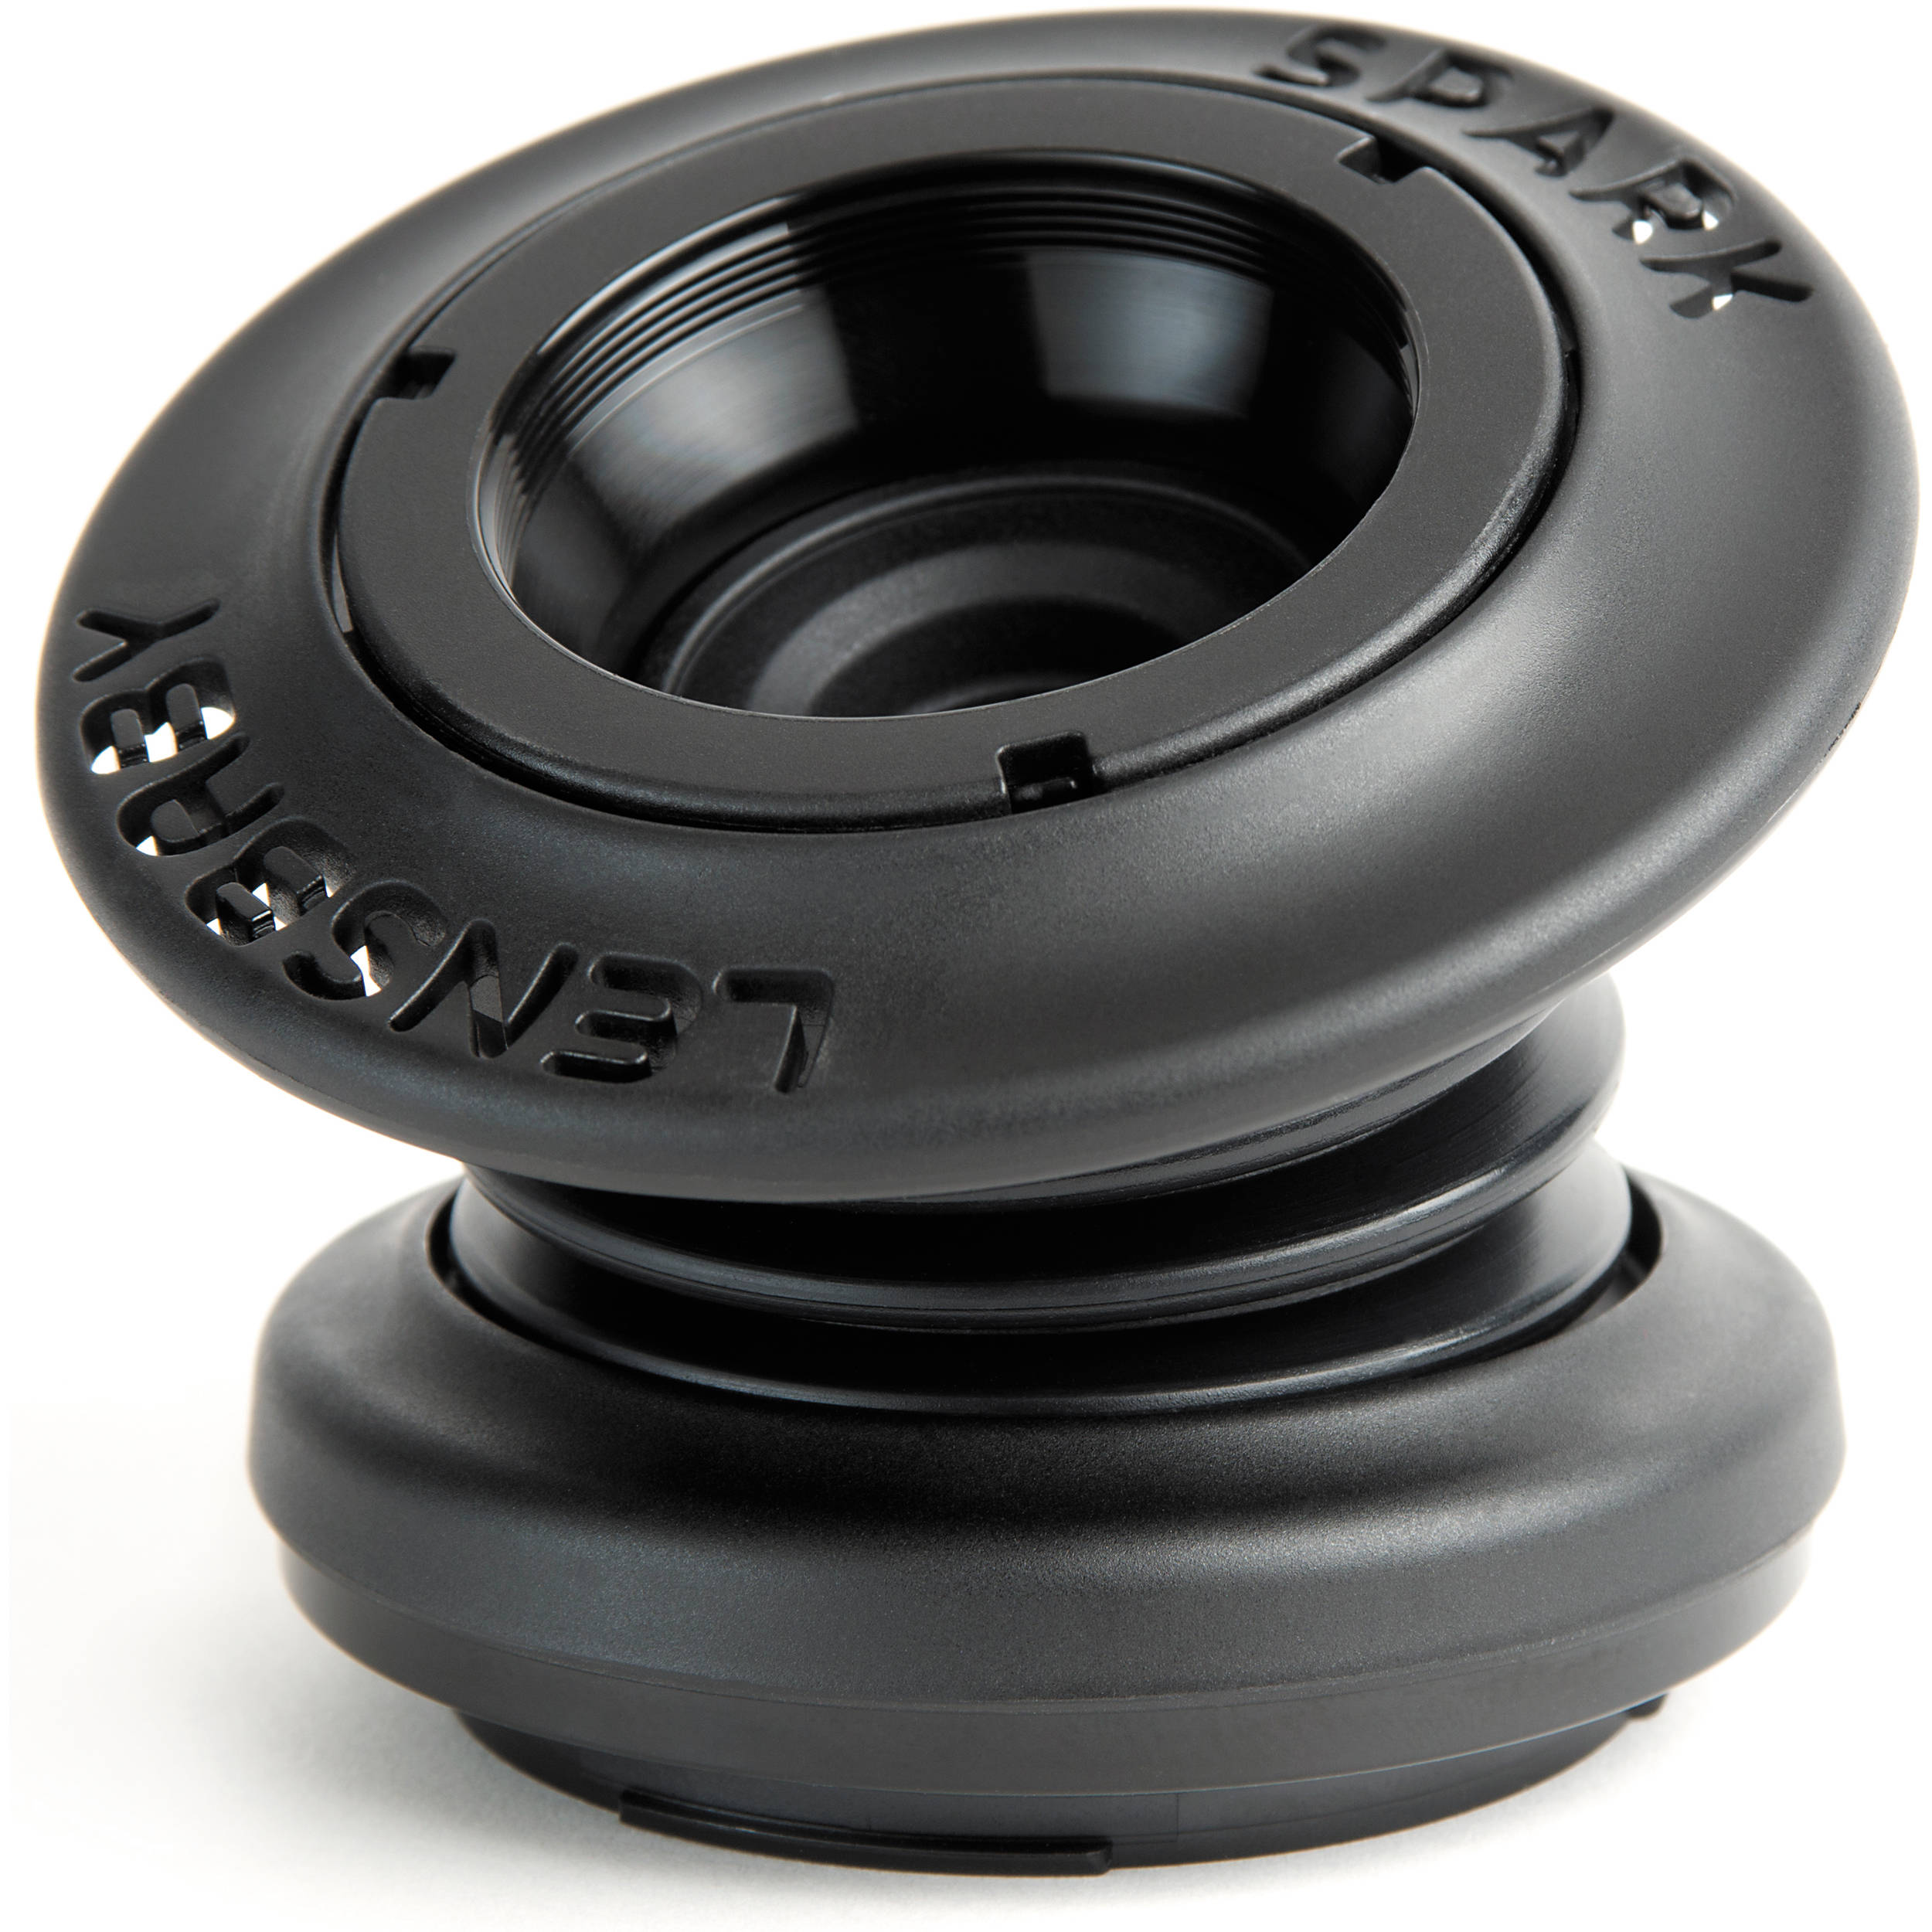
Focus on the Lensbaby Spark is achieved by squeezing the lens bellows until focus registers wherever you want to place it.
Some Lensbabies can run to several hundred dollars and have precise systems for dialing in the part of a photograph that will, through sharp focus, attract optimum attention to a subject, gently blurring the image on all sides around that point. However, for those with steady fingers and shallow pockets, the company’s gateway drug, coming in at around $90, is the Lensbaby Spark, a springy bellows lens that snaps onto your DSLR in place of a regular lens and can be compressed around the edges to place the focal sweet spot wherever you want it.
The Spark takes more muscle control and practice than the more mechanical Lensbaby models, but it’s a thrifty way to see if this kind of imaging is for you. Just squeeze the fixed f/5.6, 50mm lens until the image is sharp at the place you want it, and snap. Some DSLRs allow the Spark to be used on aperture priority, but for most of us, it’s manual all the way, with a lot of trial-and-error until you develop a feel for the process. The company also sells several insert cups so that you can choose different apertures. Pop one f-stop out, pop another one in.
For those of you who like to custom-sculpt focus and light, the gauzy, intimate effect of the Lensbaby will in fact be a gentle welcome. Finally, it’s one more component that could be either toy or tool. Your shots, your choice.
UP CLOSE AND POISONAL
Gee, this 300mm telephoto shot has it all. Terminal mushiness, hazy washout, crappy contrast. Who could ask for anything more? You could.
By MICHAEL PERKINS
THERE MAY BE A STATISTICAL TABLE SOMEWHERE that breaks down the percentage of photographers who use telephoto lenses consistently versus those who only strap one on for special occasions, but I have never seen one. Of course, I’ve never seen a three-toed sloth either, and I’m sure they exist. Fact is, there are always enough telephoto newbies (or “occasional-bies”) out there to guarantee that many of us make some pretty elemental mistakes with them, and come home with fewer jewels than we hoped for. I should know, since I have produced many such “C-minus” frames, like the image seen above. For a better understanding of everything I did wrong here, read on.
If telephotos just had to deliver magnification, and otherwise worked the same as standard lenses, they wouldn’t produce so many problems. In fact, though, they need to be used in several very different ways. For one thing, zooming in exponentially increases not only the chance of camera shake but the visible results of camera shake. A little bit of tremble at 35mm may go undetected, with little discernible effect on sharpness, while the very same amount of shake at 300mm or above creates a mathematically greater amount of instability, rendering everything soft and mushy.
This means that handheld shots at the longer focal lengths are fundamentally harder to do. Solutions can include faster shutter speeds, but that cuts light at apertures of f/3.5 and smaller, where light is already diminished. You might get around that with a higher ISO, which may not produce acceptable noise on a brightly lit day, but you must experiment to see. If you simply must have longer exposures, you’re pretty much onto a tripod, and, if workable, a cable release or wireless remote to guarantee that even your finger on the shutter doesn’t create a tremor. Remember, you’re talking about very minor amounts of movement, but they’re all magnified many times by the lens.
Some people even believe that a DSLR’s process of swinging its internal mirror out of the way before the shutter fires can create enough vibration to ruin a shot at 400mm or further out. In such case, many cameras allow you to move the mirror a little earlier, so that it’s stopped twitching by the time the shutter opens. Lots of trial and error and home-bred calculus here.
One of the factors fouling many of my own telephoto shots comes from shooting at midday near major cities, adding both glare and pollution to the garbage your lens is trying to see through. Colors get washed out, lines get warped, sharpness goes bye-bye. For this, you might try shooting earlier, taking off your haze filters (’cause they cut light) and seeing if things come out clearer and prettier.
Telephotos are a fabulous tool, but like anything else you park in front of your camera, they introduce their own technical limits and challenges into the mix. Seldom can you get results by just swinging your subject into view and hitting the shutter. Get comfortable with that fact and you will find yourself taking home more keepers per batch.
WITHOUT A LEG TO STAND ON
A tripod night exposure that could have been a contender, had I truly been prepared.
By MICHAEL PERKINS
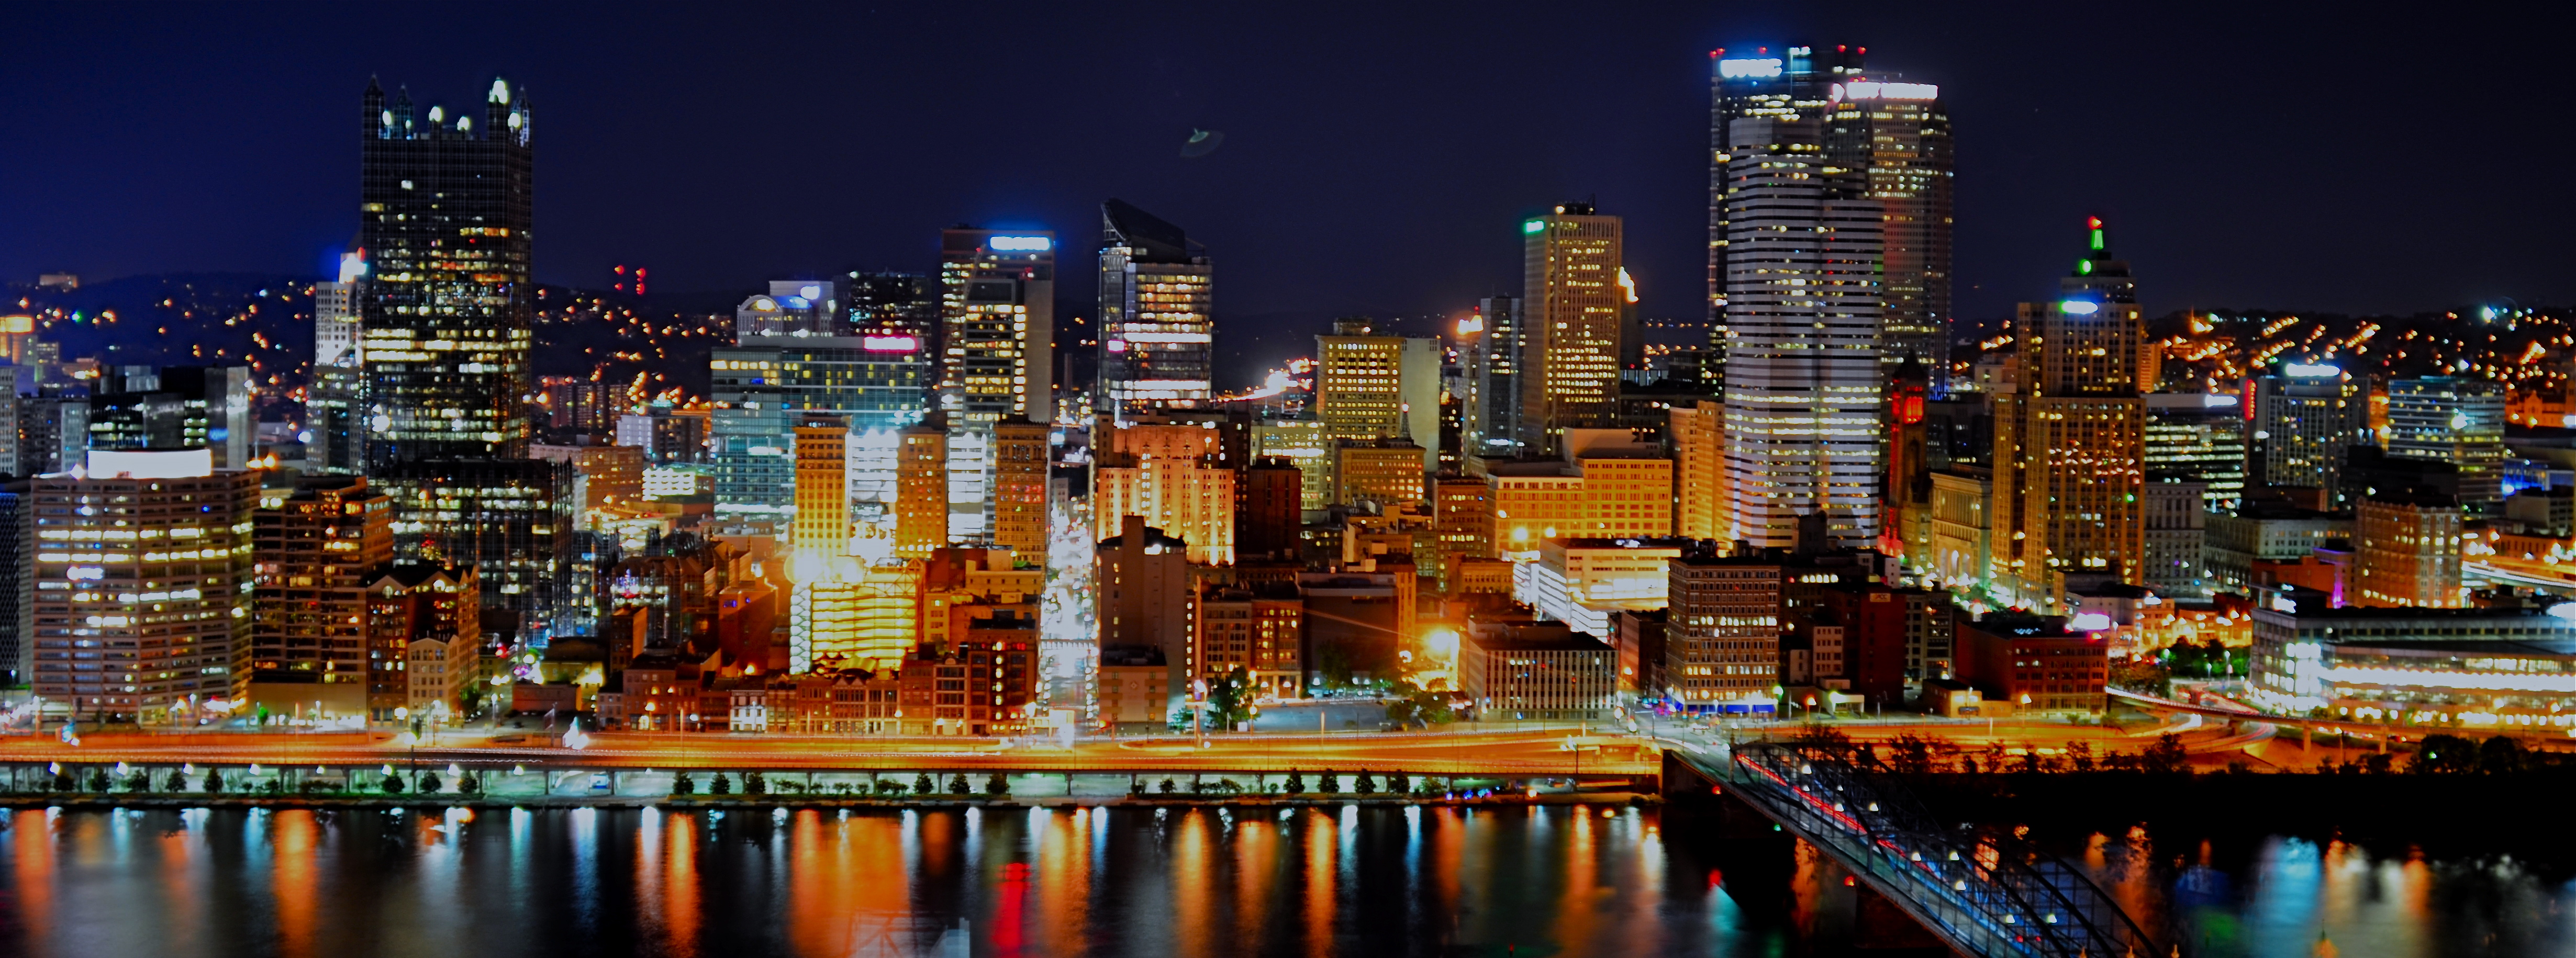
SHOOTING ON A TRIPOD IS OFTEN RECOMMENDED as the way to afford yourself the most stability in a long exposure. After all, few of us are robotic enough to hold a camera stock-still for anything below a third of a second, so it’s a no-brainer to park your camera on something that’s too inhuman to flinch. You can also take amazing stuff hand-held on shorter night exposures, so long as you (a) have a lens that will shoot around f/1.8 or wider and (b) you can live with the noise a higher ISO will engender.
So, yeah, tripods have their place, but they are not the only determinants in the success of a night-time shoot. And those other x-factors can severely compromise your results. There is the stability of the tripod itself, which isn’t a big sweat if you shelled out $900 for a carbon-fiber Gitzo Pan/Tilt GK, but might generate heartburn if you got something closer to a set of metallic popsicle sticks for $29 at Office Max. The shot above was taken using my own modest (cheap) rig atop Mount Washington across from downtown Pittsburgh, and a few of the healthier gusts threatened to take it and me on a quick lap around the riverfront. Some people buy sandbags. Some believe in the power of prayer. Your choice.
Another x-factor for ‘pod shots is the actual weather you’re shooting in, which will, let’s say, shape your enthusiasm for staying out long enough to get the perfect shot. The smaller your aperture, the longer the exposure. The more long exposures you take, the longer you, yourself, are “exposed”…to snow, sleet, and all that other stuff that mailmen laugh at. Again, referencing the above image, I was contending with freezing drizzle and a windbreaker that was way too thin for heroics. Did I cut my session short? i confess that I did.
I could also mention the nagging catcalls of the other people in my party, who wanted me to, in their profound words, “just take the damned picture” so they could partake of (a)a warm bar, (b) a cold beer, (c) a hot waitress. Result: a less than perfect capture of a fairly good skyline. A little over-exposed, washing out the color. A little mushy, since the selfsame over-exposure allowed the building lights to burn in, rendering them glow-y instead of pin sharp. I was able to fix some of the color deficiencies later, but this is not a “greatest hits” image by any stretch.
Tripods can be lifesavers, but you must learn to maximize their effectiveness just like any other piece of camera equipment. If you’re going to go to a buncha trouble to get a shot, the final result should reflect all that effort, quality-wise.
THE FASTEST MAN ALIVE
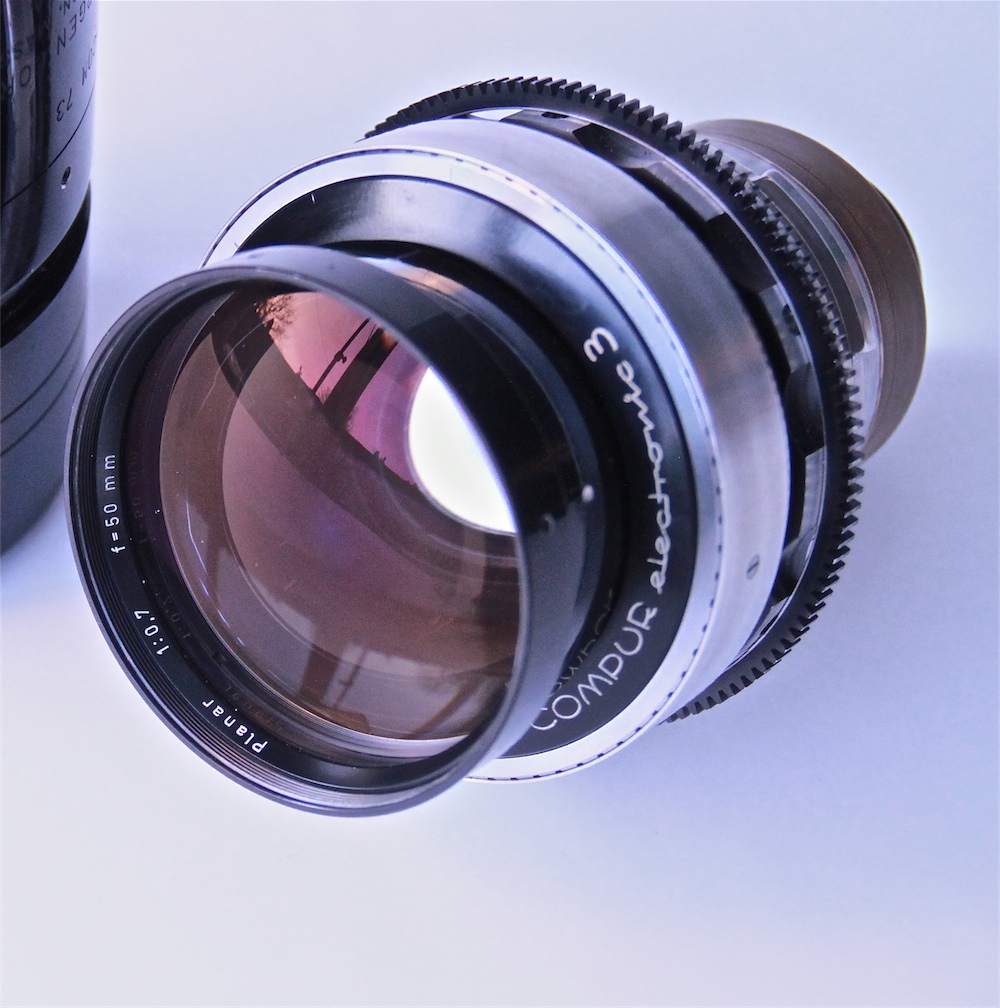
The Mutant: Stanley Kubrick’s unbeatable light sucker, the Zeiss 50mm f/0.7 lens.
By MICHAEL PERKINS
IF THE SUPREME BEING IS CORRECTLY QUOTED, as having proclaimed, at the dawn of time, “Let There Be Light!”, then photographers, since the beginning of their own Creation, have more specifically pleaded, “let there be more light.” Indeed, incredible leaps in imaging technology over the last two centuries have taken us from ten-minute daguerreotype exposures to sharp, bright images snapped in thousandths of a second, and, still, the fight for more light and faster lenses continues unabated.
Between here and there, a few photographers have made their mark by pushing this envelope a little farther than the rest of us. One of them, however, tore that envelope to shreds, and his achievement in this area has never been surpassed, or even matched, by any of his peers.
That man’s name is Stanley Kubrick.
Before he began his directing career in the early 1950’s, Kubrick had years of experience under his belt as the youngest staff photographer for Look magazine, second only to Life as the premier photo-dominant national news weekly. Years before he wielded a Leica IIIf on that job, he had spent his early childhood learning the ins-and-outs of his own Graflex, one of the monster machines that battle-hardened newspaper photogs lugged to crime scenes and fires in dozens of “B” movies (stop the press). By his early ’30’s, Kubrick had amassed a personal collection of lenses and cameras that he would continue to modify and alter for use in his feature films, and by the ’70’s, he was ready to take a giant step attaining a kind of nirvana in the use of available light.
Hey, anyone got a match? The Zeiss delivers Kubrick’s candles-only visions for Barry Lyndon (1975).
As he prepared to adapt William Thackeray’s novel of 19th karmic komeuppance, Barry Lyndon, to the screen in 1974, Kubrick pondered filming the interior scenes of the story’s powdered-wig salons with no lighting whatever beyond that of candle power. Now, we’re not using the term “candle power” to refer to the measurement of light. No, I’m referring here to actual candles, and nothing else. To do so, he would have to have gear that simply did not exist in the gear closets of any major studio, or, in fact, the entire movie industry. To become the fastest man alive, lens-wise, he would have to go shopping at the same place NASA shopped.
Most commercial lenses available at the time opened no wider than around f/1.4, enough to give you and me more than enough light-gathering power for dark times around the house but far too slow to operate on a movie set without a huge battery of kliegs and floods to boost the illumination. However, Kubrick had heard that NASA had developed a lens specifically designed to allow scientists to get sharp images on the dark side of the moon, a Zeiss 50mm with a focal length of …gasp…f/0.7. Zeiss made just ten of these mutants. Six went to Houston. The company kept another one for a rainy day. And the remaining three were gobbled up by Stanley Kubrick.
Taking the aforementioned benchmark of f/1.4 as the 1970’s yardstick for “man, that’s fast”, the ability to open up to f/0.7 represented a quantum leap of at least two-and-a-half stops of extra light (check my math), allowing Kubrick’s film to be, absolutely, the only cinema feature to date to be lit exclusively by ambient light. Of course, it wasn’t all sugar cookies and Kool-Aid, since that also meant working in a range of focus so shallow that only selective parts of actors’ faces were in sharp registration at any given time, giving the players the extra problem of remembering how little their heads could move without screwing up the shot. It was the only thing that could force even more re-takes than Kubrick’s renowned mania for perfection. We’re not talking a fun shoot here.
The resulting, soft, soft, soffffft look of Barry Lyndon is intimate, delicate, and absolutely gorgeous (click the image for a slightly larger version). Practical? Not so much, but for the specific mood of that material, spot on. Critics of the final film either hailed the technique as a new benchmark or sniggered at what they regarded as a showy gimmick. Of course, audiences avoided the film like Jim Carrey fleeing vaccines, so the entire thing remains, for many, a kind of grandiose Guiness-book stunt. Still, while ever-faster lenses and films eventually allowed directors much greater freedom, Uncle Stanley’s claim as fastest gun still merits its place in the hall of frame.
As a strange post-script to the story, several companies have recently boasted that you, too, might rent the same kind of hack-hybrid that Kubrick had fashioned to support the light-sponging Zeiss glass, their ads suggesting that you might secure the needed funding with the sale of several of your more expendable internal organs. Cheap at the price. The Lord got all the light he wanted pretty much on demand. The rest of us have to curse the darkness and, well, light another candle.
MAKING LIGHT OF THE SITUATION
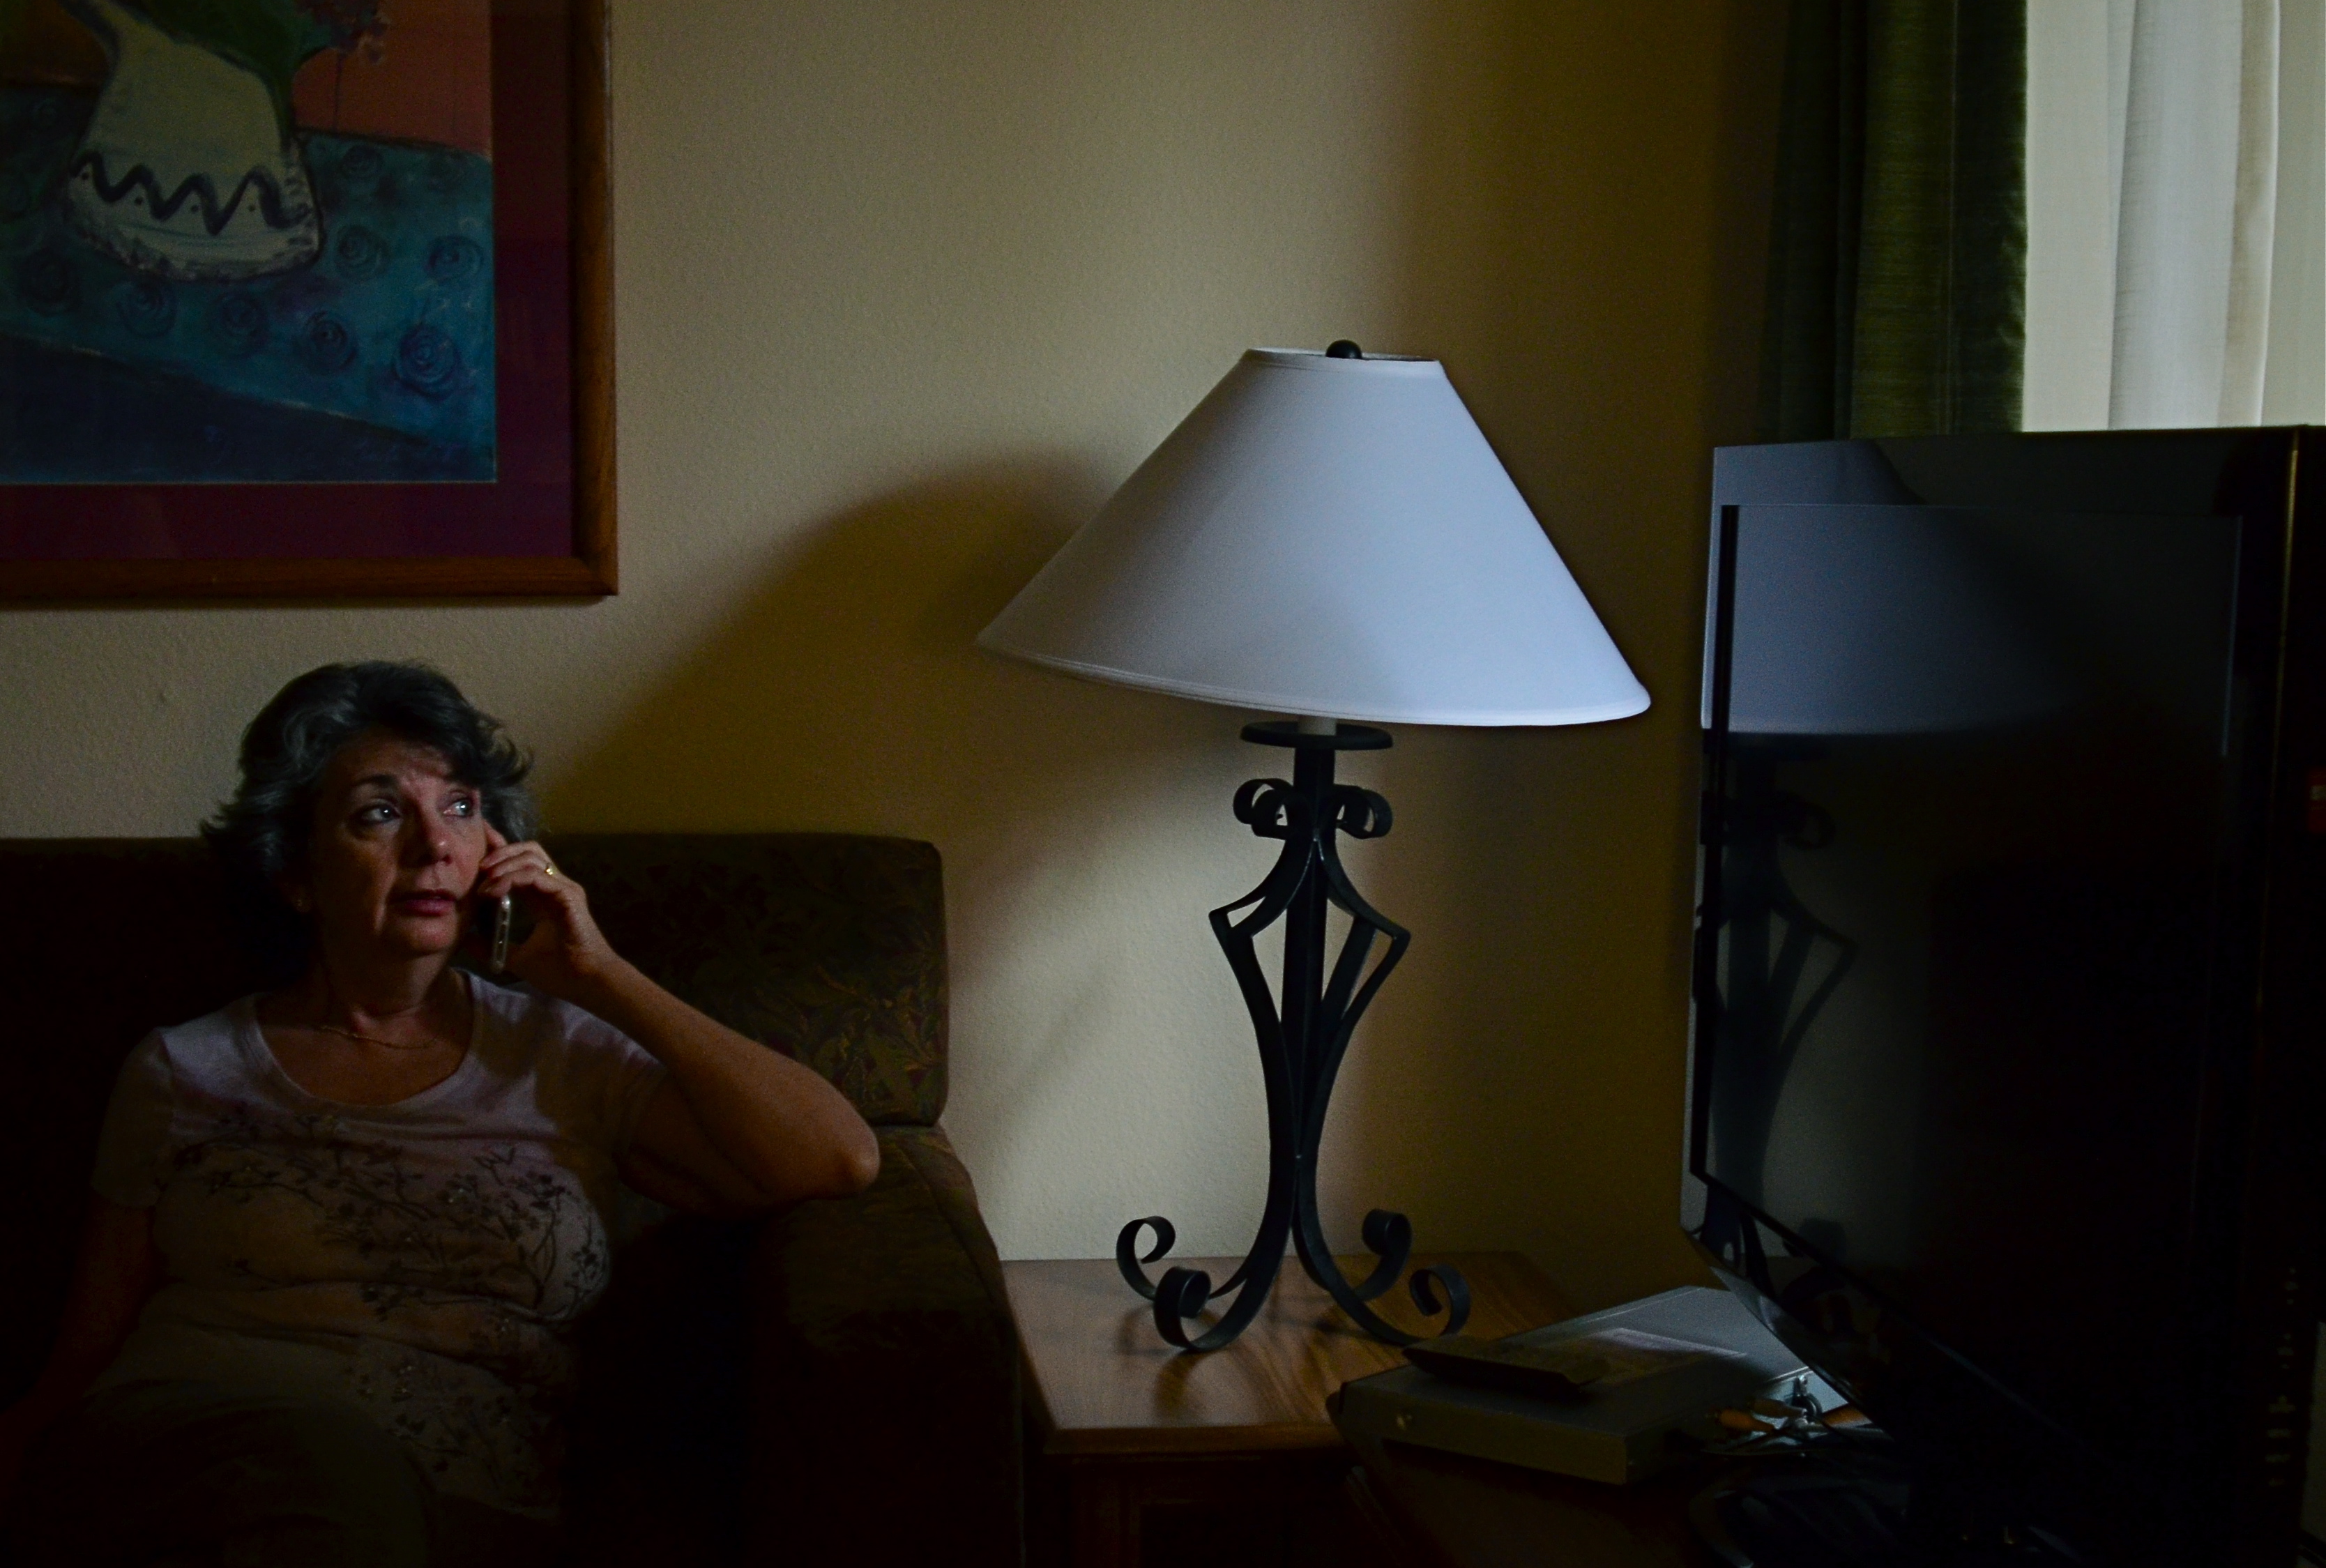
One lady, one source of light, one shot: 1/40 sec., f/1.8, ISO 640, 35mm.
BY MICHAEL PERKINS
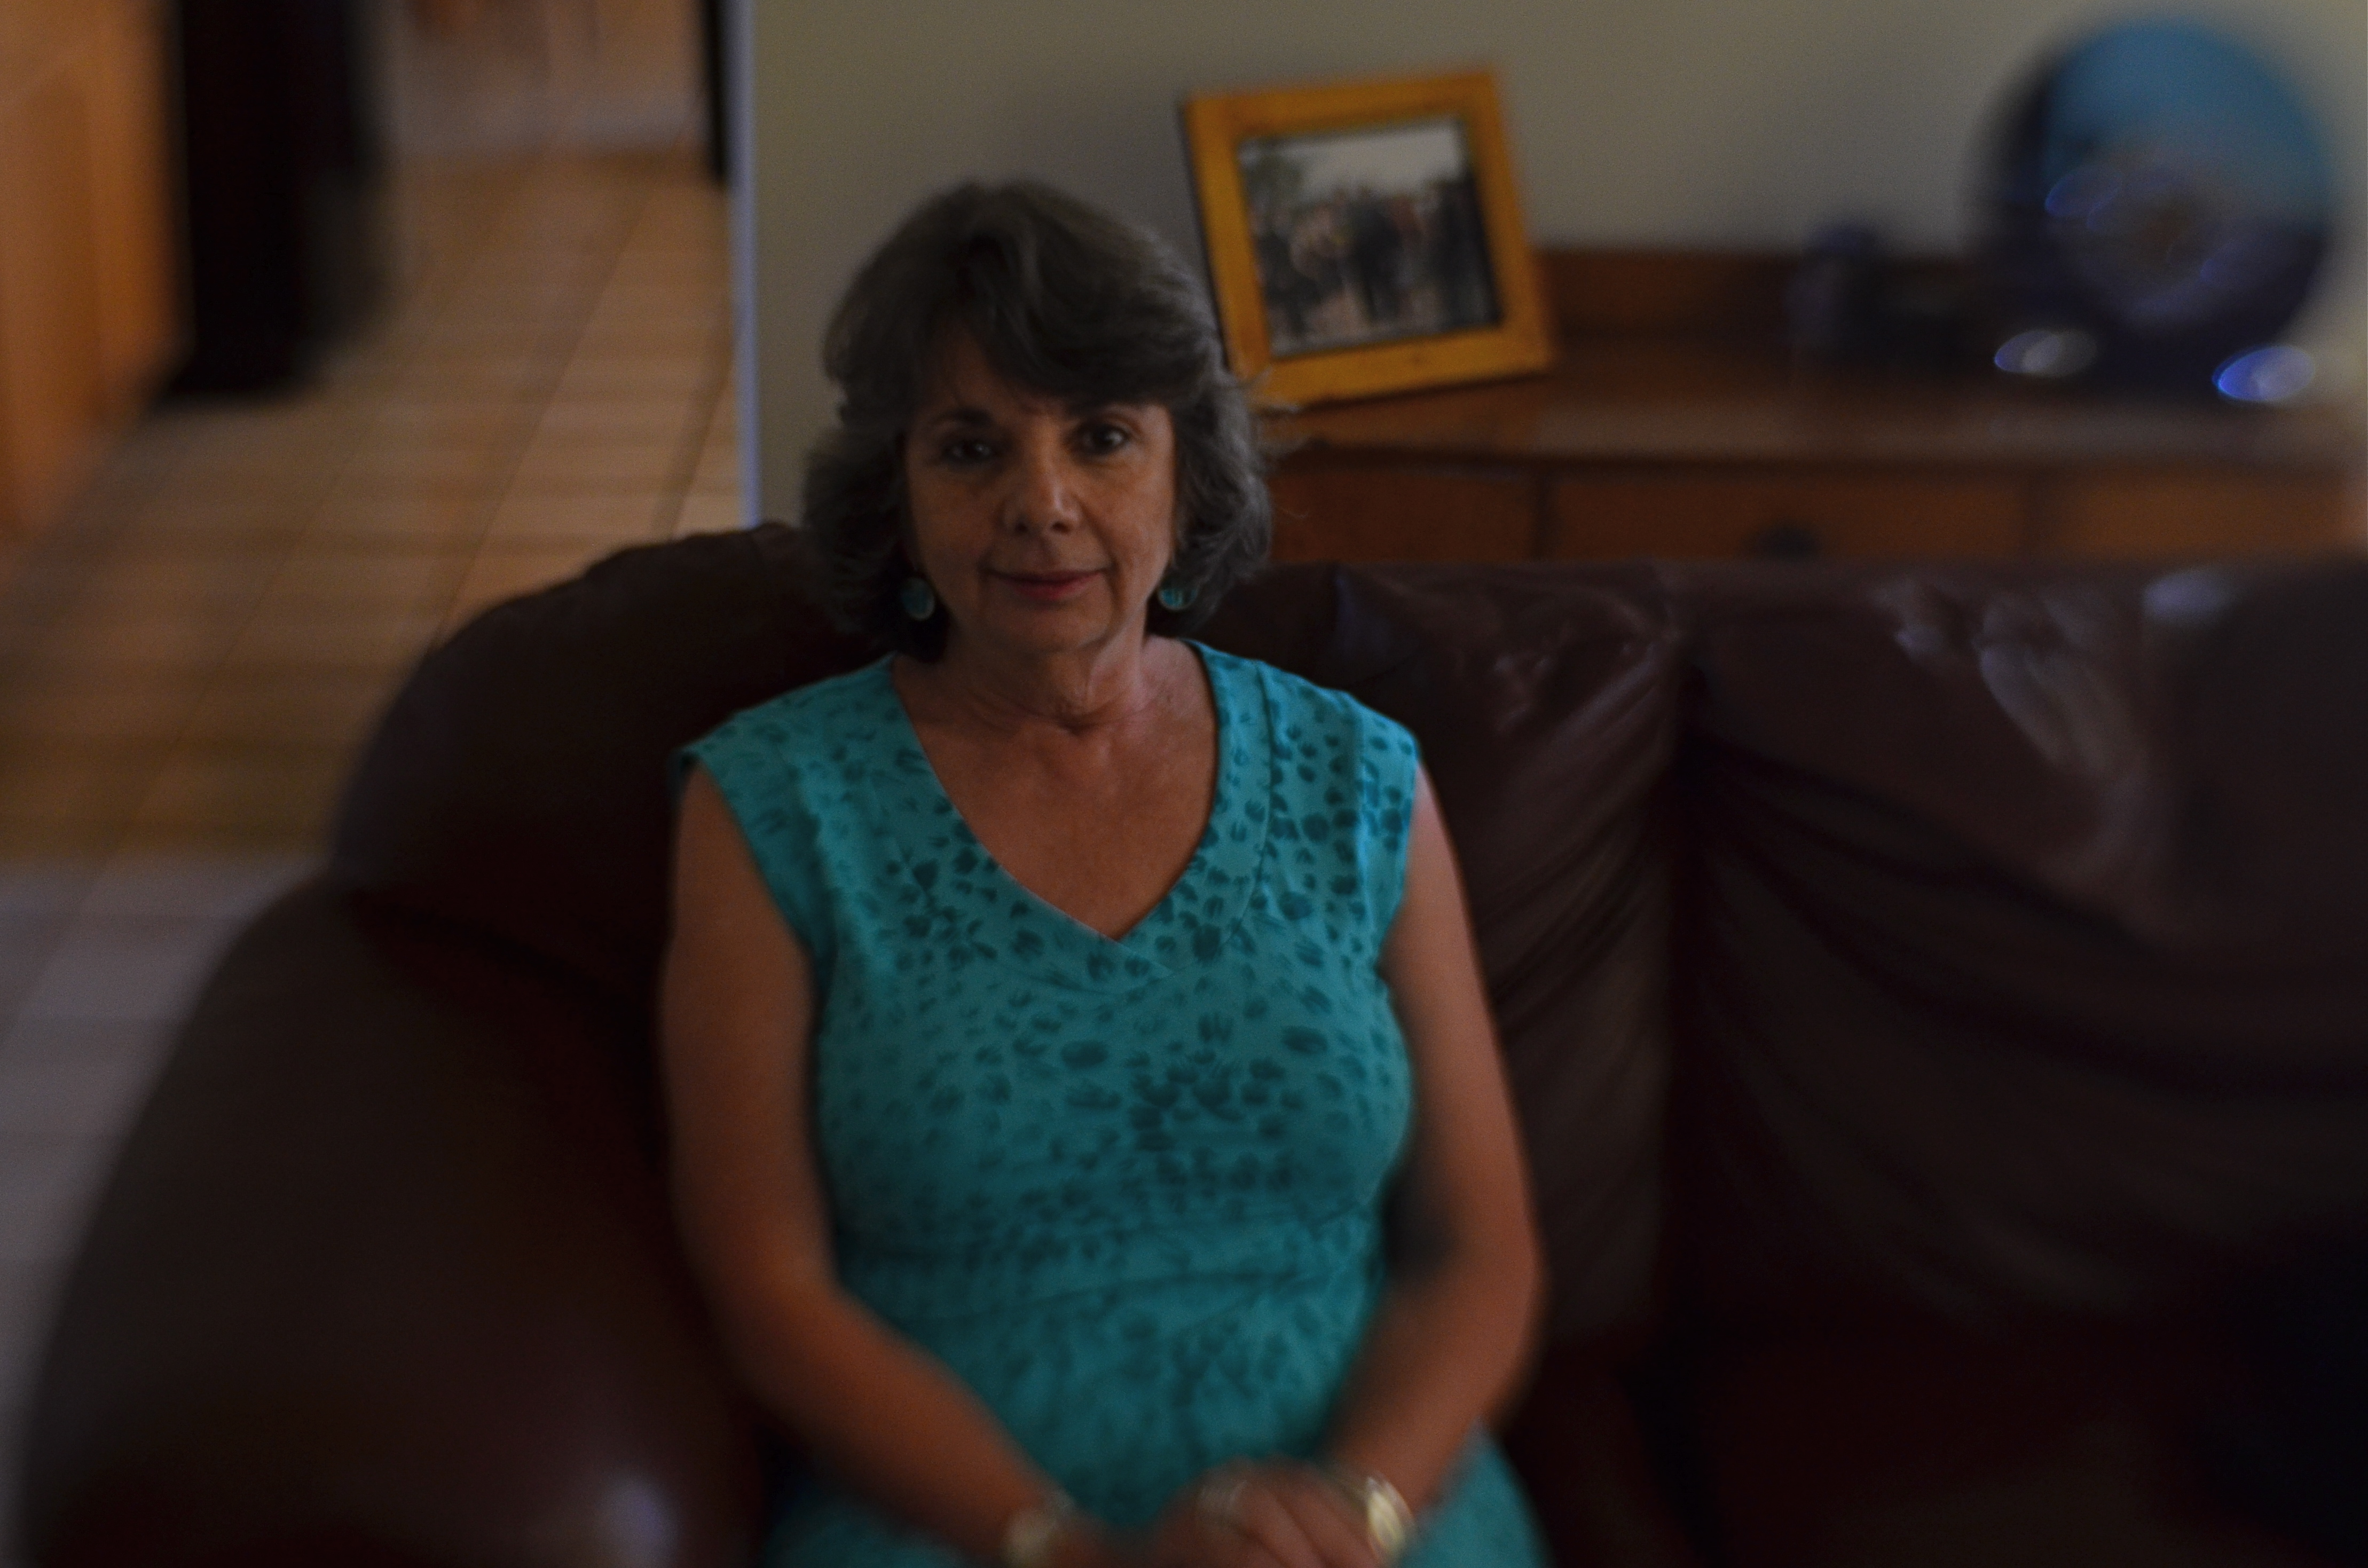
IN PORTRAITS, PHOTOGRAPHERS SOMETIMES HAVE TO SUBSTITUTE INTIMACY FOR TECHNICAL PERFECTION. We understandably want to come as near as possible to meticulously modulated light in telling the story of a face, and so we try to ride the line between natural, if inadequate light, and light which is shaped so much that we dull the naturalness of the moment.
It’s a maddening tug of war. If we don’t intervene, we might make an image which is less than flattering, or, worse, unfit for publication. If we nib in too much, we get a result whose beauty can border on the sterile. I find that, more often than not, I lean toward the technically limited side, choosing to err in favor of a studied snapshot rather than a polished studio look. If the face I’m shooting is giving me something real, I worry more about throwing a rock into that perfect pond with extra tinkering.
If my subject is personally close to me, I find it harder, not easier, to direct them, lest the quality I’m seeing in their natural state be replaced by a distancing self-consciousness. It puts me in the strange position of having to wait until the situation all but gifts me with the picture, as adding even one more technical element can endanger the feel of the thing. It’s times like this that I’m jammed nose-up against the limits of my own technical ability, and I feel that a less challenged shooter would preserve the delicacy of the situation and still bring home a better photograph.
In the above frame, the window light is strong enough to saturate the central part of my wife’s face, dumping over three-fourths of her into deep shadow. But it’s a portrait. How much more do I need? Would a second source of light, and the additional detail it would deliver on the left side of her head be more “telling” or merely be brighter? I’m lucky enough in this instance for the angle of the window light to create a little twinkle in her eye, anchoring attention in the right place, but, even at a very wide aperture, I still have to crank ISO so far that the shot is grainy, with noise reduction just making the tones flatter. It’s the old trade-off. I’m getting the feel that I’m after, but I have to take the hit on the technical side.
Then there was the problem that Marian hates to have her picture taken. If she hadn’t been on the phone, she would already have been too aware of me, and then there goes the unguarded quality that I want. I can ask a model to “just give me one more” or earn her hourly rate by waiting while I experiment. With the Mrs., not so much.
Here’s what it comes down to: sometimes, you just have to shoot the damned thing.
RETURN OF THE POD PEOPLE
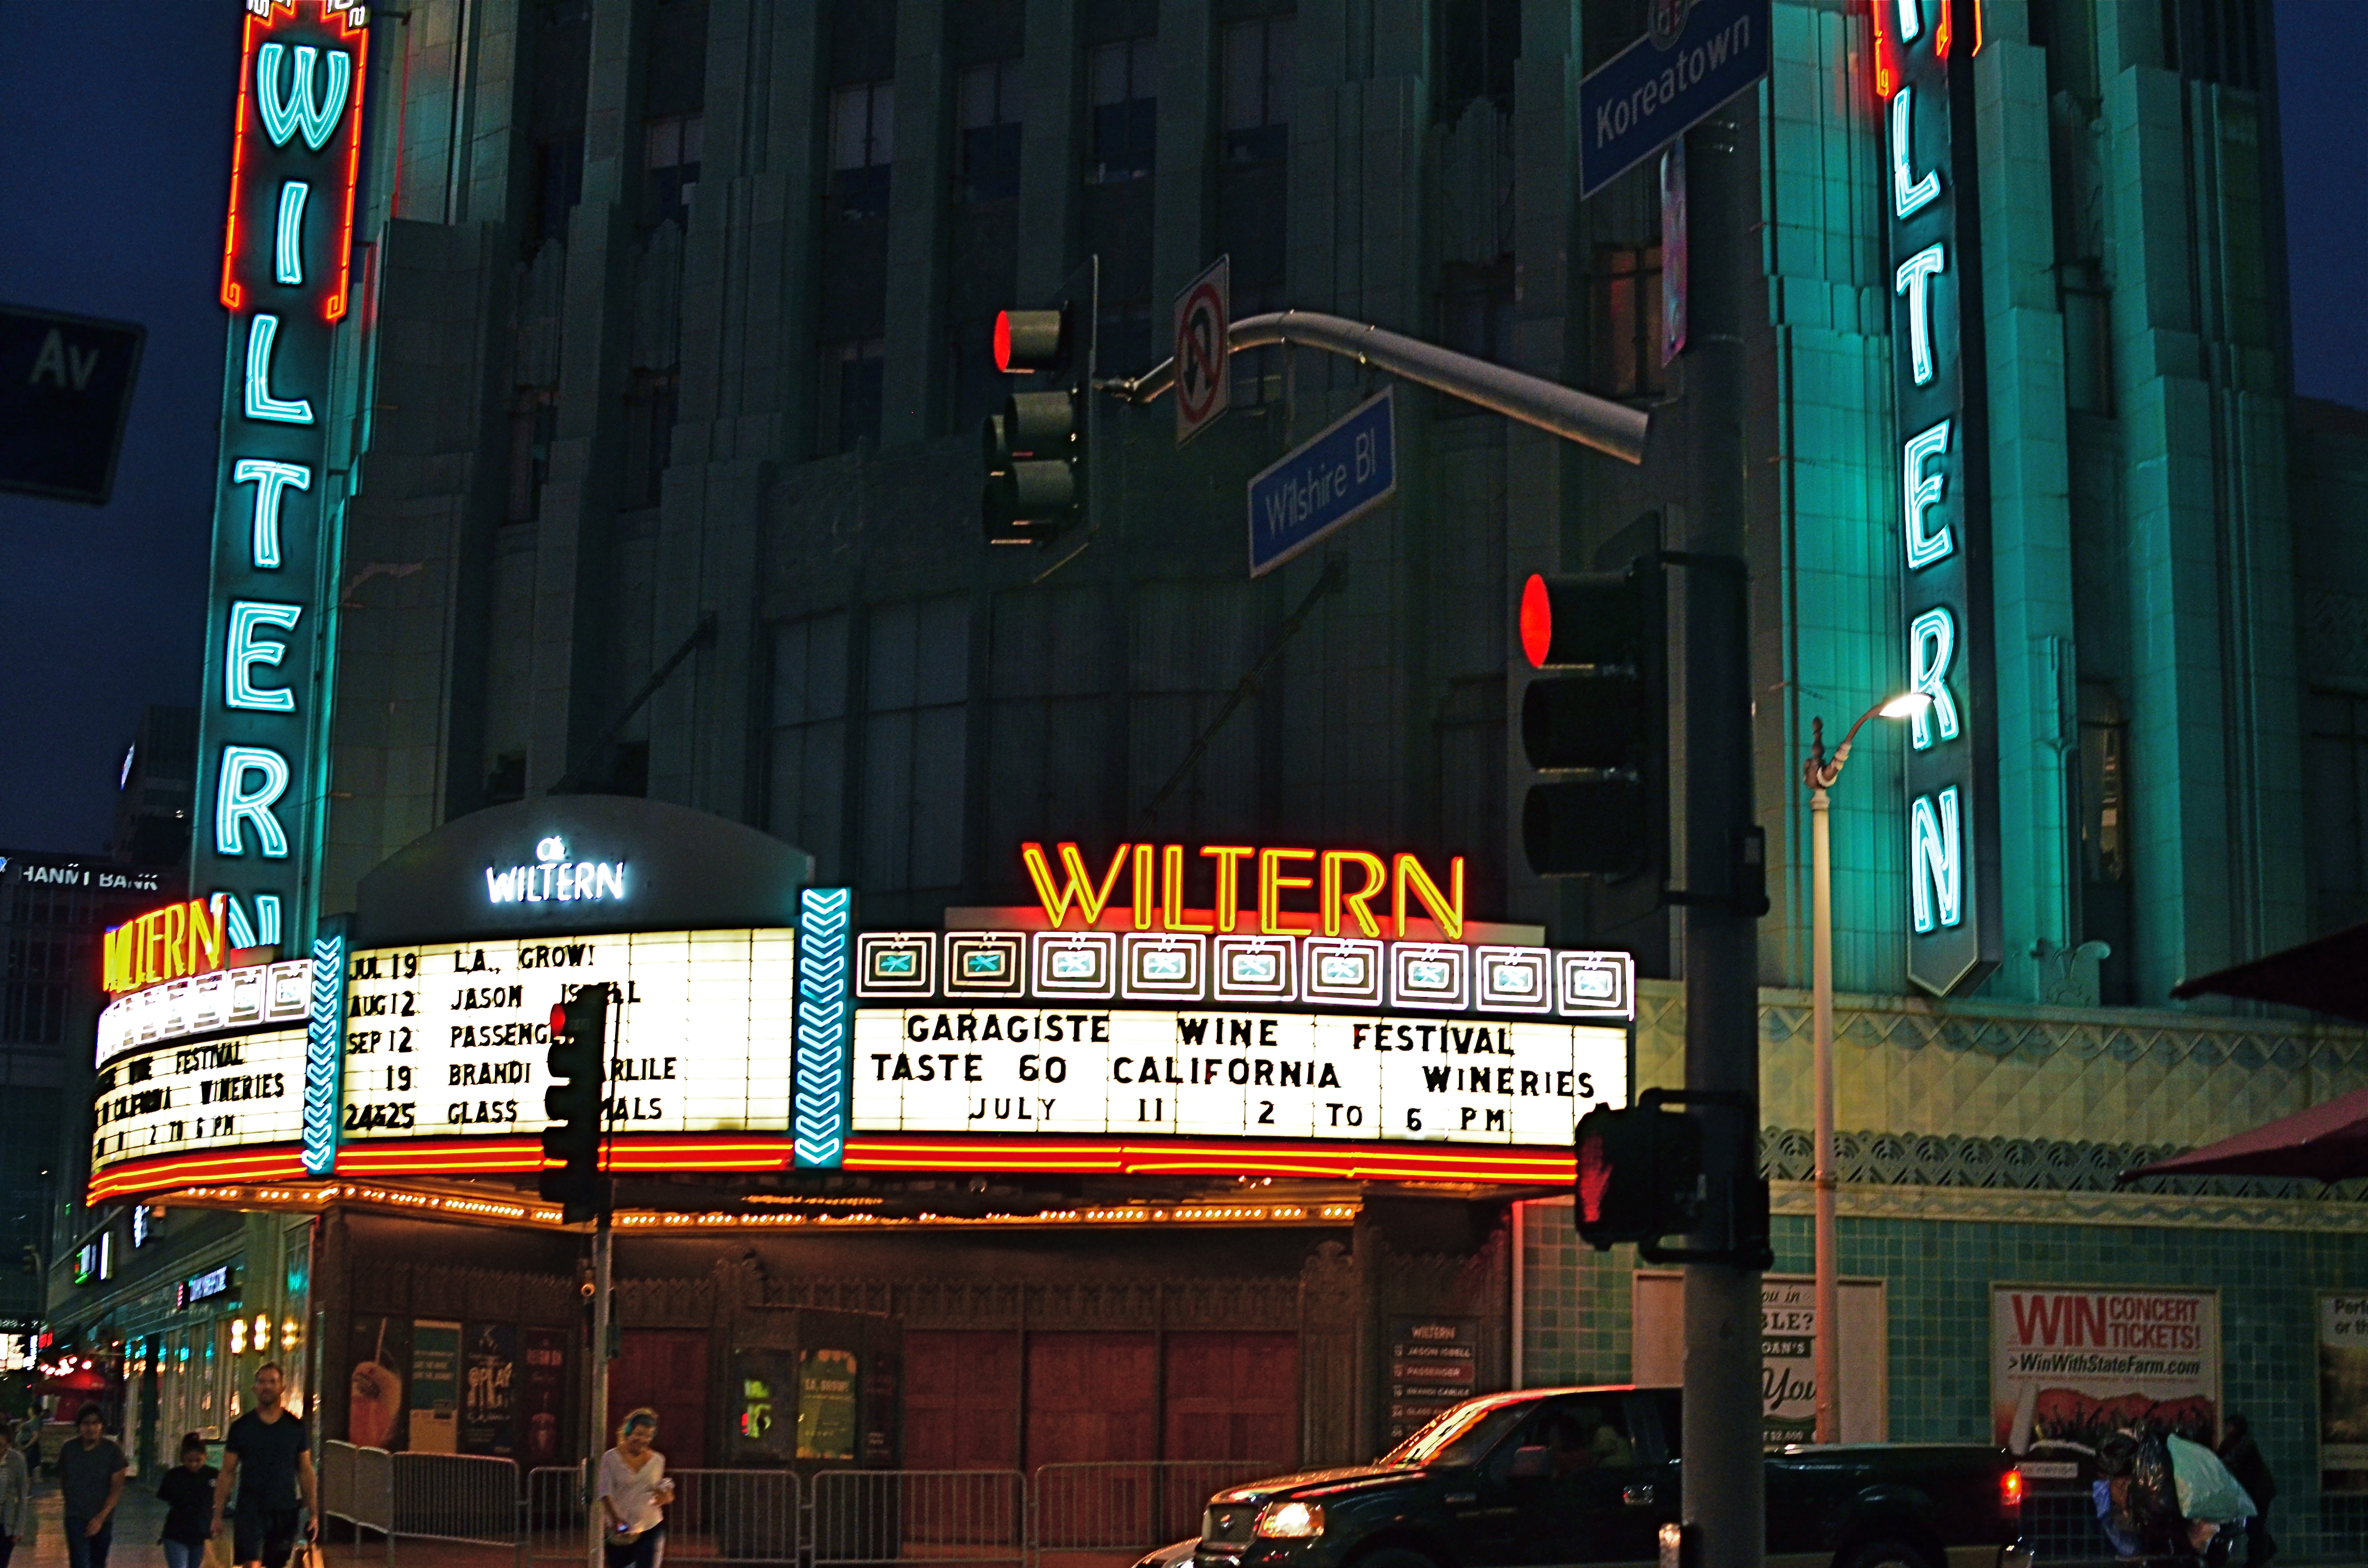
Wiltern On Wilshire, 2015. At f/3.5 and an ISO of 1000, this is an acceptably sharp hand-held exposure. Want the lights to be sharper? Might have to go tripod.
By MICHAEL PERKINS
I HAVE OCCASIONALLY SOUNDED WHAT, I ADMIT, IS A PREMATURE FUNERAL DIRGE for the lowly tripod, that balky, bulky, creaky throwback to the 19th century that continues to linger as an occasional, if fading, tool of the 21st. Part of this stems from the pure aggravation involved in trucking the things around, getting them locked and level, and praying that nothing from a stiff wind to an enraged gopher to a power-tripping mall cop will intervene to undo the entire rickety works. Hey, I’m not a hater, just a very reluctant fan.
One of the reasons I’ve mostly weaned myself from the pod is the ever-evolving speed of lenses and sensors in the digital era. This means scenes with less and less light can be captured with greater sharpness in short, hand-held exposures, albeit with a little more visual noise or grain. You can now shoot on a dark street at night, if your lens opens wide enough to keep your ISO as low as possible and if you can maintain a rock-steady grip on your camera at shutter speeds around 1/20 or so. And, for many cases, the results from this setup will be quite satisfactory.
However, we ain’t just about being satisfied, are we, mmmm?
Problem with a wide exposure and bright highlights (like the theatre marquee in the above shot) is that those elements will burn in and become diffuse, even in fast exposures, especially since your ISO setting is instructing your sensor to suck light like a maniac. As a result, instead of being sharp pinpoints of light, they will often turn soft and globby. If you can live with that, then go in peace and sin no more, my son.
However, if you really need to get those lights as sharp as you see them with your own eye, you might try doing a longer exposure at a smaller aperture, and that can mean dragging the pod down from the attic and doing it old-school. Good news is that you can now crank your ISO back down to minimum, so, yay, no noise atall, atall. You also might pick up some more contrast and detail within bright objects, like the horizontal lines on the above marquee. Bad news is, duh, you’re using a tripod. Hey, is that a mall cop I see running over here?
SWEETER, SHARPER
By MICHAEL PERKINS
AS SOME PHOTOGRAPHERS AGE, THERE IS A STRONG TEMPTATION to do more and more with less and less. For many, this manifests itself as a kind of divestiture, a relinquishing of toys. Maybe it’s just muscle fatigue, but, at some point in a shooter’s life, he or she makes a conscious decision to carry fewer hunks of gear into battle. Your approach to the work gets more complex, and, paradoxically, the mechanical doing of it gets more streamlined.
This is where the idea of a “go to” lens comes from, with photogs deciding that, yes, they can do nearly everything with the same hunk of glass. It becomes a bragging point: I shoot everything with a 24mm prime. I always use a 35. I don’t carry a big bag of stuff around anymore. But here’s the great thing: even a single lens is actually several lenses at once, since its optical properties change dramatically depending on aperture. That’s why, if you’re trying to take more kinds of pictures with fewer lenses, it’s important to do some homework on all the different ways they see.

Everyone has an “go-to” aperture that they use more than any other. For me, it’s f/5.6.
One of the things it’s best to know about your lens is where its “sweet spot”, or optimum sharpness occurs across the aperture range. Turn on your trusty Google machine and you will find more opinions on how to determine this than there are recipes for apple pie, and that’s the tricky part. Optics are a science, to be sure, but they are also somewhat subjective. Translation: if it looks good to you, it’s good. So publishing a table that proves your argument on what “sharp” is to your satisfaction just picks a scab for someone else. You have to get away from the charts and do the field work. Shoot. Look. Compare.
The chart people believe, for example, that the sweet spot for a lens is always two f-stops less light than your maximum wide-open aperture, meaning that, say an f/1.8 prime would hit its sweet spot somewhere around f/3.5. However, on my own 35mm f/1.8, I get the most uniform sharpness, from center to corners, another stop beyond that, so my “go to” aperture on my “go to” lens is more like f/5.6. I know this is true, because I have set up a tripod and shot the same subject from the same distance through the entire range of apertures and visually compared them. You know, the real-world, old-fashioned way….observation.
The better you know every property of your lens, the closer you will get to one that does most of what you want, most of the time. More pictures with fewer toys, with time and labor saved as well.
