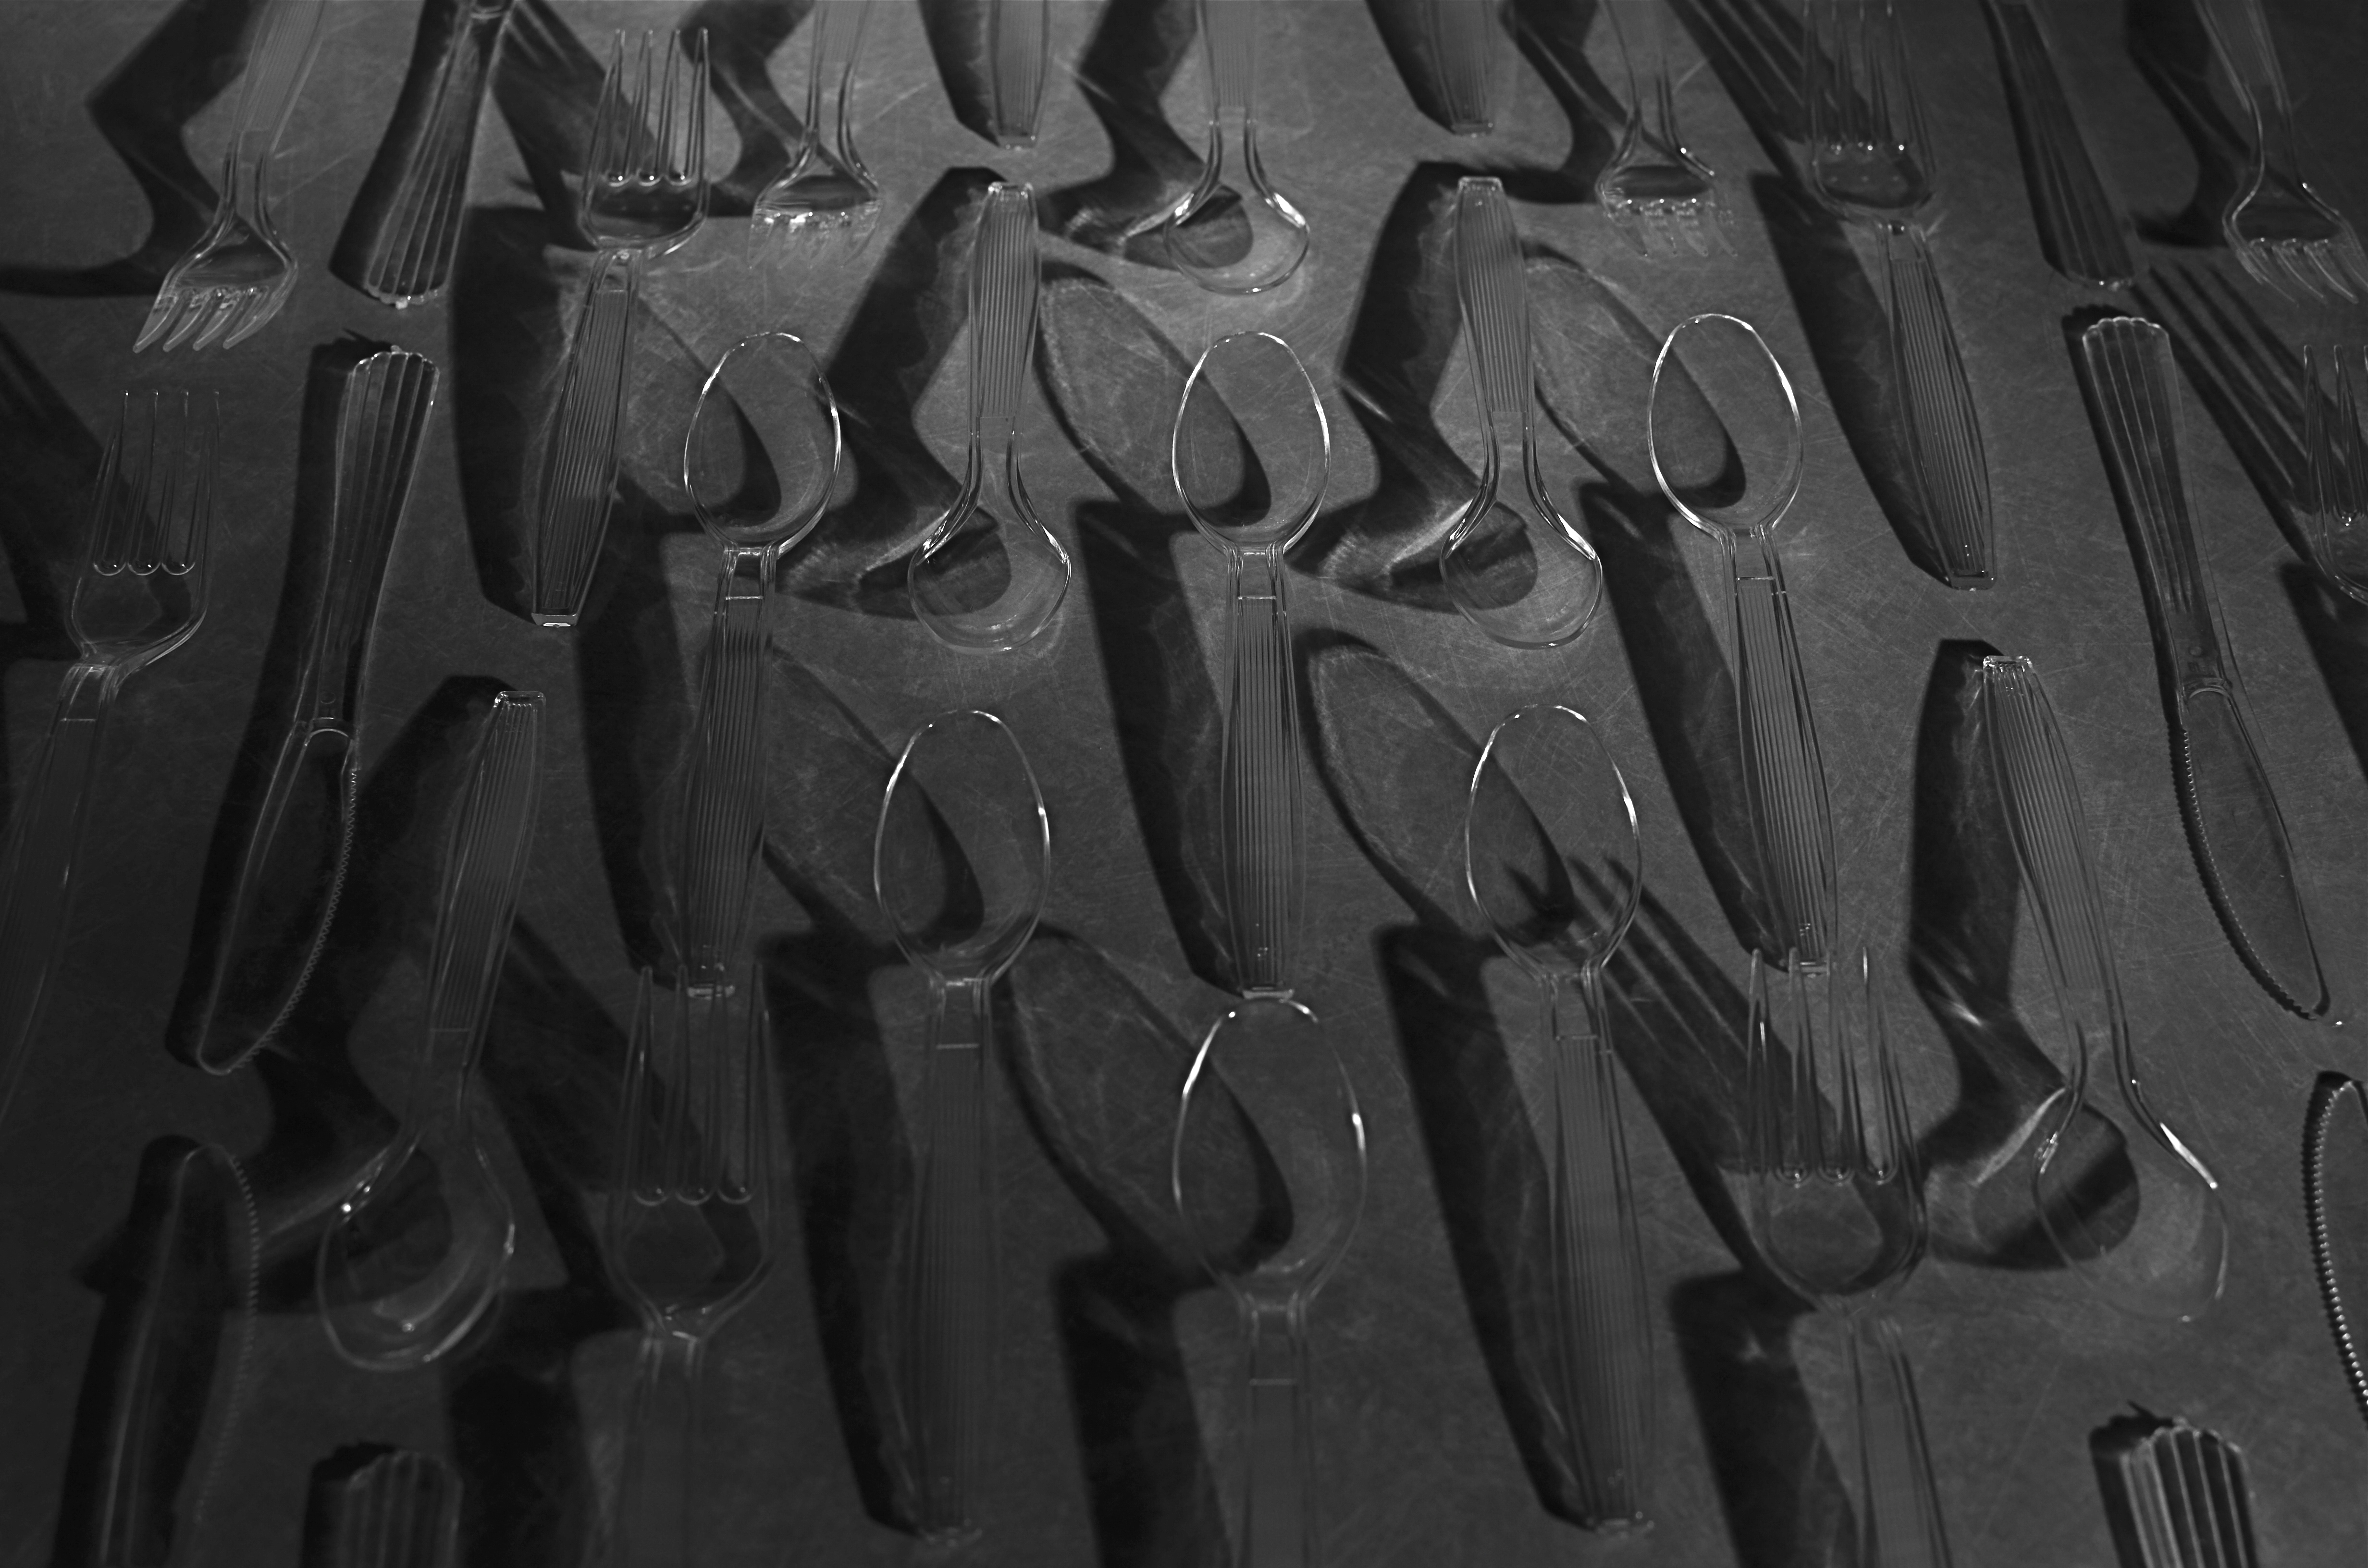
DOWN GO THE DOMINOES
By MICHAEL PERKINS
THOSE WHO WRITE HISTORIES ON PHOTOGRAPHY understandably see it as an unbroken series of technological breakthroughs that have allowed the art to move forward and gain wider adoption for an ever-growing audience. This leads to an endless litany of Who Did What followed by Who Did What Next followed by What Did It Mean. When I look at the breaking of these barriers, it’s even more personal. Because when something new happens in photography, the net result, for me, is to help me get to the picture-making part with less delay and fewer screwups.
Take the most elementary part of creating an image, i.e., the gathering of light. We make ourselves crazy trying to corral as much of it as quickly as possible with as few intermediary steps in the process. After actually grabbing the light, we get snarled in other thickets, such as how to refine it, how to use it as a compositional tool, even how to control its range in color and tone. All this takes time and patience and learning, and so I bow to no one in my adoration for the wizards who’ve helped me get there easier. The tools are changing incredibly fast and the benefits are bigger and deeper than ever before.
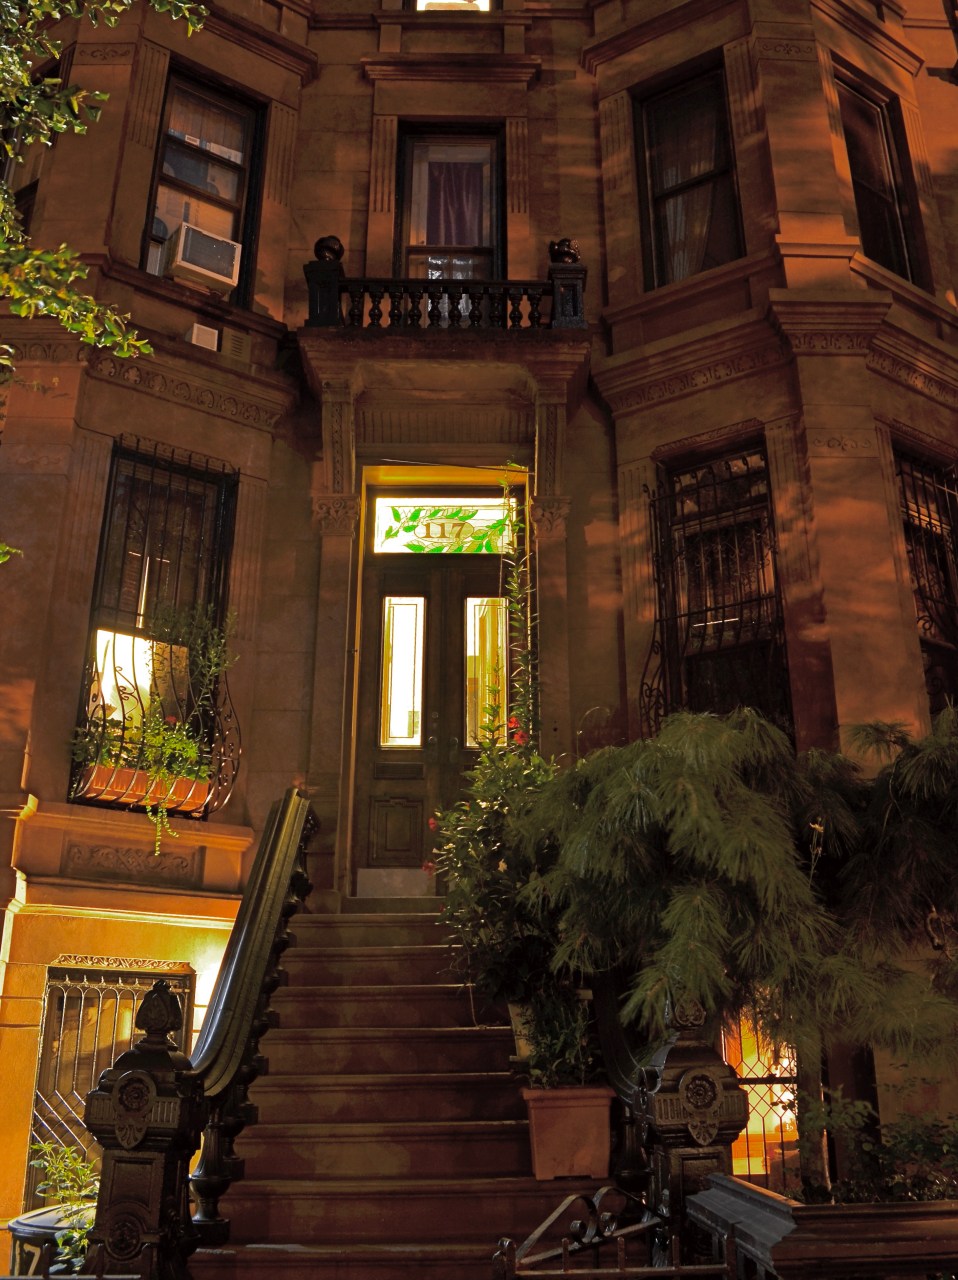
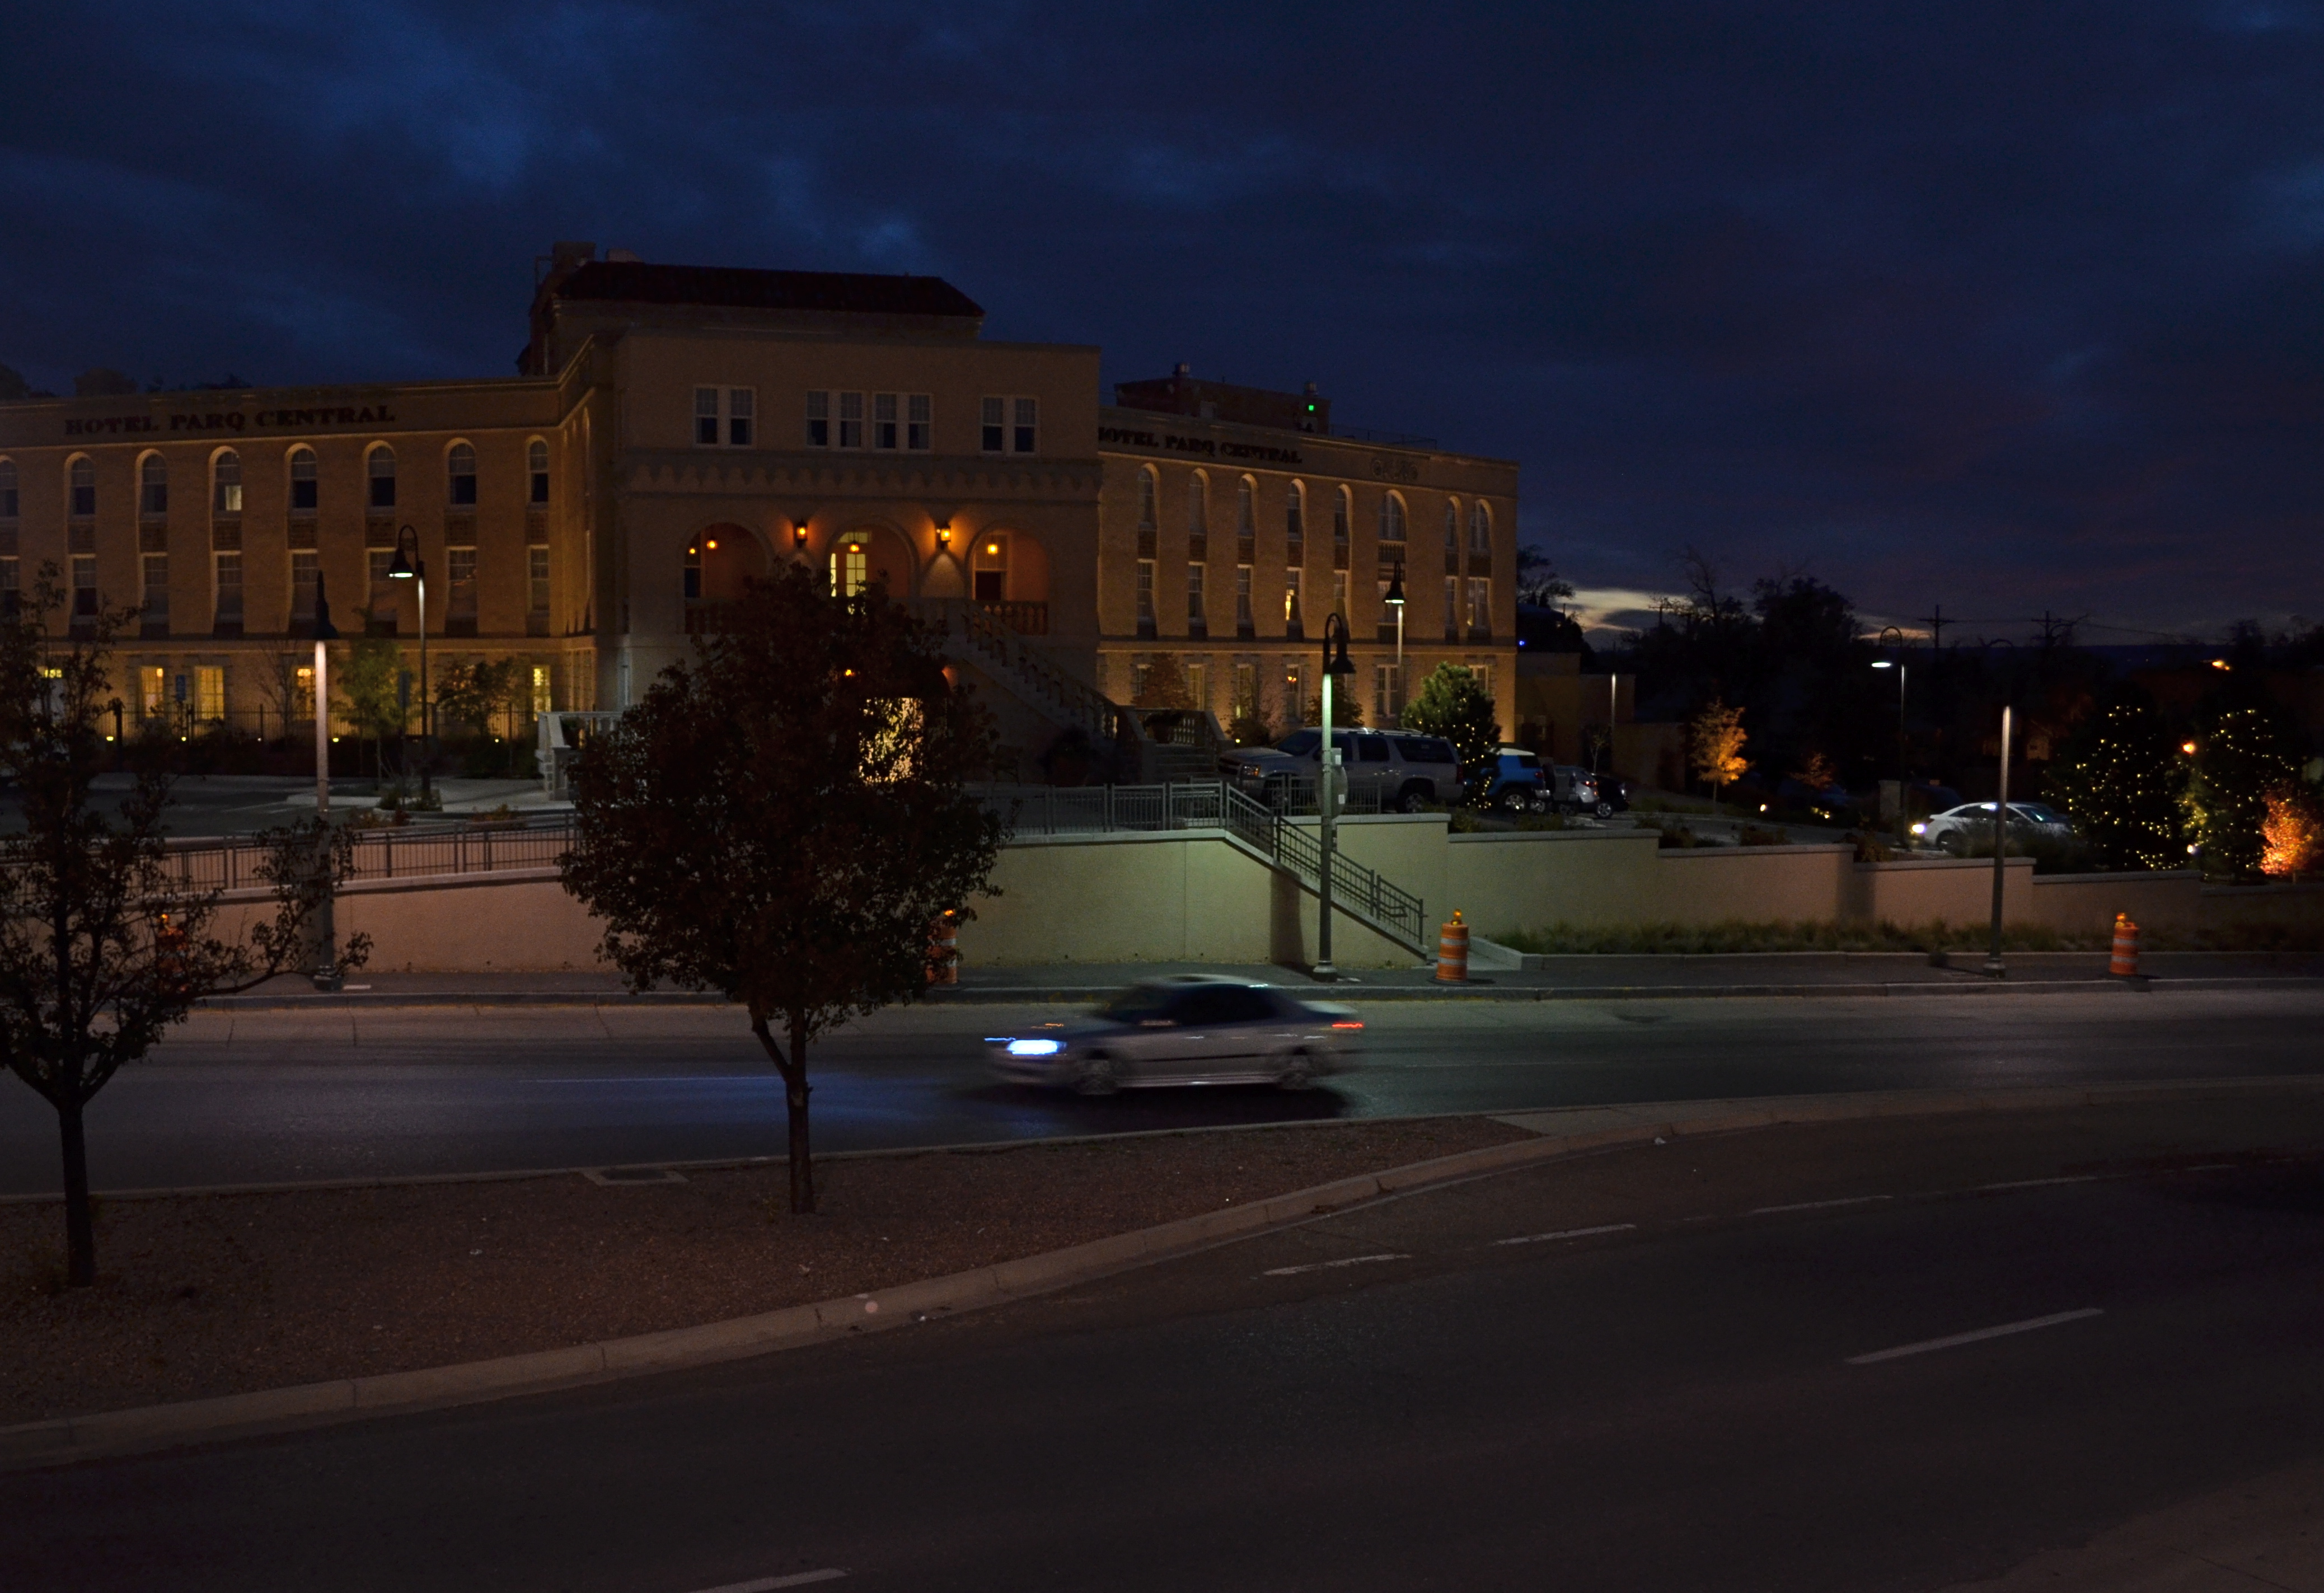
Take the idea of time exposure. The shot you see here was grabbed thirteen years ago, in the inky black of night, several hours after sunset, my camera, a crop-sensor DSLR, was mounted on a tripod and held open for ten seconds, allowing me to keep my ISO to 100, so zero noise. Jump ahead to 2025 and the larger, more sophisticated sensors of a full-frame camera, and it is nearly possible to take this photo handheld, albeit with a very high ISO that, amazingly, still comes out very, very clean. Is the tripod dead?
Certainly not, and you can draw up your own checklist of occasions that still call for it. Obsolescence happens slower than technical advancement (as witness the too-stubborn-to-die case of analog film). And yet. And yet we are that much closer to the tripod eventually going the way of the dodo, and in a remarkably brief stretch of time. That’s what I was pointing out at the top of this article; the fact that photography is swiftly getting to the point were excellence and flexibility are almost a given with present-day gear….with the steps needed to get the picture, to, in essence help us get out of our own way, being rapidly streamlined and simplified. Less calculating, more envisioning. Less adjustment, more captures. Every domino trips another domino trips another domino. Progress.
HORSESHOES
By MICHAEL PERKINS
ONE OF THE MORE QUIET EXITS from the average photographer’s toolbox over the last twenty years has been that of the once-ubiquitous tripod, that rigid testimony to the fact that here, ladies and gentlemen, was a serious shooter, someone dedicated to precision and accuracy. The anti-shake and image stabilization programs that are now incorporated into even the most modest cameras have largely relegated the “three-legged-spider”, as I call it, to the closet. The devices still command a multi-million dollar industry and are certainly in no danger of winking out of existence, but the everyday shooter can do very well without them much more of the time. That’s not a judgement, merely an observation of how once-crucial gear becomes a luxury or exception, like light meters or flash guns.
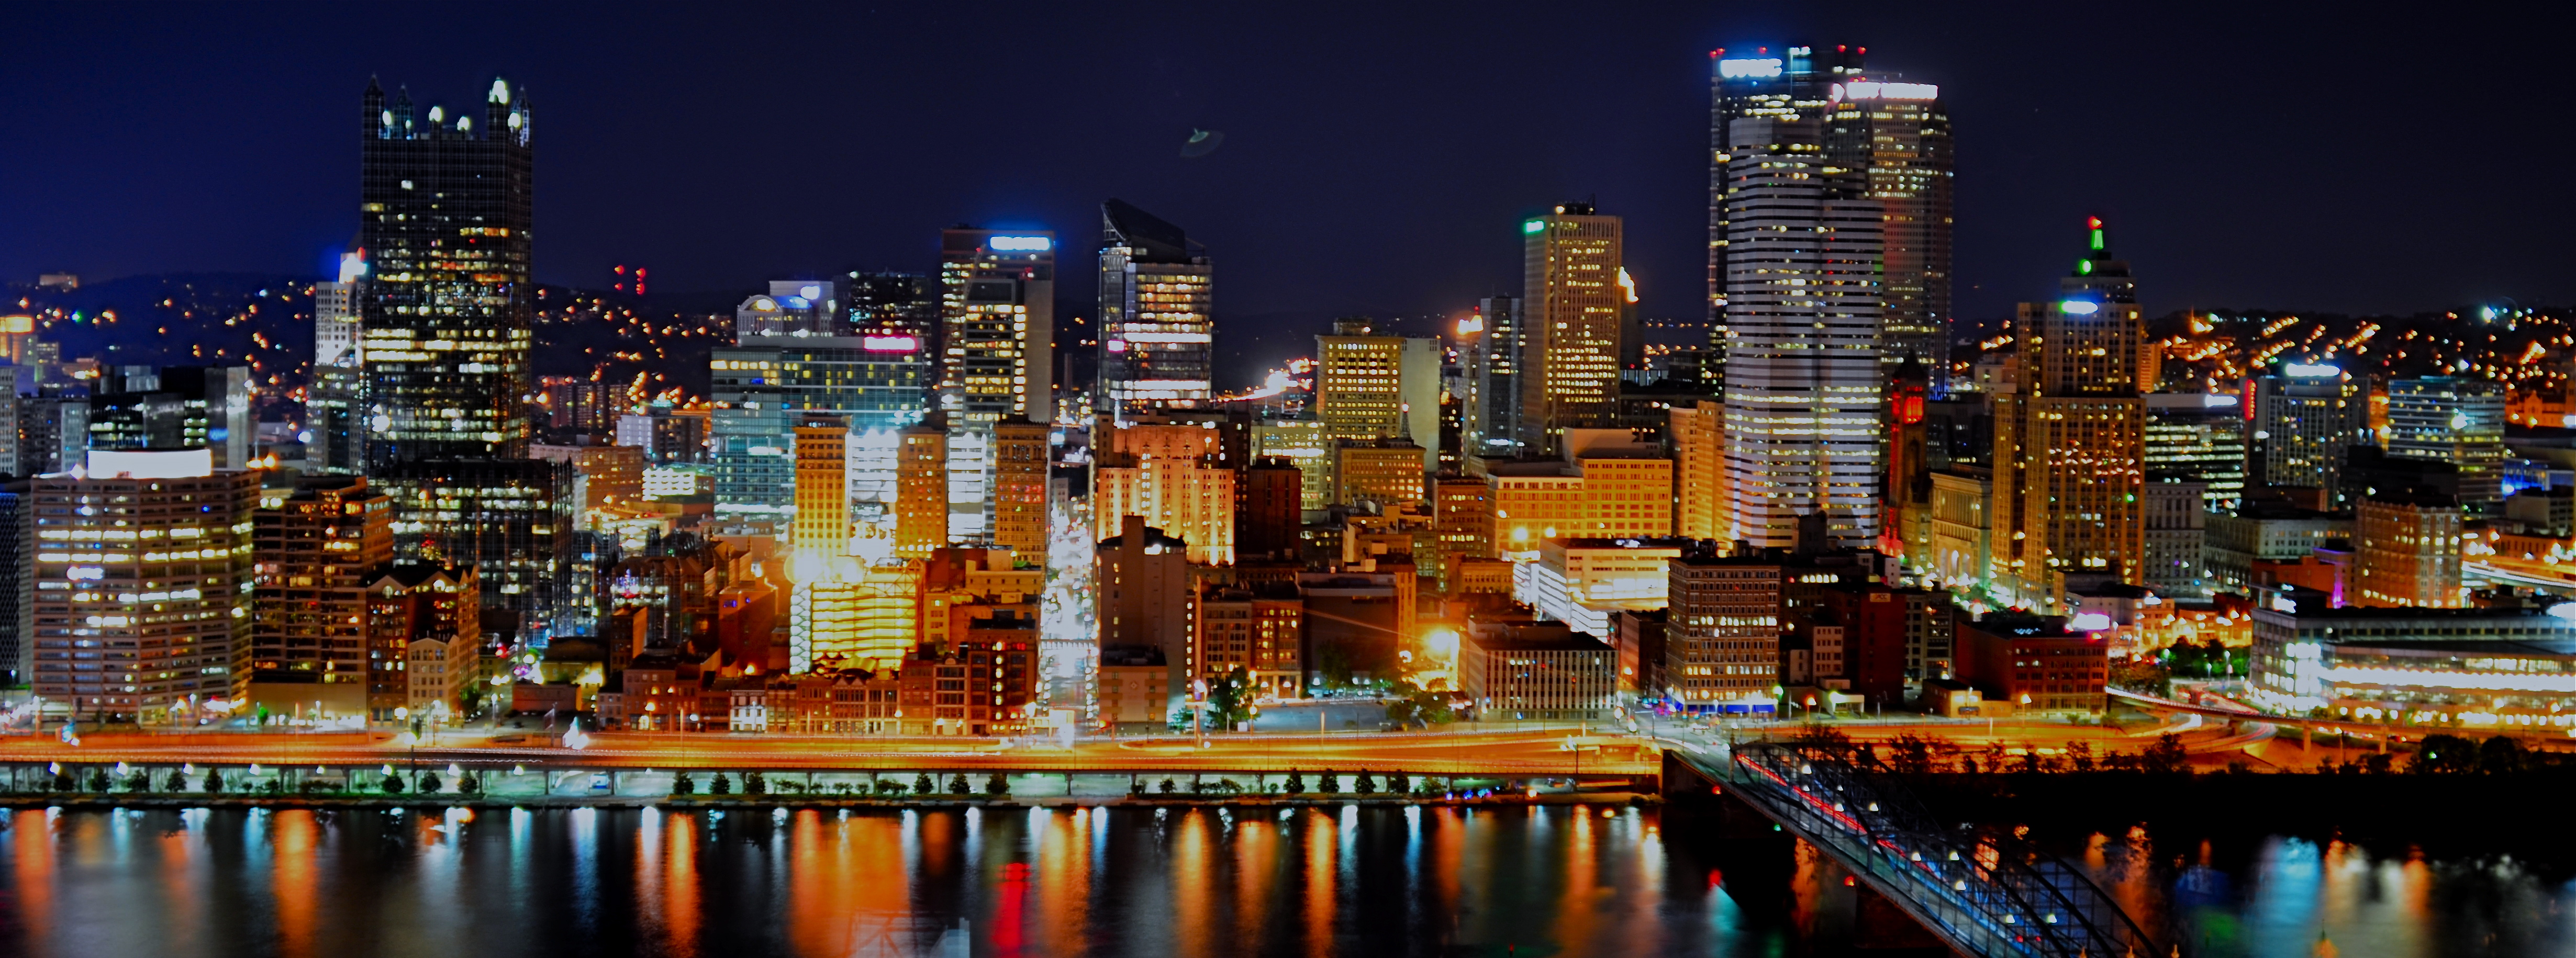
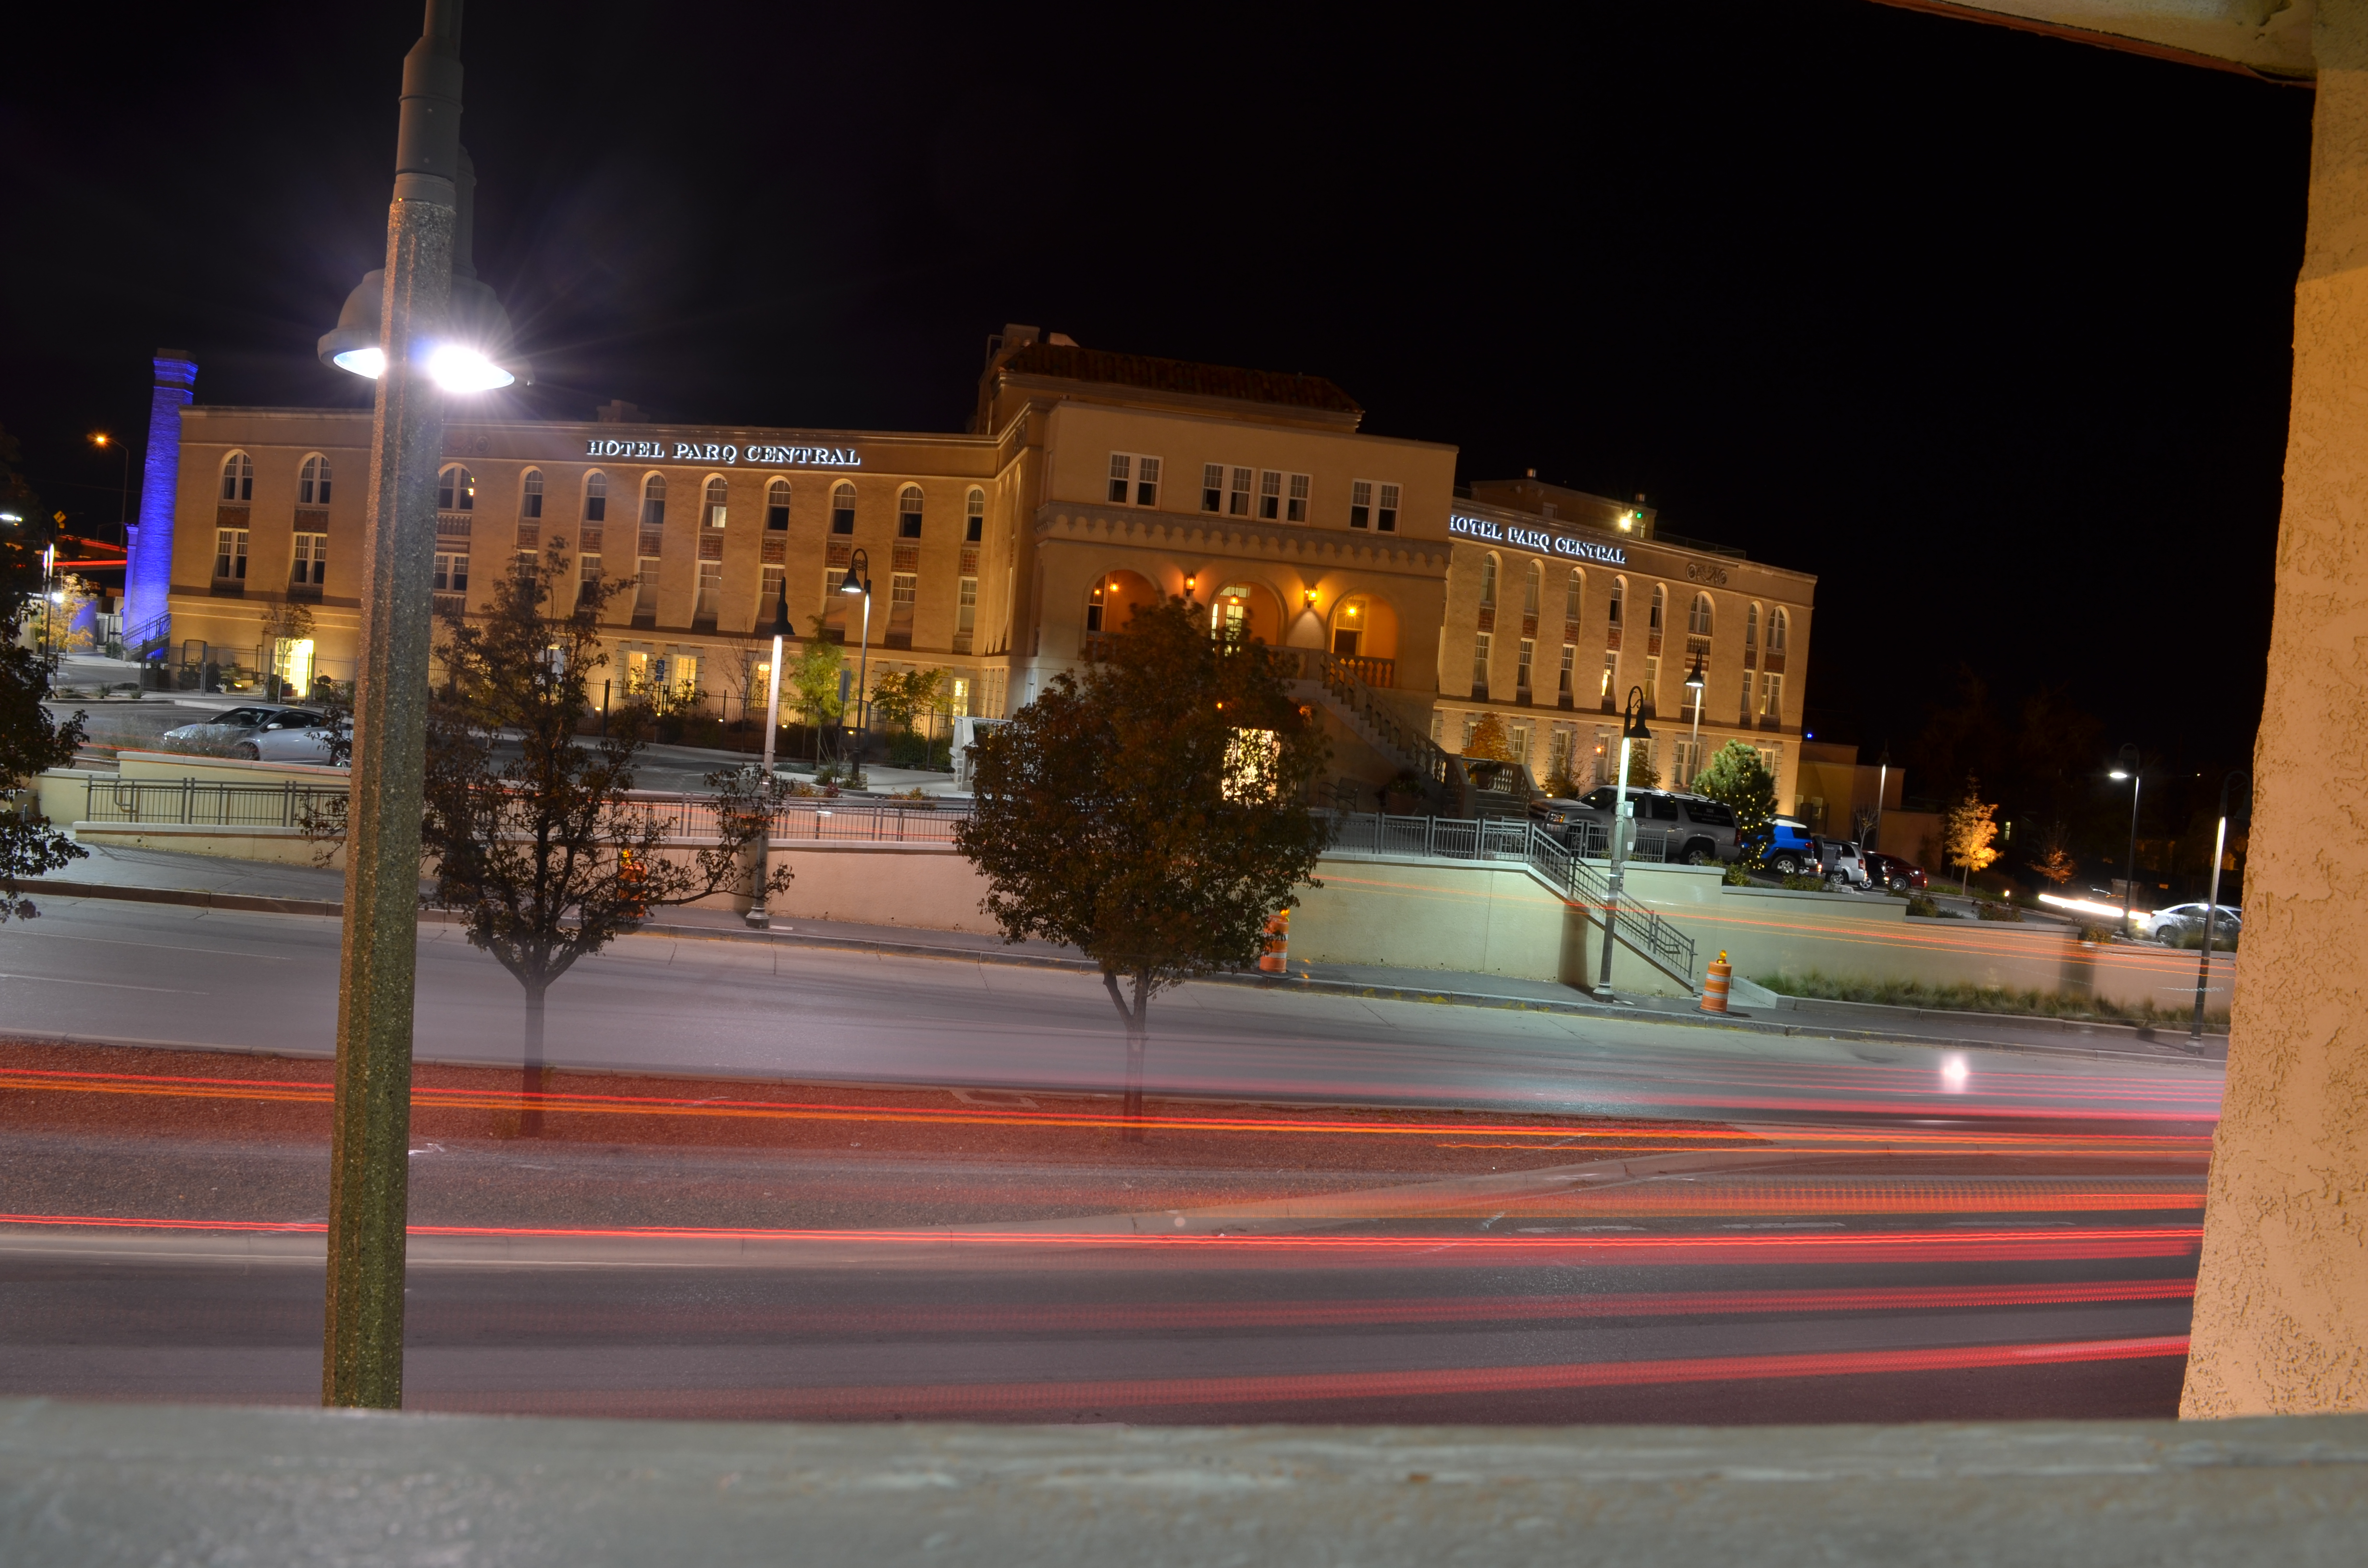
Of course, spending lots of time with birders, I still see folks carting their cameras around atop the things, using them mostly to stabilize shots that are zoomed out all the way and which would otherwise pose the problem of magnified body shake. But my own use of tripods, back when I regularly used them, was not for nature work but for urban nightscapes, where light would be a premium and extended handheld exposures would guarantee an unsteady result.
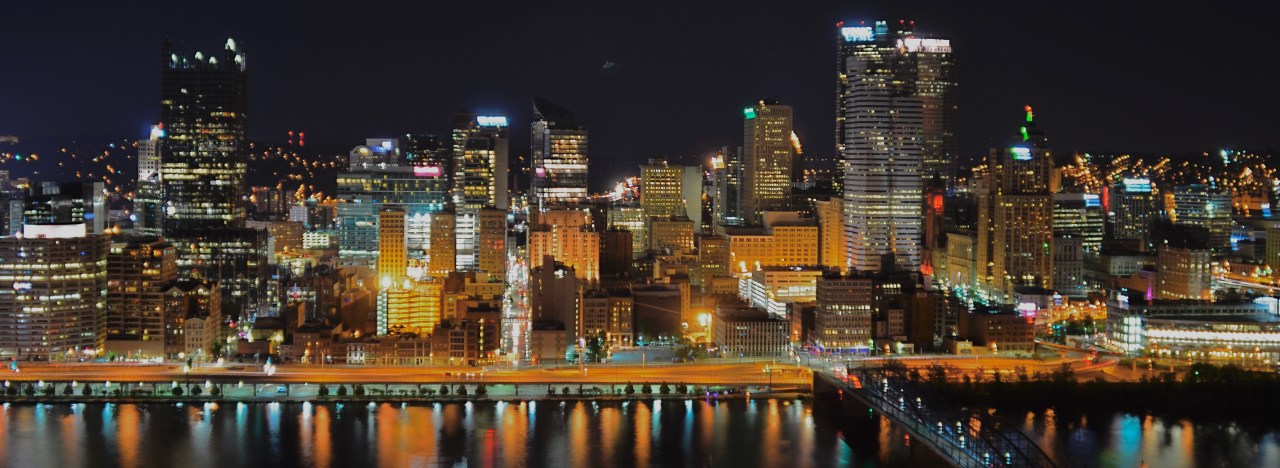
This 2017 shot of the skyline of Pittsburgh, Pennsylvania, for example, would have been impossible to do handheld, back then, especially since it was taken from the top of nearby Mount Washington, with evening winds buffeting me around even as the icy temperatures made me shiver. Shooting without a tripod would have meant going wide-open, to about f/2, to allow for maximum light intake in a brief exposure, as well as jacking up the ISO to untold heights, which, in shooting a dark sky, would have invited in a ton of noise and rendered the building lights as bleary blobs. Today, with a full-frame mirrorless sensor, I just might be able to shoot the thing hand-held, but getting it this clean would still be more luck than genius.
Things are essential until the world deems them not so. We don’t buy a lot of vacuum tubes and horseshoes anymore, and so living a life that still incorporates them centers more on nostalgia than functionality. Every once in a while, hauling around a 600mm telephoto while stalking a tiny bushtit may make me long for the physical comfort of a three-legged spider, but I value being able to work faster with less fuss, a state to which every photographer aspires.
RE-EMBRACING THE RANDOM
By MICHAEL PERKINS
LIFE FOR PHOTOGRAPHERS HAS BECOME ENTIRELY TOO SAFE.
It’s to be expected, really. In recent decades the forward tsunami of technical improvement in cameras and editing options has almost completely “idiot-proofed” the process of making pictures. In nearly every possible scenario, today’s gear guarantees that you will at least get something usable every time you take a shot, and, in many cases, images that are far better than even your best efforts could have guaranteed just a few years ago. The risk of making visuall lousy photographs has been nearly zeroed out.
And that’s the problem. Because with the randomness of luck, which used to mean the potential for ruined images, there’s also the potential for the happy accident, the unplanned discovery that comes when something unpredictable is introduced into the mix. I was reminded of that in a recent return to the tabletop fun of light painting, where you shoot an object in complete darkness, with your camera set on full manual and mounted on a tripod. Using a remote shutter release for extra stability, you start the exposure on “bulb” setting, meaning that the shutter will stay open until you click it shut. You then selectively “paint” light onto the subject, passing over different parts of it with a small penlight. Unlike a static lighting scheme, this system more or less guarantees randomness, since you will never pass the light over the scene twice exactly the same way. And that very randomness affords you a kind of impulsive, instinctual indulgence from frame to frame.
I usually shoot anywhere from thirty to fifty frames when doing a light painting, as I am always surprised or inspired by how the smallest variation in my passes will drastically affect the results. I can literally make the light look like it came from any direction, with whatever intensity I desire, from deep shadows to total blowouts. I can even let the flashlight itself be seen in the frame to suggest motion or speed, as seen in the above shot.
Is it art? Well, in that randomness is an element of risk/reward in photography, I’d say that art occurs when you can’t absolutely nail everything down. It’s often considered an alibi to say, of one’s occasional errors, “hey, I’m only human”, but, in photography, the same phrase might actually be a valid brag.
YOU AND YOUR BRIGHT IDEAS
A simple manipulation of single–source light produces a wide range of effects.
By MICHAEL PERKINS
THE SELF–EDUCATION PROCESS INHERENT in photography is perpetual: that is, the lesson-learning doesn’t “clock out” merely because a given task is completed, but flows equally during the in-between moments, the spaces outside of,or adjacent to, the big ideas and big projects. Down time need not be wasted time.
Often it’s because the pressure of delivering on a deadline is absent that we relax into a more open frame of mind as regards experimentation. You find something because you’re not looking for it.
One such area for me is lighting. I seldom use flash or formal studio lights, so I obsess over cheap, mobile, and flexible means of either maximizing natural light or adding artificial illumination in some simple fashion. This isn’t just about making an object seem plausibly lit, or, if you like, “real: it’s also about choosing or sculpting lighting schemes, making something look like I want it to.
Small, powerful LEDs have really given me the chance to fill spare moments cranking out a wide array of experimental shots in a limited space with little or no prep, producing shaping light from every conceivable angle. I just lock the camera down on a tripod, make some simple arrangement on a table top, and shoot dozens of frames with different directional sweeps of the light, usually over the space of a time exposure of around a half a minute. I can move the light in any pattern, either by holding it static or tracking high/low, left/right, etc.
Frequently this activity does not result in a so-called “keeper” image. Such spare-time experiments are about process, not product. The real pay-off comes somewhere further down the road, when you have need of a skill that you developed over several days when you had.. nothing to do.
HOLDING HANDS IN THE DARK
By MICHAEL PERKINS
ONE THING OF WHICH THE PHOTOGRAPHIC COSMOS IS NOT IN SHORT SUPPLY IS THE SELF-PORTRAIT. What might have been a specialized kind of image-making just a few scant years ago is now, in the mobile era, a flat-out obsession. We snap ourselves being happy, being moody, eating a cheeseburger, or giving that cheeseburger a thumbs up with friends, etc, etc. We make more photographs than ever of our faces, and, it could be argued, say less and less in the process.
I think that a good self-portrait, if it is to say or imply anything true about the life behind the face, requires a little prep time, or at least a pre-conceived notion of what one is trying to reveal about that person. That said, I think our concept of a selfie is, at the very same time that it’s overdone, is also far too narrow. Simply speaking, there are other parts of our physical envelope that convey information about who we are and what we’ve been in the world. The hands, for example.
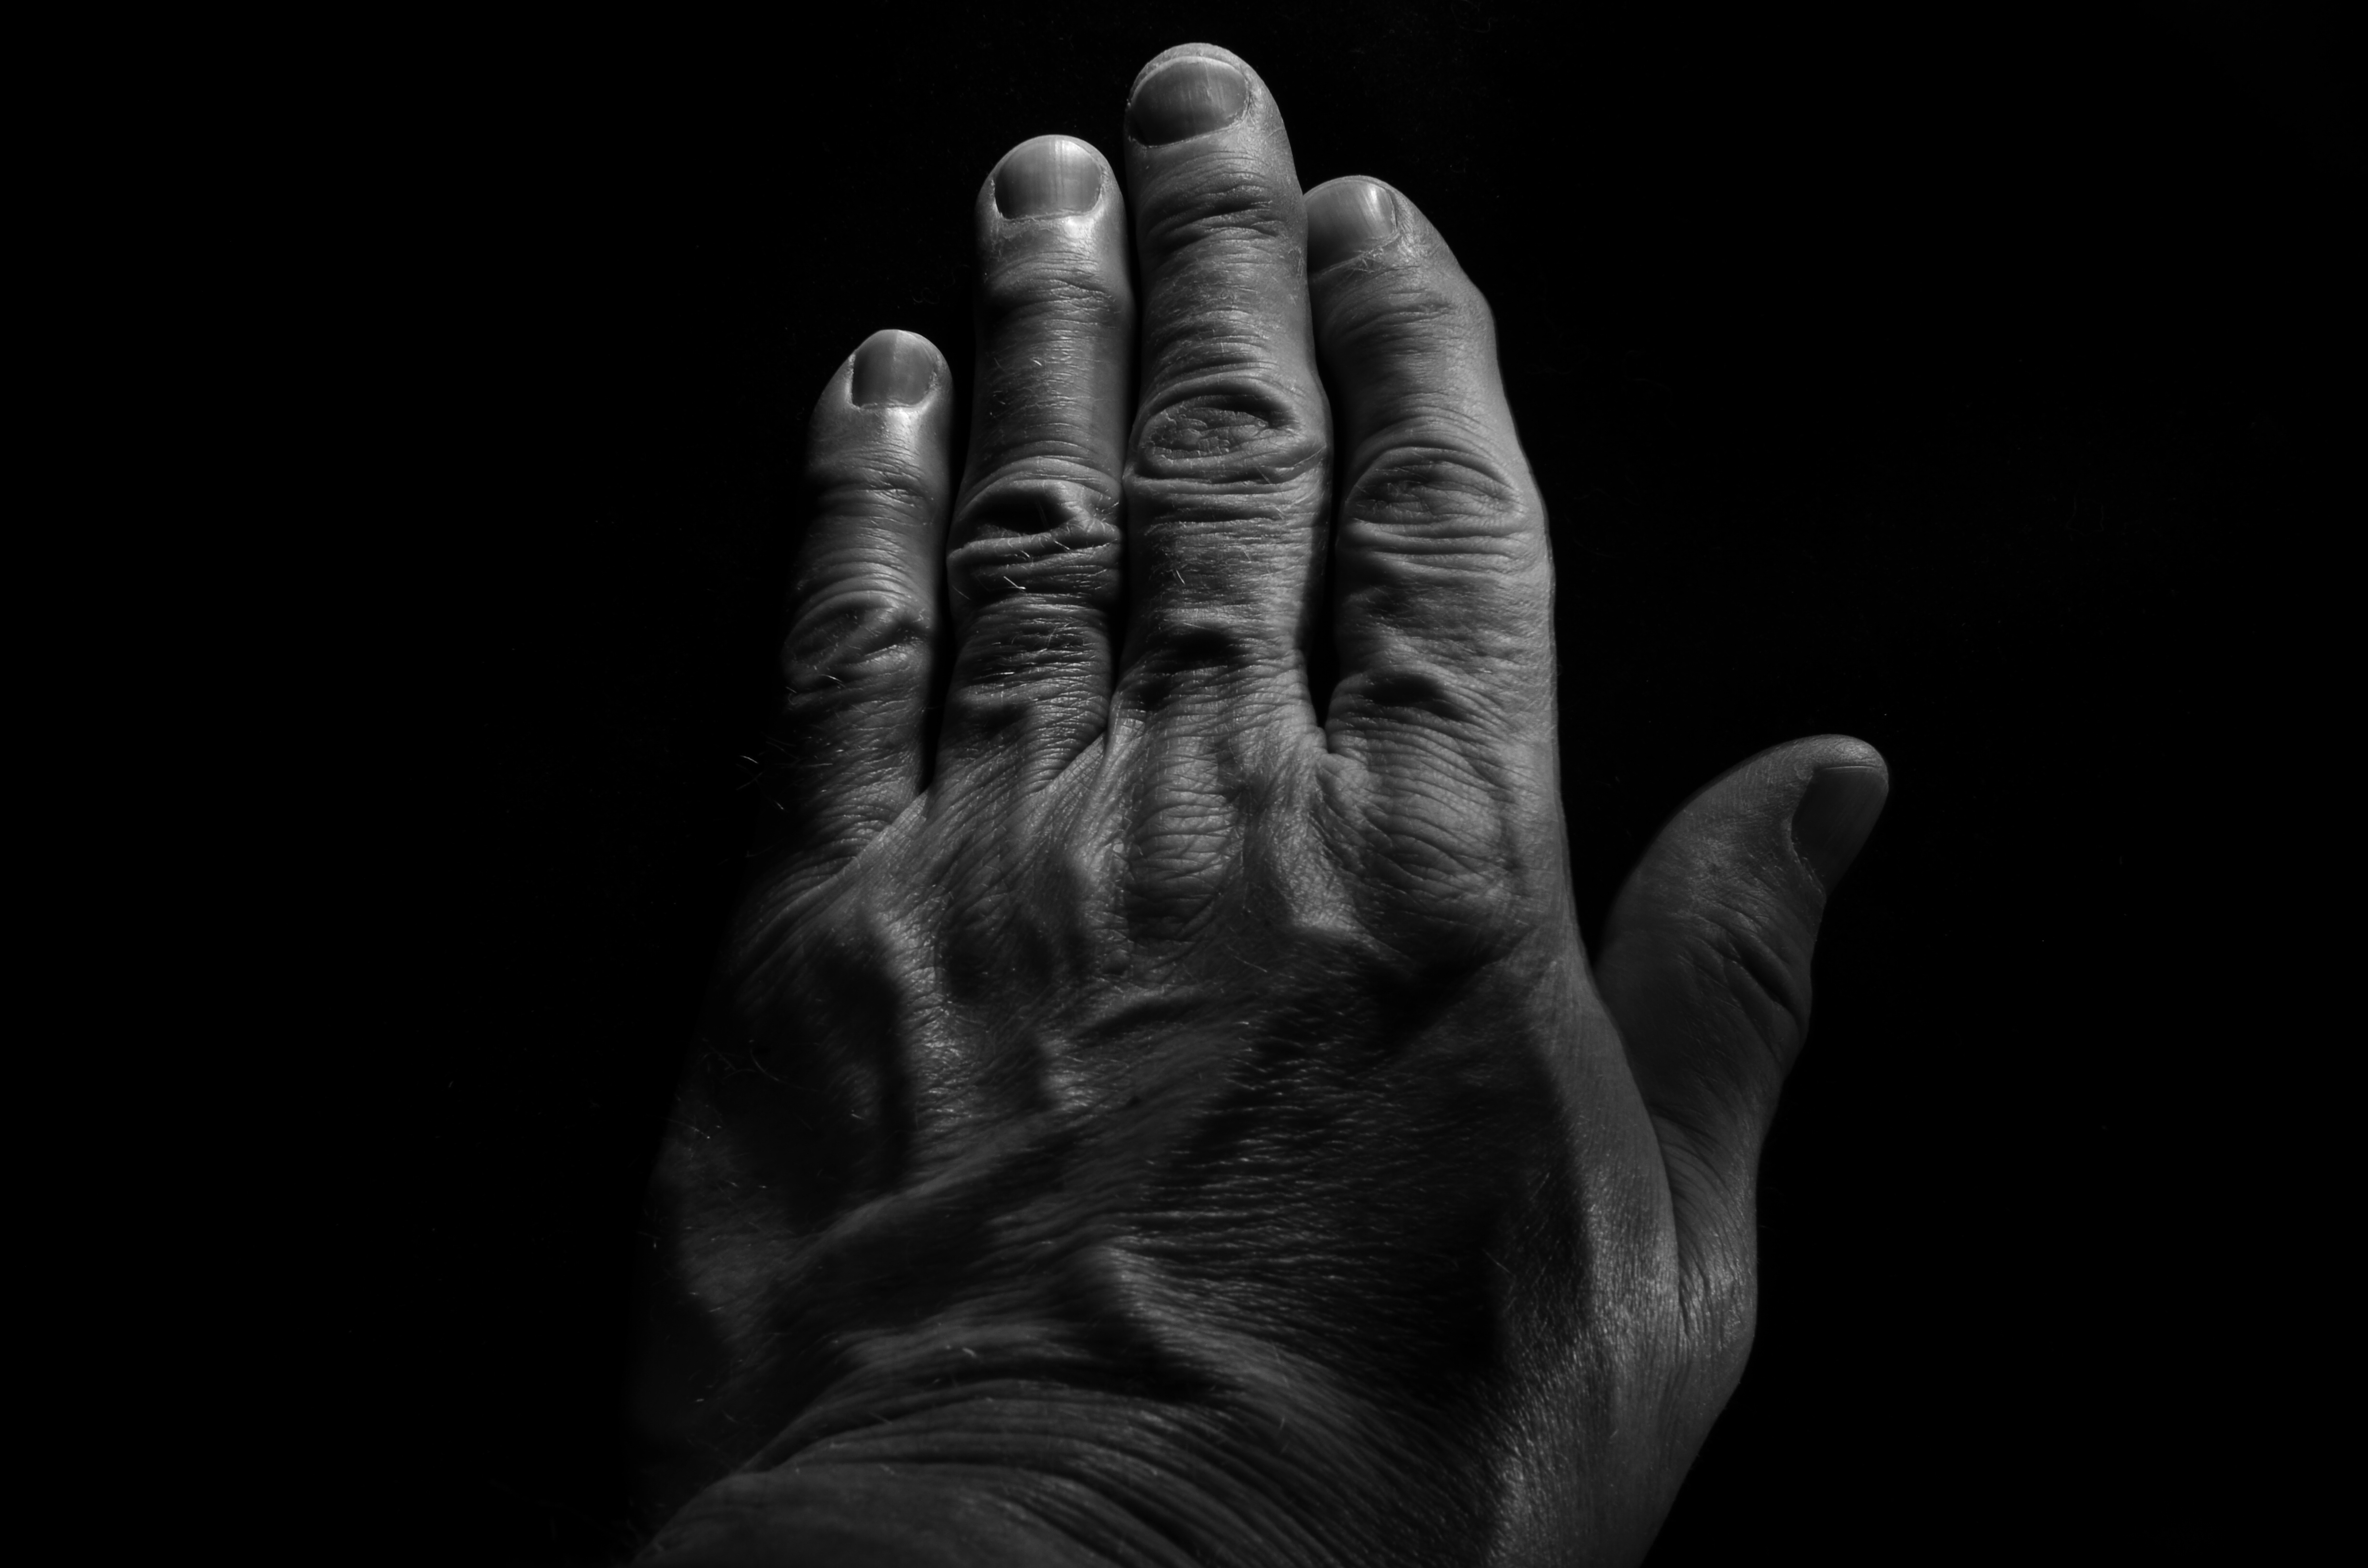
Pax Humana (2017). Hand-held LEDs used to “light-paint” in the dark can create interesting textures in human skin. 18 sec., f/16, ISO 100, 35mm.
If the eyes are the window to the soul, the fingers are the foot-soldiers who carry out the orders that the soul dreams up. The mind behind the face can certainly shine through a good facial portrait, but consider that the hands are the real agents of change in a person’s life. They lift: they move: they put plans into action. Moreover, hands bear the traceable time-stamps of all that agency. Each wrinkle and scar is a document of both deliberate action and unforeseen consequence. Hands belong in any serious study of a person’s life, no less than the face. The trick, as with photographing every other subject, is in getting the image you want.
I find, for example, that normal room light keeps a lot of fine detail from registering in an image, since human skin is highly reflective, causing the grain of the skin to wash out. One way to get around that is to use light painting, a technique we’ve discussed here before. Set up your composition and focus with the camera on a tripod in normal light, then leave everything in place until nightfall and make the image in a completely darkened room while experimenting with a range of exposure times. Your only illumination will be a small hand-held LED, such as a miniature key chain flashlight….nothing wide-beam or super-powered. Use a wireless remote to trigger your shutter, then “write” light paths over the hand, slowly tracking the LED over small areas until all have been “hit” before the trigger snaps back shut.
In the above example, I wanted greater contrast between the hills and valleys of my knuckles, veins, etc., and I wanted to minimize the shine-making effect of the light, so I lit from an angle, sideways from the tips of the fingers. That bumped up the pores and hairs into starker relief as well. Two things to remember: using short stabs of light, that is, turning the LED rapidly on and off, is better than a continuous beam, since you can pinpoint the effect more precisely. Also, using a very small aperture (f/16 here) provides maximum depth of field and enhanced detail. Other than that, it’s truly trial-and-error. This frame, as an example, is one of forty attempts, so it’s not a project you do on the fly. But this, I feel, is my hand, my real hand, its labors and history in full view. And it’s as much a portrait as any face can ever provide.
I HOLD HERE IN MY HAND…..
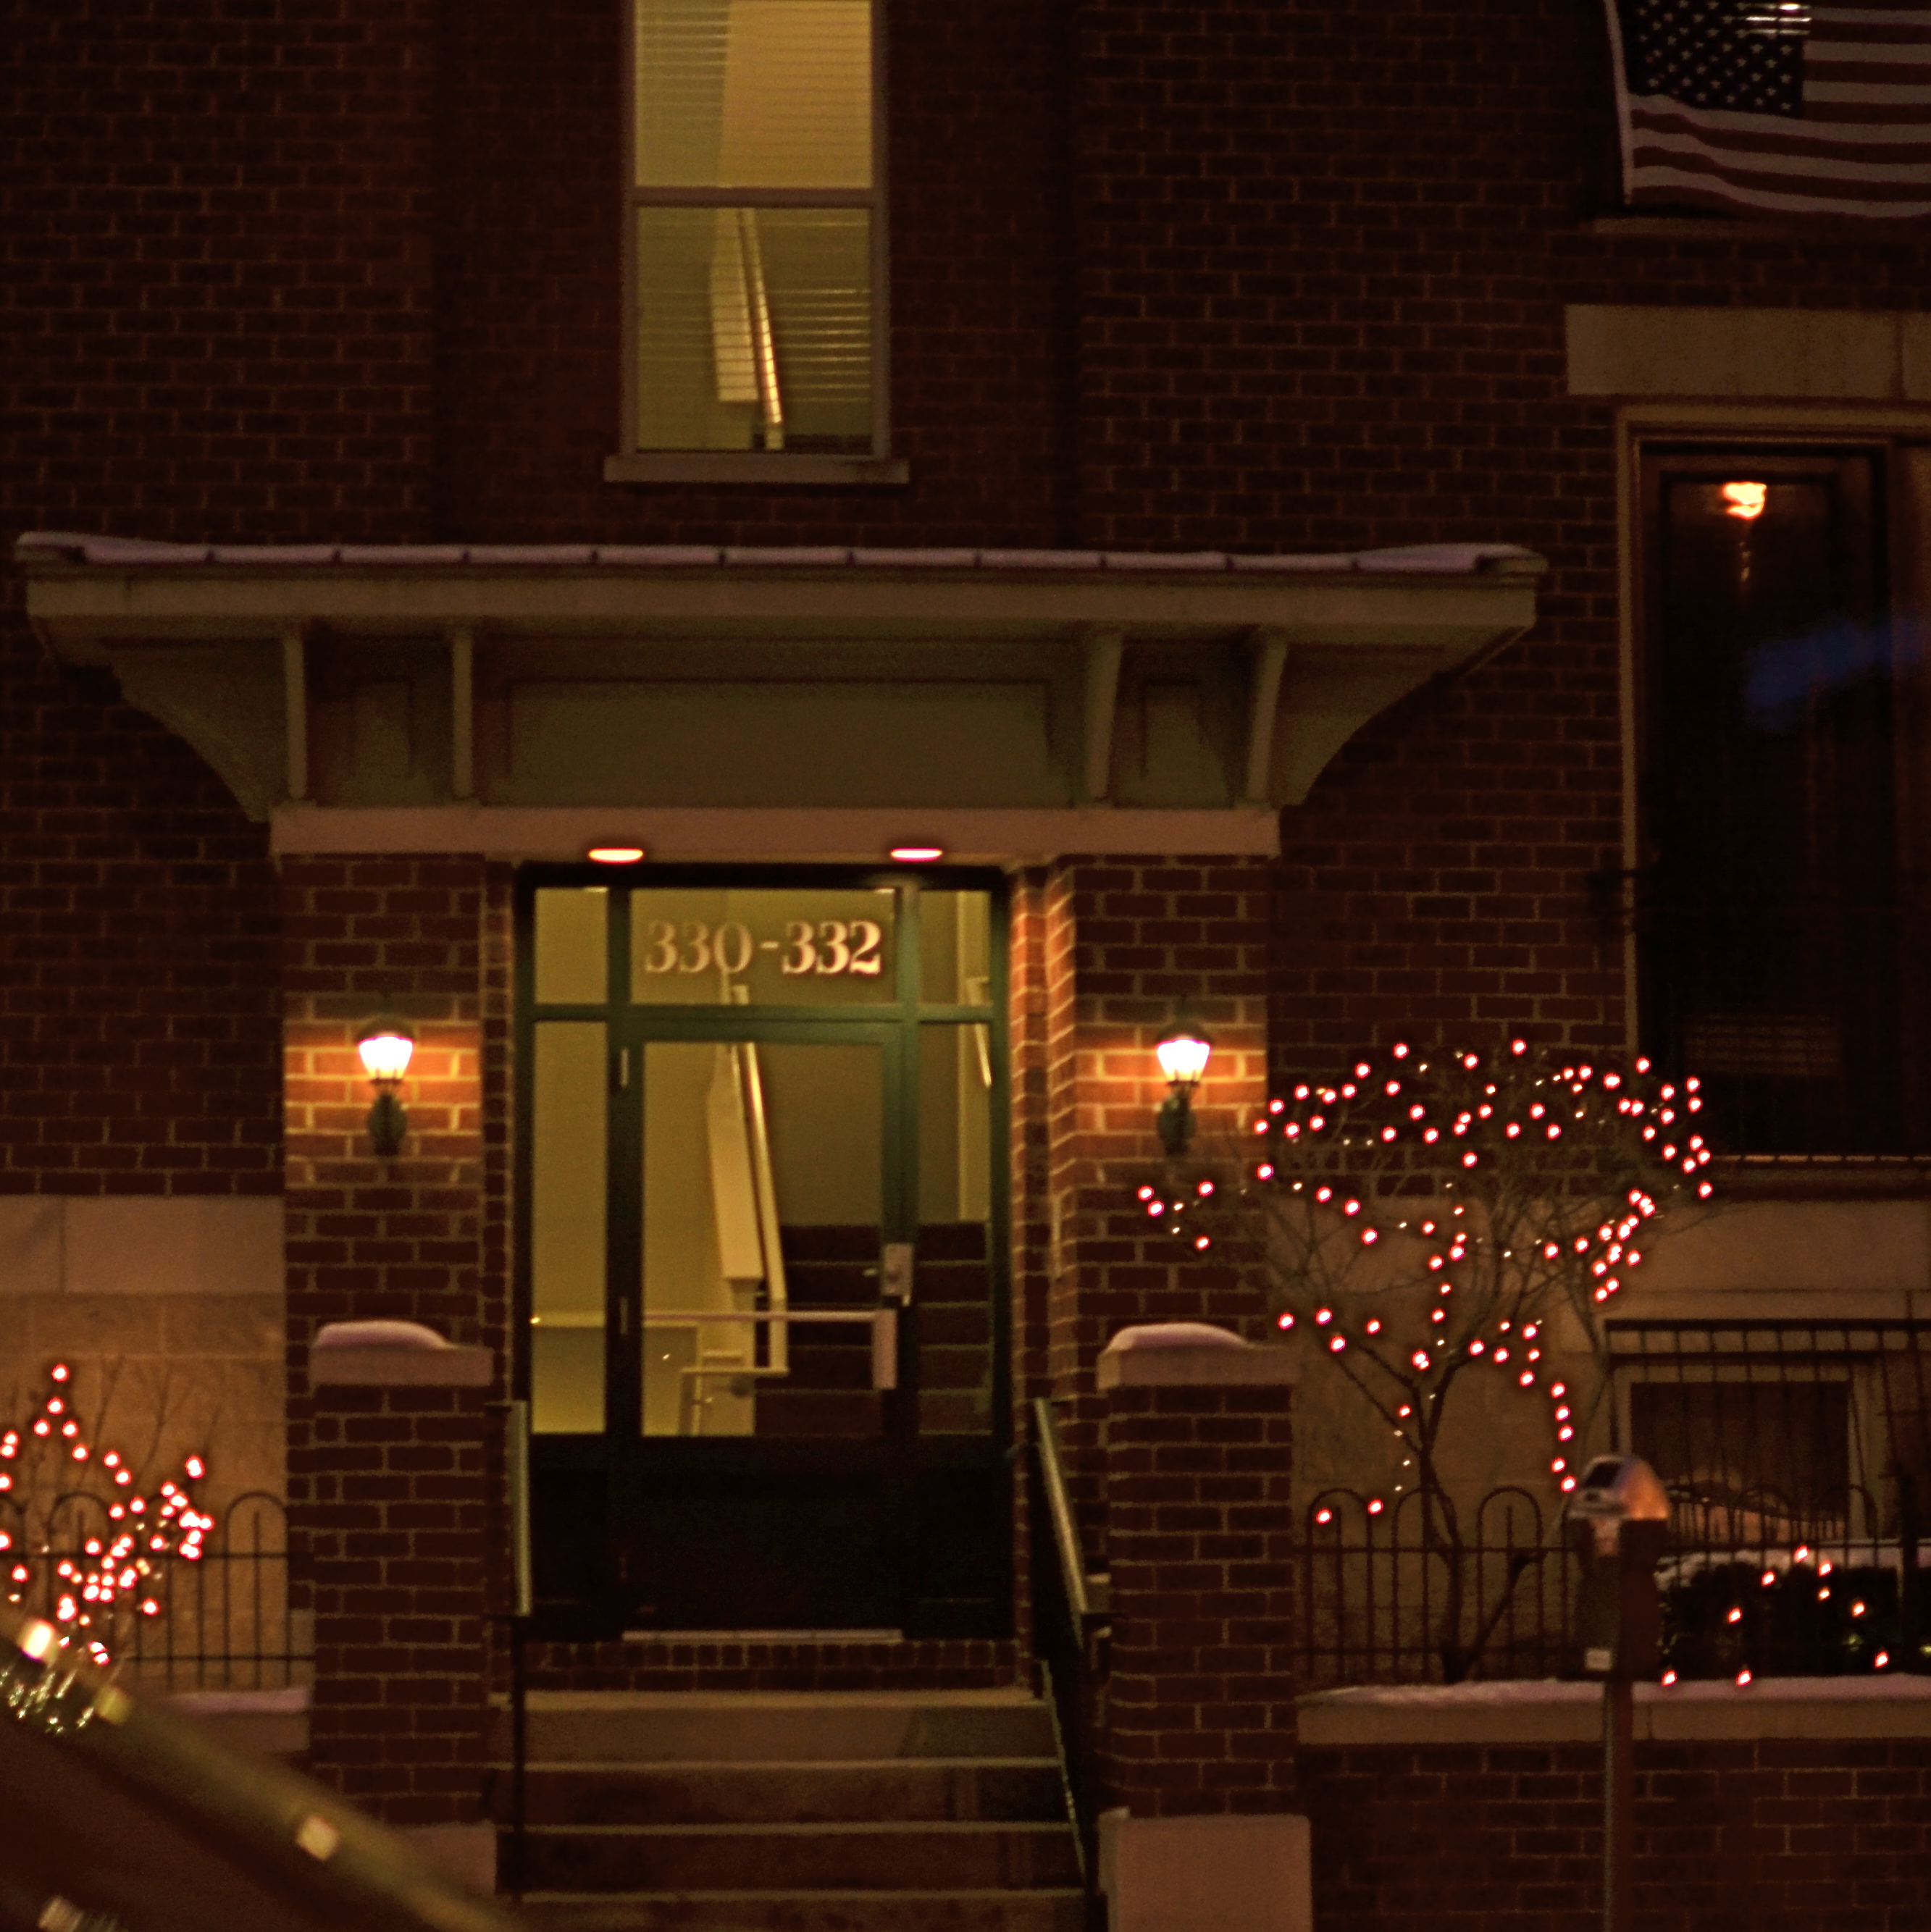
One Flight Up (2013) Handheld night shot, 1/100 sec., f/1.8, ISO 320, 35mm.
By MICHAEL PERKINS
NIGHT SHOTS IN CITIES SEEM TO BE A SIMPLE CHOICE BETWEEN HAND-HELD OR TRIPOD, but those are only the most basic decisions to be made, depending on the texture and mood you’re trying to build into your images. Of those two main choices, many more are opting for hand-held because of convenience and speed, bypassing interference from security people, passers-by, weird weather,etc. And, let’s face it: it’s easier than ever to deliver a readable night photo without the long exposures that used to absolutely necessitate a tripod, especially if you are not worried by the need to either use a wide aperture (thus shallow depth of field) or increased ISO (inviting more digital noise and a decidedly “smudgy” look in the deeper shadows. If you are in the hand-held camp, you’ve got plenty of company.
Tripod people are dedicated, patient, and doomed to travel less lightly, composing longer exposures in darkened conditions and sweating the unwanted artifacts, from wild pixels to smears of people and lights, that will be baked into shots lasting a few seconds or longer. But to rescue a ton of texture and detail from darkened buildings with a minimum of noise, there is no look like a well-modulated time exposure.
The Old Post Office (2013) 1/100 sec., f/1.8, ISO 230, 35mm.
Beyond these two big choices, however, lie the deeper, more subtle reasons we like to shoot cities at night. Some towns flood nearly every important building with light, much of it of the sodium-vapor variety, which is long on orange. And that can mean that a mysterious, brooding quality might be totally unattainable, either three-legged or hand-held, with no way to underexpose or suggest something not absolutely spelled out in neon, in even short exposures.
I personally love to to look for the more neglected sectors of cities, those “London after midnight” kinds of streets where dark means dark. I love to underexpose them a bit as well, ensuring that all the details of the structure are not revealed, all the better to let your mind wander. If my subject has prominently lit windows, I have to tweak and tease to render them in a kind of incandescent amber, but I decide in the moment whether the exterior should be pure black, blue-black, or even amber-black, as if the window light has spilled onto the surrounding textures. And, yes, I might decide that the more ashen, grainy look of high ISO is just what I’m looking for in that moment.
Tripods used to be a do-or-die proposition for night images, but the freedom of hand-held shots carries with it a whole distinct set of decisions, since there is no typical camera, no typical subject, and no typical result. The only thing that truly matters is what you want to see coming out of the camera, be it long shot or short snap.
THE FLAWED CHILD or the fine art of self-photobombing
By MICHAEL PERKINS
WORKING WITH TIME EXPOSURES IS A LITTLE LIKE THE EXPERIENCE PILOT TRAINEES GET the first time they are aboard a weightlessness simulator. You know that you’re outside the general rules of “reality”, and yet some kind of natural law is still in force. That is, as much fun as it is floating like a feather around the cabin, it still hurts if you slam your head into the ceiling. It’s just that, under normal circumstances, you wouldn’t be close enough to the ceiling to have to think about smacking into it.
Yeah, time exposures are like that.
Most of what we intuitively “know” about photo-making is based on a concept of exposure time that is pretty close to “instantaneous”, so we tend not to plan for what can occur when the shutter is stuck open for extended periods. Even a few seconds can introduce a very different relationship between light and dark, as well as the various non-stationary factors like wind, people, traffic, etc., that can create artifacts as they walk through our work area.
A kind of weird calculus, borne of trial and error, comes into play. For example, we know that cars rolling through a time exposure may be moving too quickly to be seen in the final picture, while their headlights will leave a glowing trail. We know that people walking into the shot at the correct speed can vanish to complete invisibility or register as smeary ghosts. It all has to be measured against how long you need for your camera to be sponging up light, and how standard, onwardly moving reality interacts with that process.
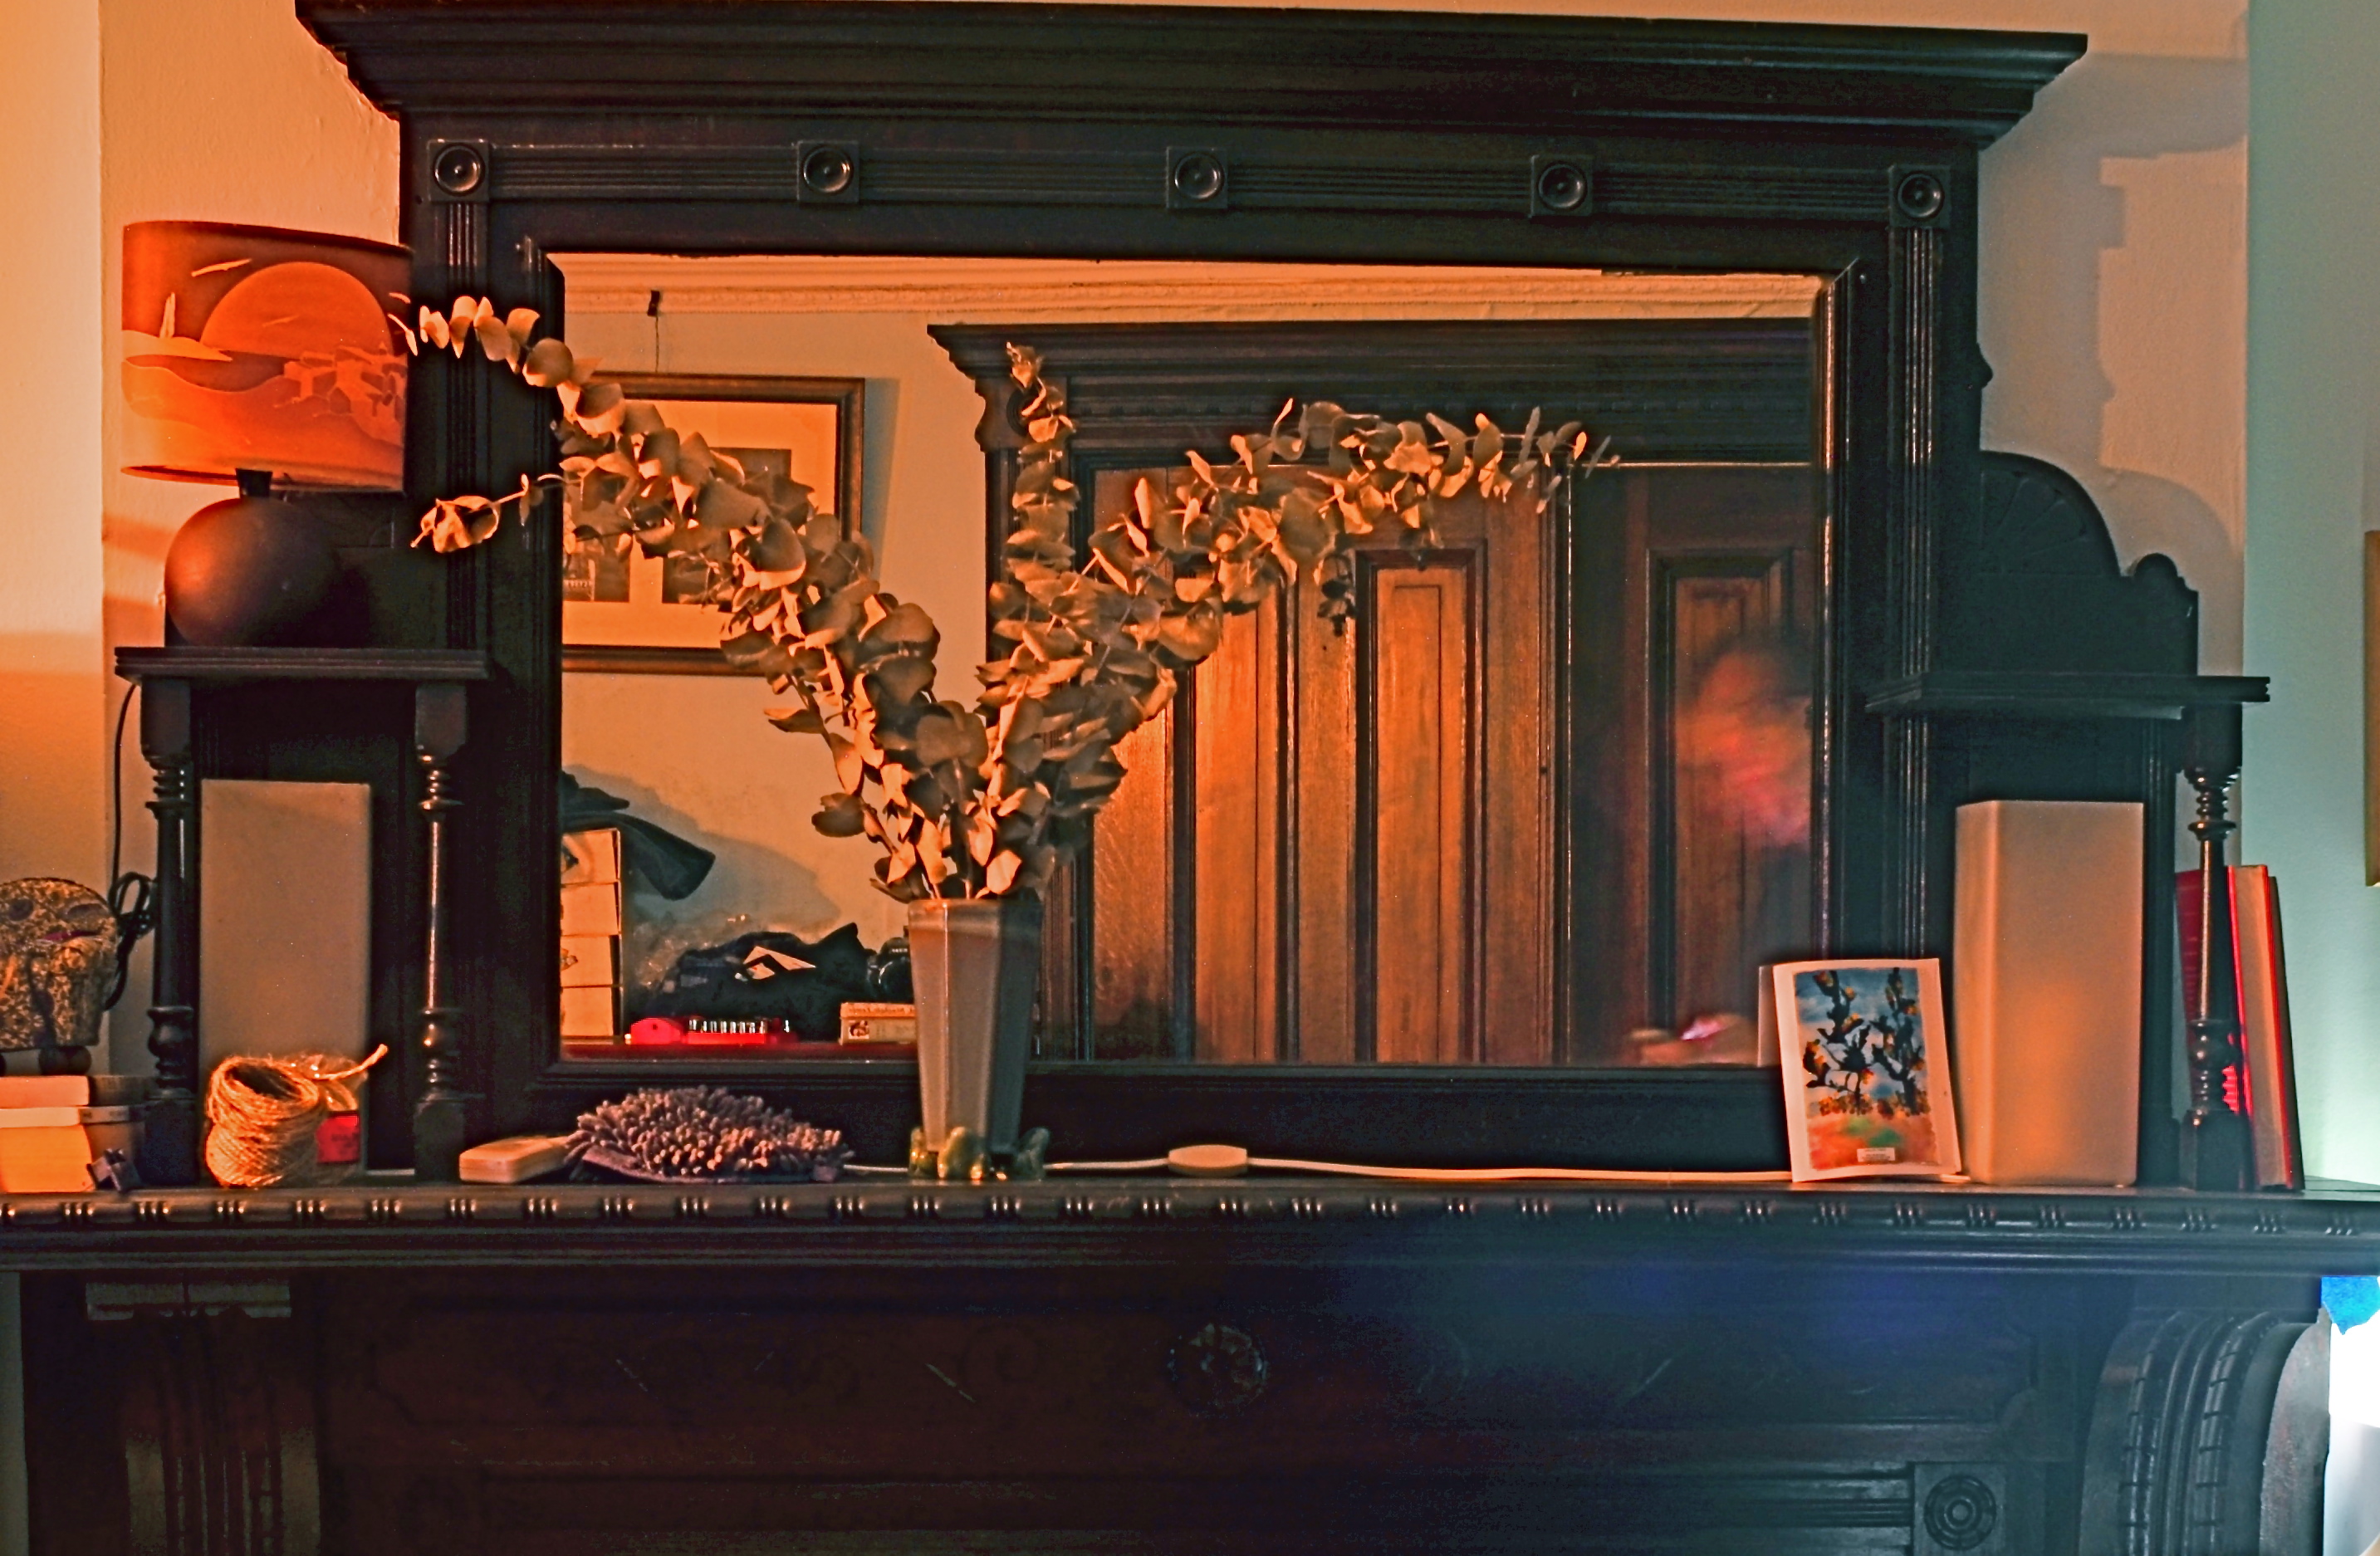
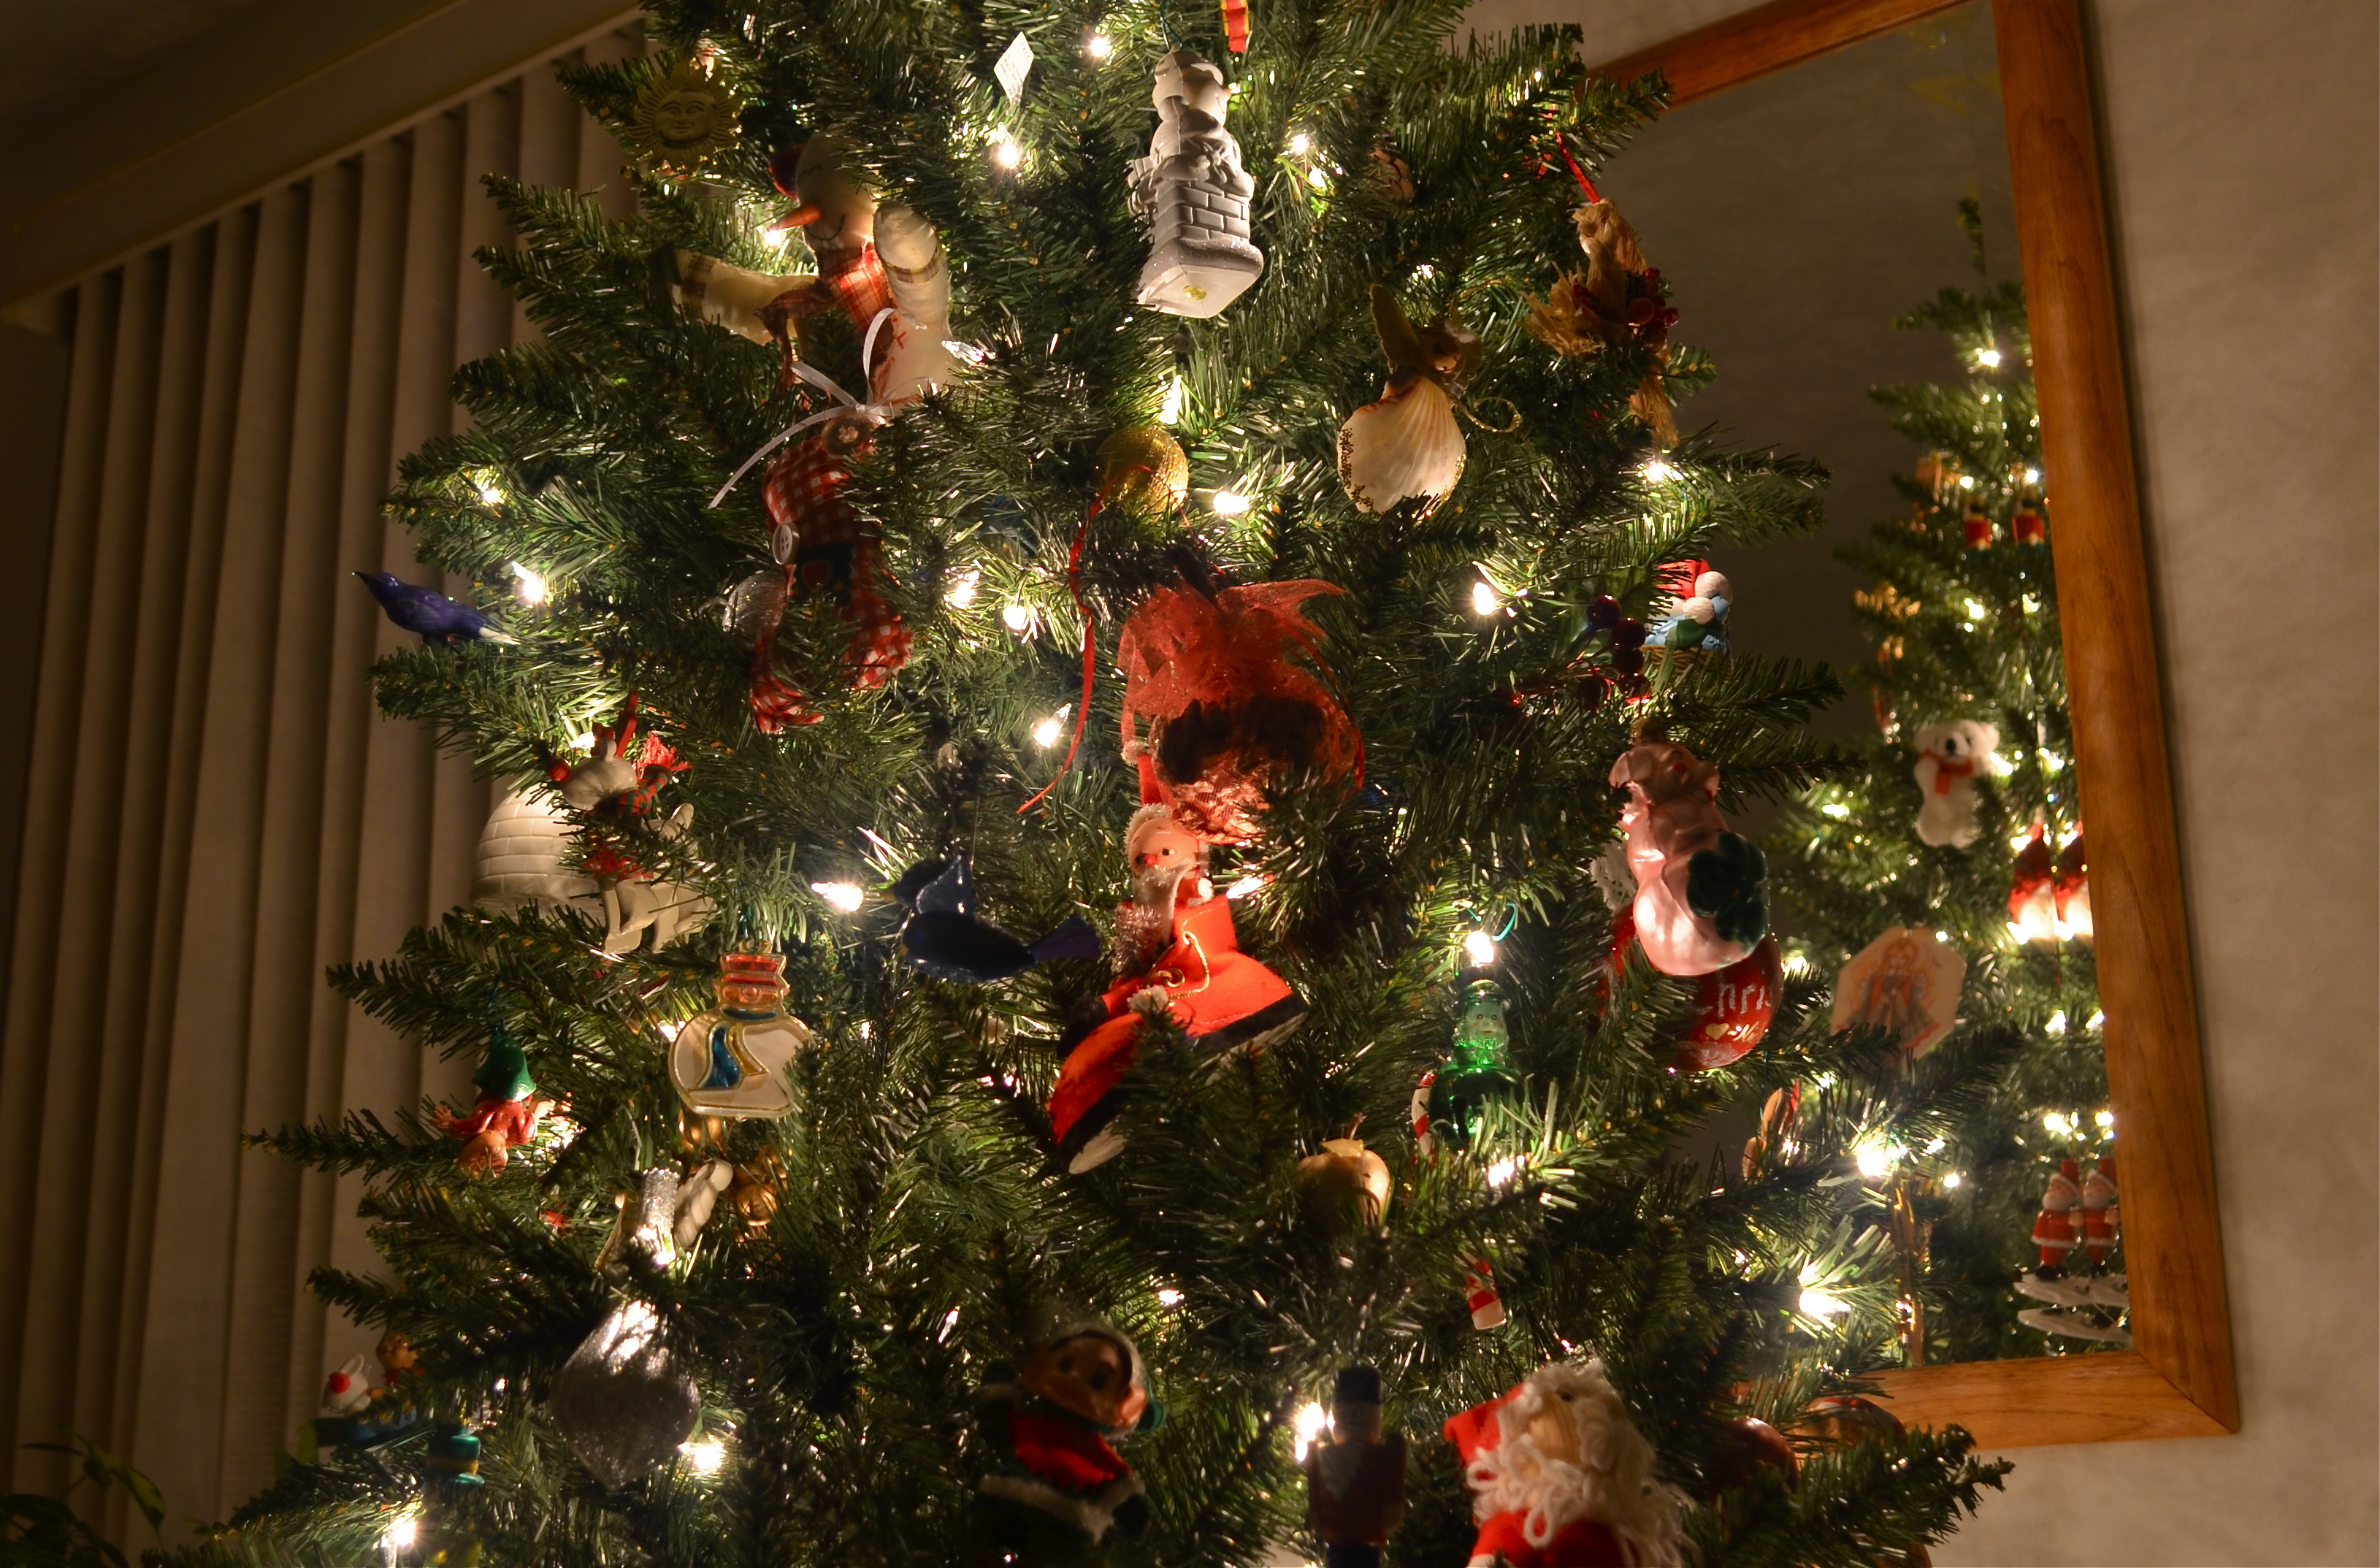
Monu-mantel (2016): A 36-second time exposure with an unscheduled guest appearance (inside the mirror’s right lower frame) by your humble author.
Recently I tried a layered still-life in the darkest room since, well, since darkness, and I knew that I would have to open for a long time. In trying to take a frame that included both a crowded, mirrored mantel in front of me, and the bureau and pictures from behind me that were reflected in the mirror, I balanced my camera on said bureau (you can see it to the left of the vase) and started experimenting with exposure times. Half a dozen or so tries later, I thought I’d nailed the magic number, but, in counting out the time in my head, I got distracted and walked partway into the shot, lingering just long enough to be recorded as the lighter sheen on the right front of the mantle and the facial smear in the right side of the mirror.
Again, we’re back in the weightlessness simulator. Different rules apply here in Oz, Dorothy. So, this picture is forever in the category of How To Get Out Of Your Own Way…..one of those flawed photographic children, that, while not quite flawed enough to merit being sent to military school, will also never be the favored kid, either. Joys of parenthood and all that.
ESCAPING THE DARKNESS
By MICHAEL PERKINS
TO A PHOTOGRAPHER, THE ENTIRE WORLD IS PRETTY MUCH A “PUBLIC PLACE“, or, more properly, his own personal work space. However, that dreamy viewpoint is not shared by the world at large, and shooters who try to harvest their shots in museums, theatres, office lobbies and other popular gathering points are finding, more and more, that they are about as welcome as a case of shingles unless they are (a) quick (b) unobtrusive and (c) polite to the point of fawning.
It’s not hard to understand why.
First, some of the excess paraphernalia that photogs pack can strike curators and security personnel as hazardous, if not downright dangerous. This view is reflected in the growing number of attractions that have, of late, prohibited the use of selfie sticks. That one I kinda get. Photographers have also taken a hit in the number of places that will permit flash of any kind, and tripods and monopods are nearly always forbidden. The real determinant in why public spaces are less inclined to play ball with photographers, however, is that they simply don’t have to. More patrons than ever rely solely on cel phones, which, in turn, have become more sensitive to low-light situations, making for shorter exposures with fewer add-ons, a technical leap that ensures that everyone will come away with at least some kind of picture. If you need a longer exposure at lower ISO (hence less noise), you still need traditional, higher-end gear, but those numbers are shrinking so much that the gatekeepers can be a lot more restrictive overall.
In many dark spaces I simply can’t find a place to stabilize my camera long enough to take an extended exposure. And, with ‘pods off the table as an option, you’re down to benches, ledges, or other precarious surfaces, and, with them, the paranoid hovering of a mother eagle guarding her eggs to steer foot traffic away from her “nest”. A remote shutter release helps, but the whole project can raise the blood pressure a bit. At least with tripods, passersby can see a set space to steer themselves clear of. A crazy man waving his arms, not so much.
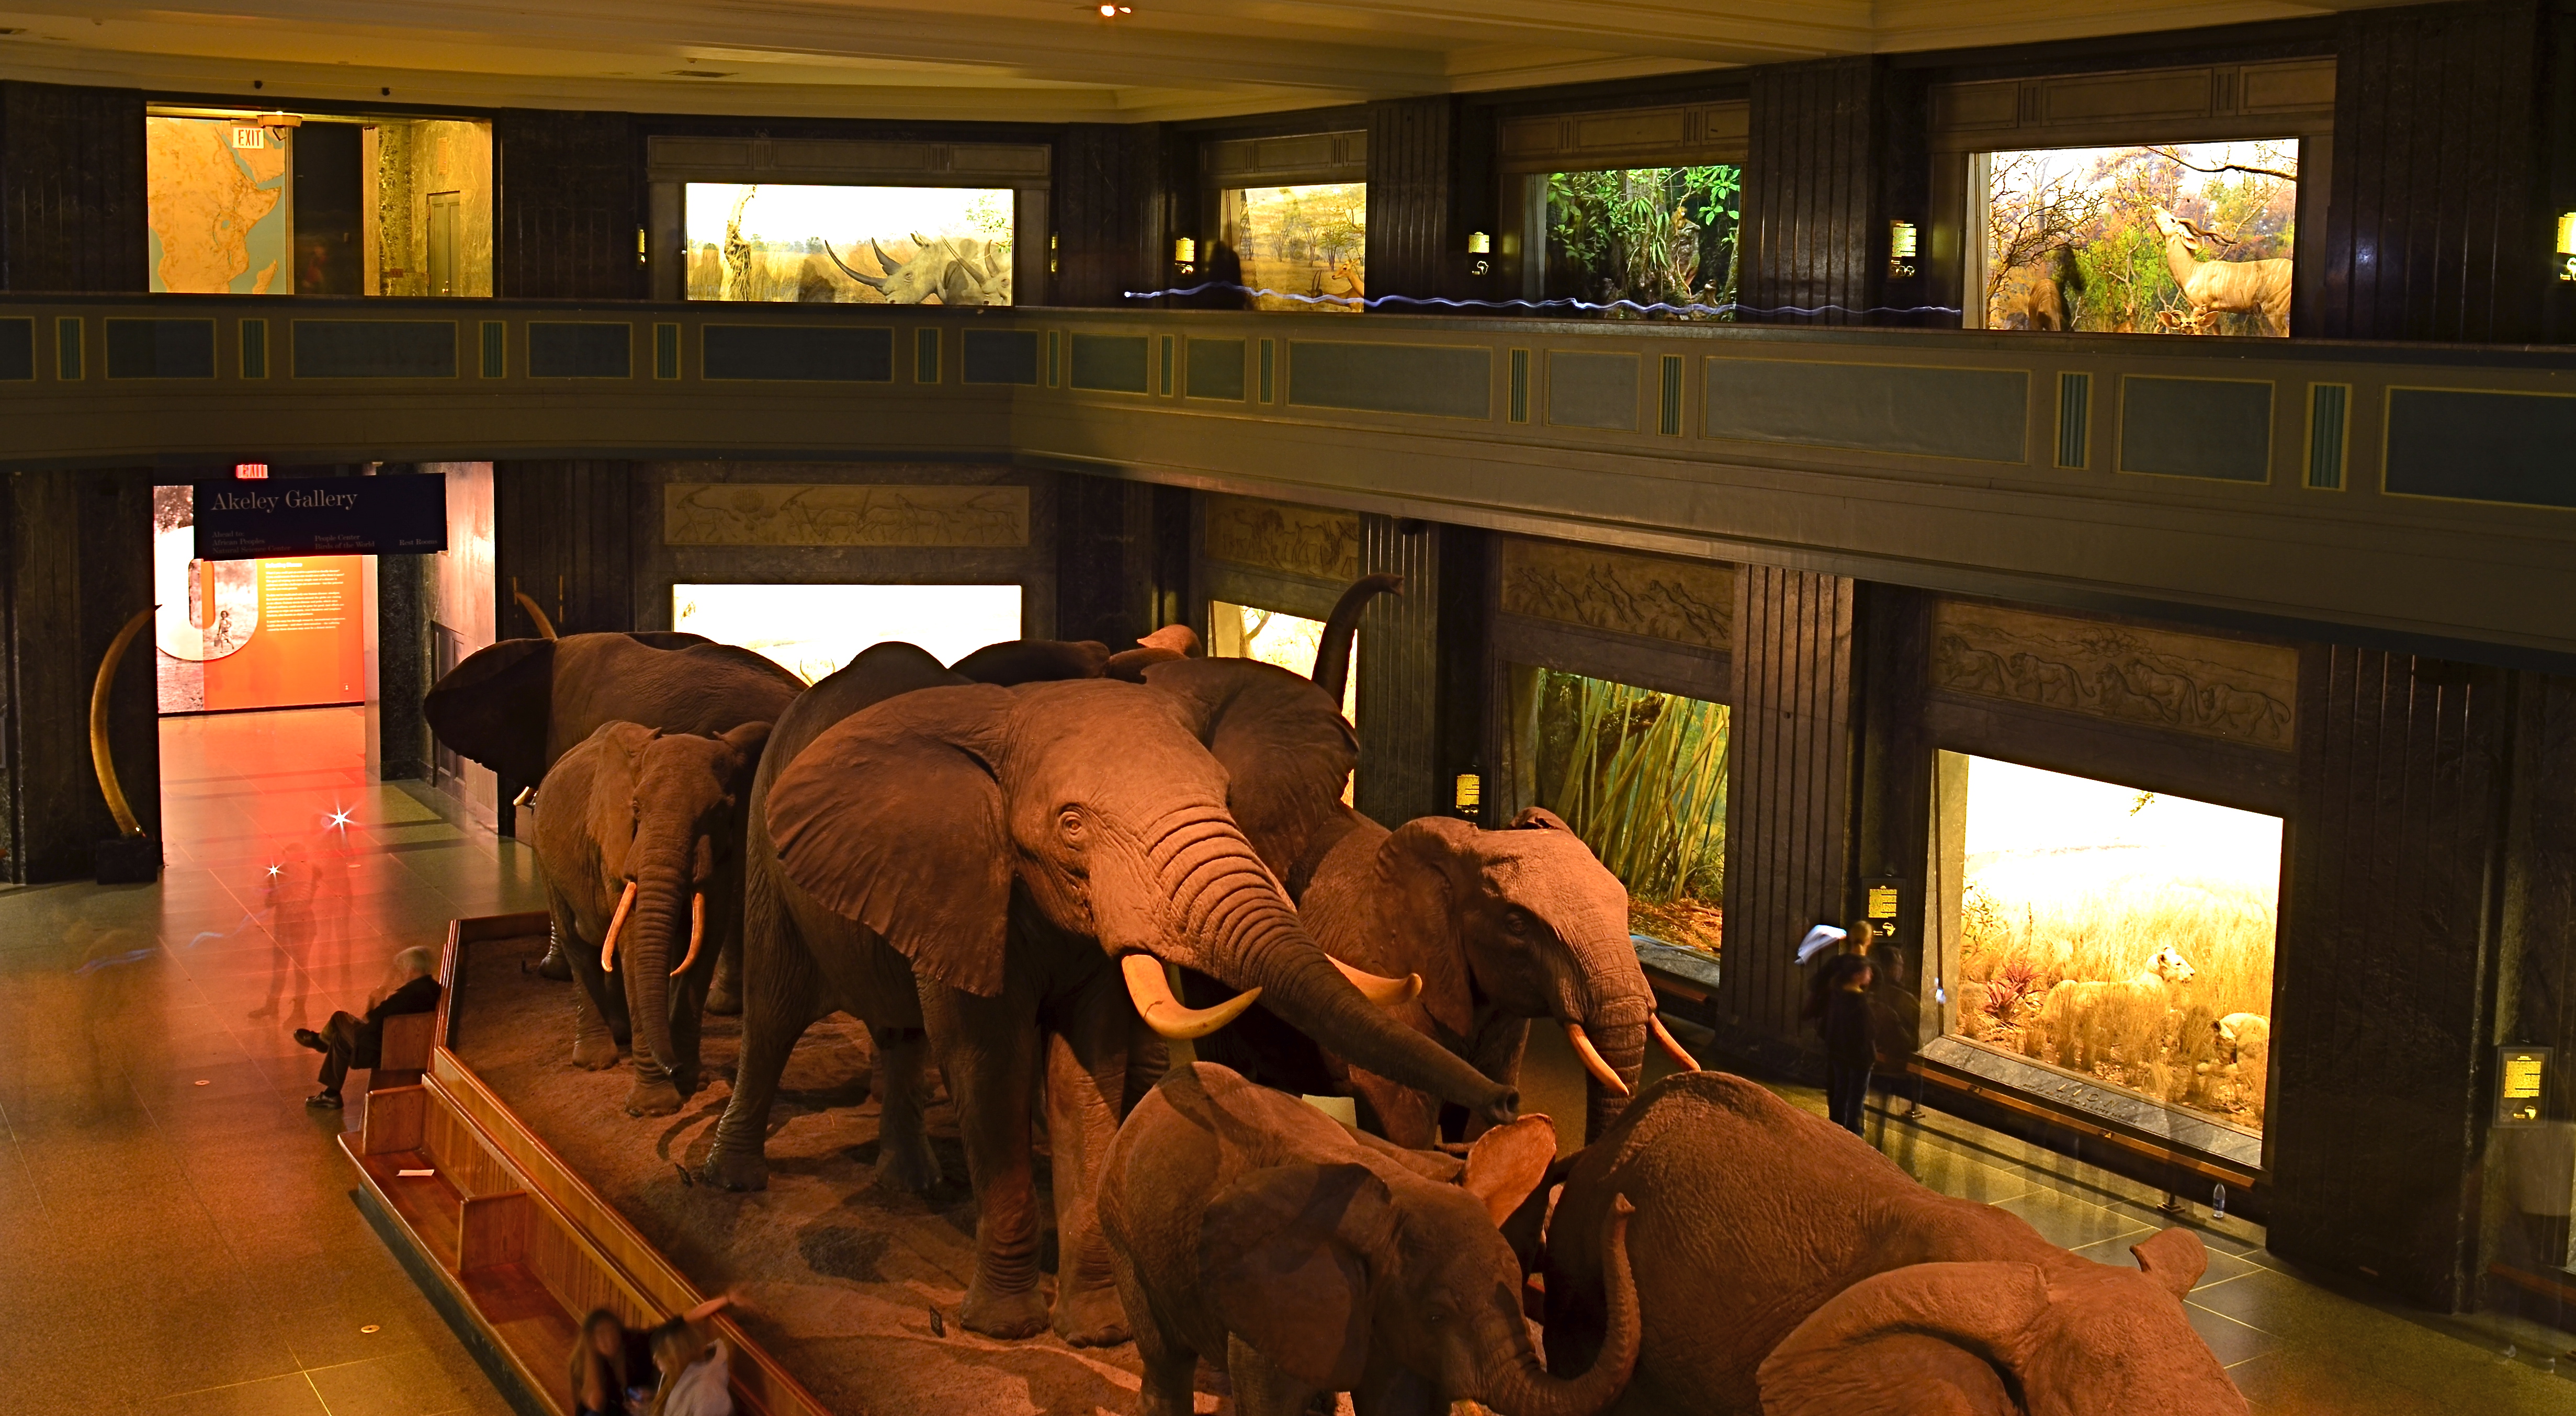
Herd On The Street, 2016. A twenty-five second exposure at f/8, ISO 100, 24mm, from a camera teetering on a museum railing.
The above image was taken in one of the most light-deprived sectors of the New York Museum Of Natural History, with only soft illumination in the side showcases to redeem the pitch-black gloom. No flash would even begin to fill this enormous space, even if it were permitted, and the hall is always crowded, so resting my camera on a narrow rail, twenty-plus feet above the main floor, and going for a long exposure, is the only way for an acceptable degree of detail to emerge from the murk. My wife, who is known for nerves of steel, had to excuse herself and go elsewhere as I was setting up the shot. I couldn’t blame her.
Three or four anxious framings later, I got a workable exposure. As occurs with time exposures, people walking through the scene at a reasonable speed are rendered nearly invisible. The persons near the back of the elephant herd stood still long enough to take a flash snapshot, so their flash burst and some smudgy shadows of their bodies can be seen, as can the trailing LED light that someone else on the upper deck apparently was walking with in the upper right corner. But for this kind of shot, in these modern times, such artifacts are part of the new normal.
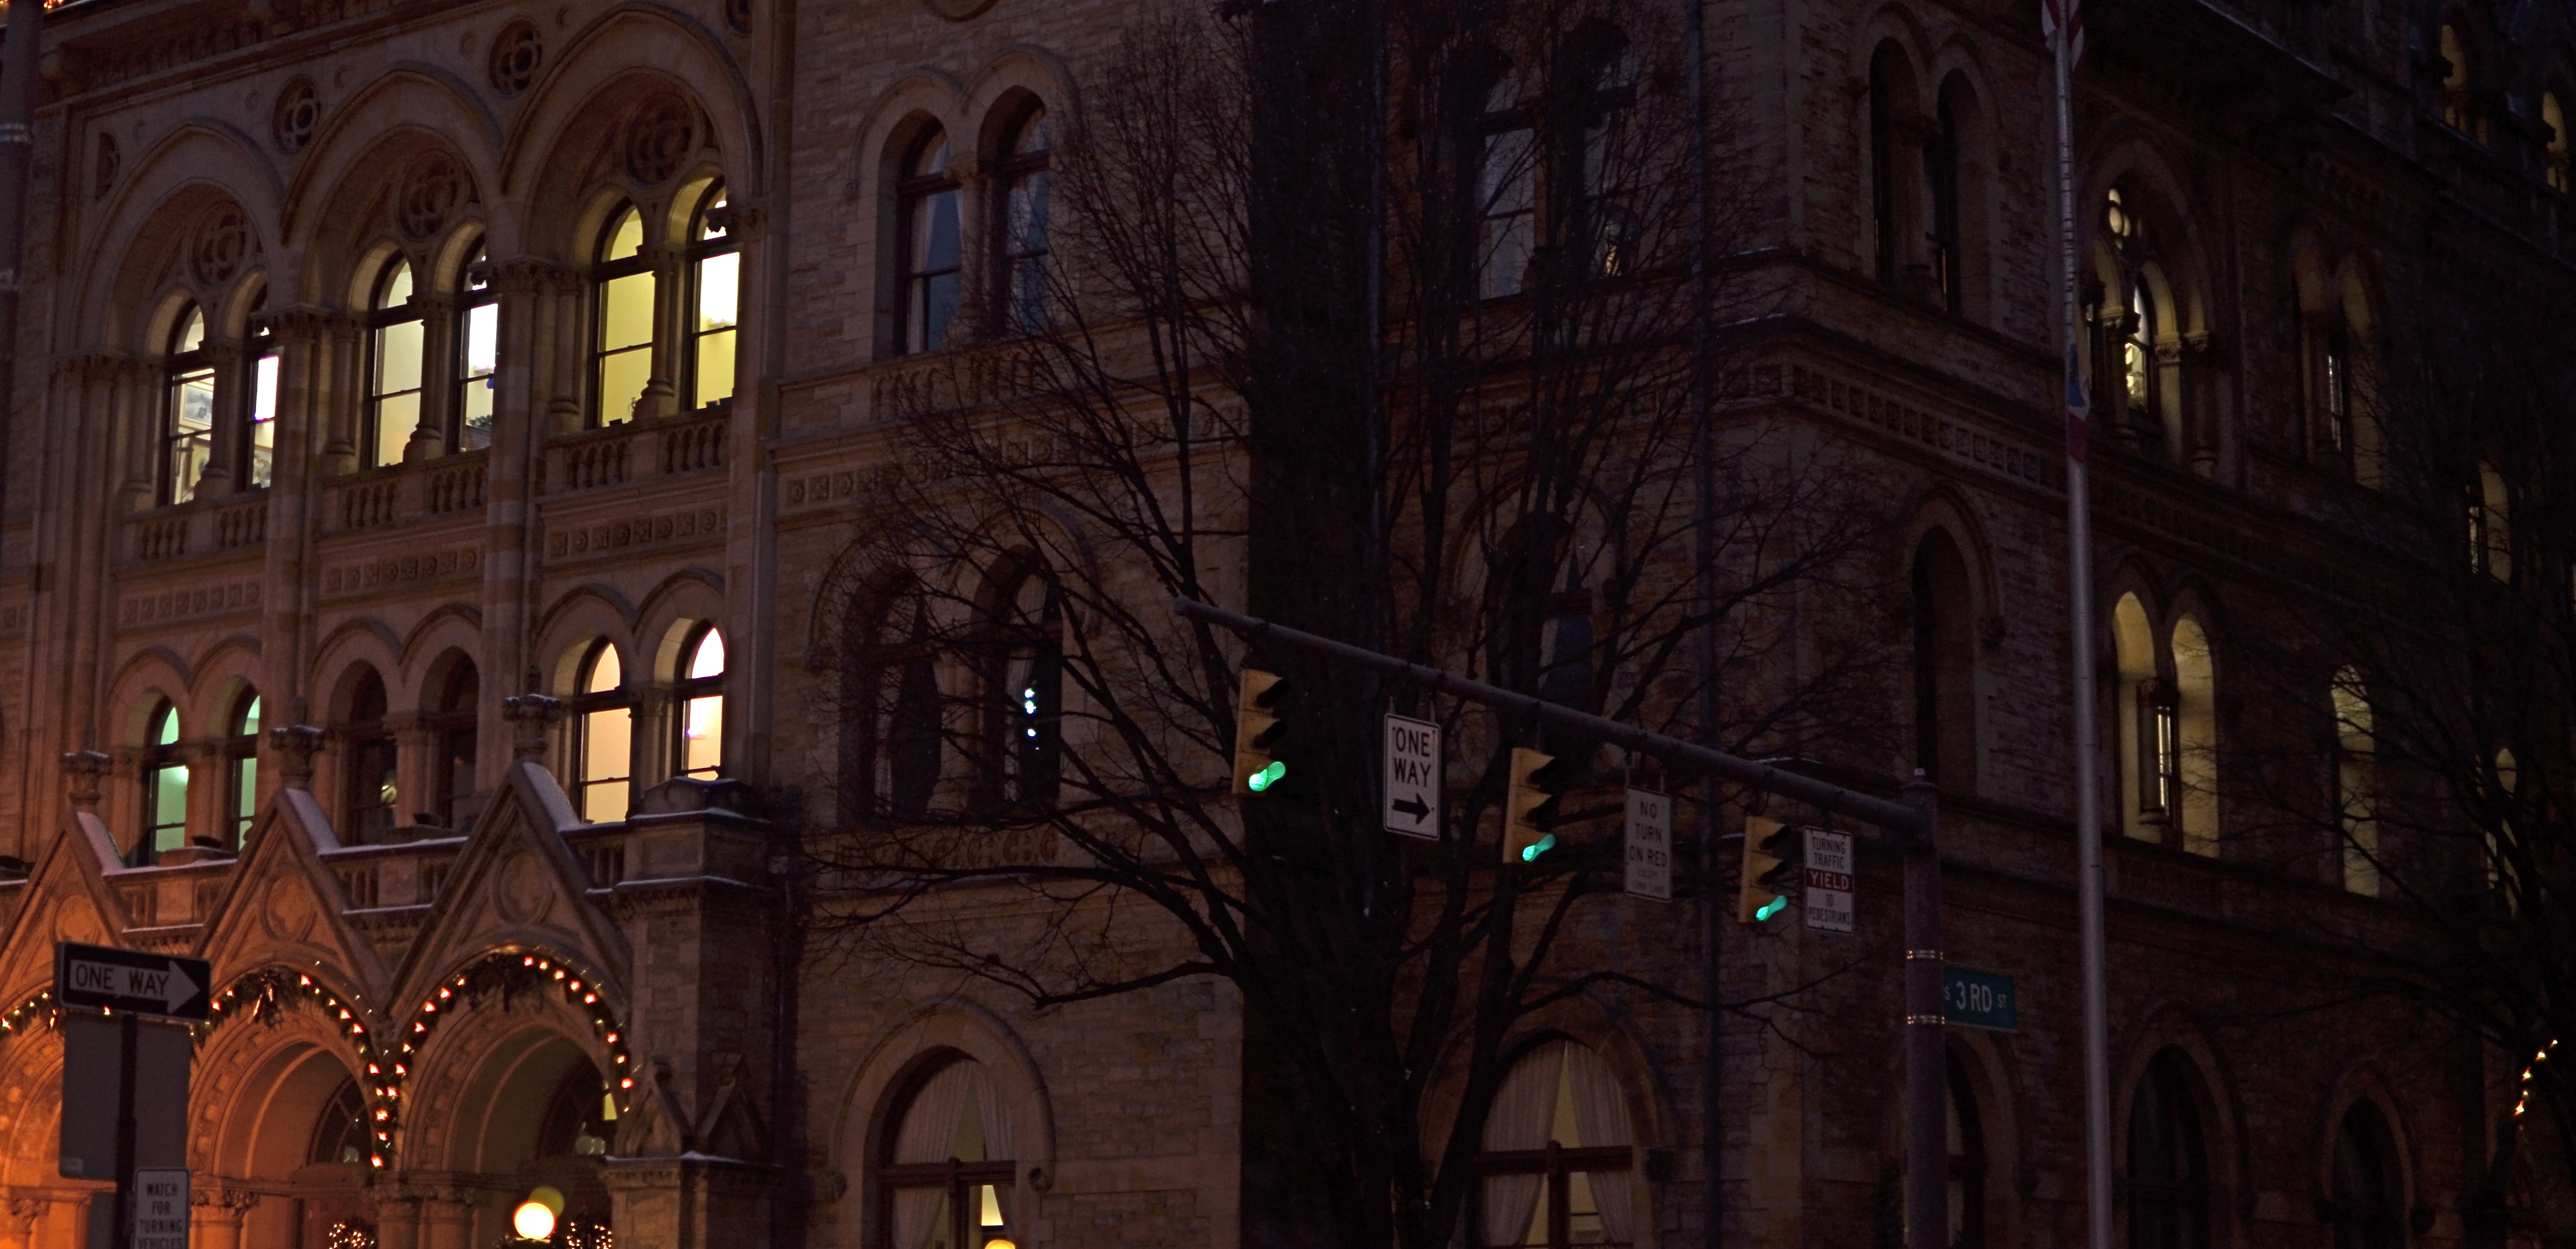
LATE-BURNING CANDLES
Night Bloom, 2016. 8 sec., f/8, ISO 100, 35mm.
By MICHAEL PERKINS
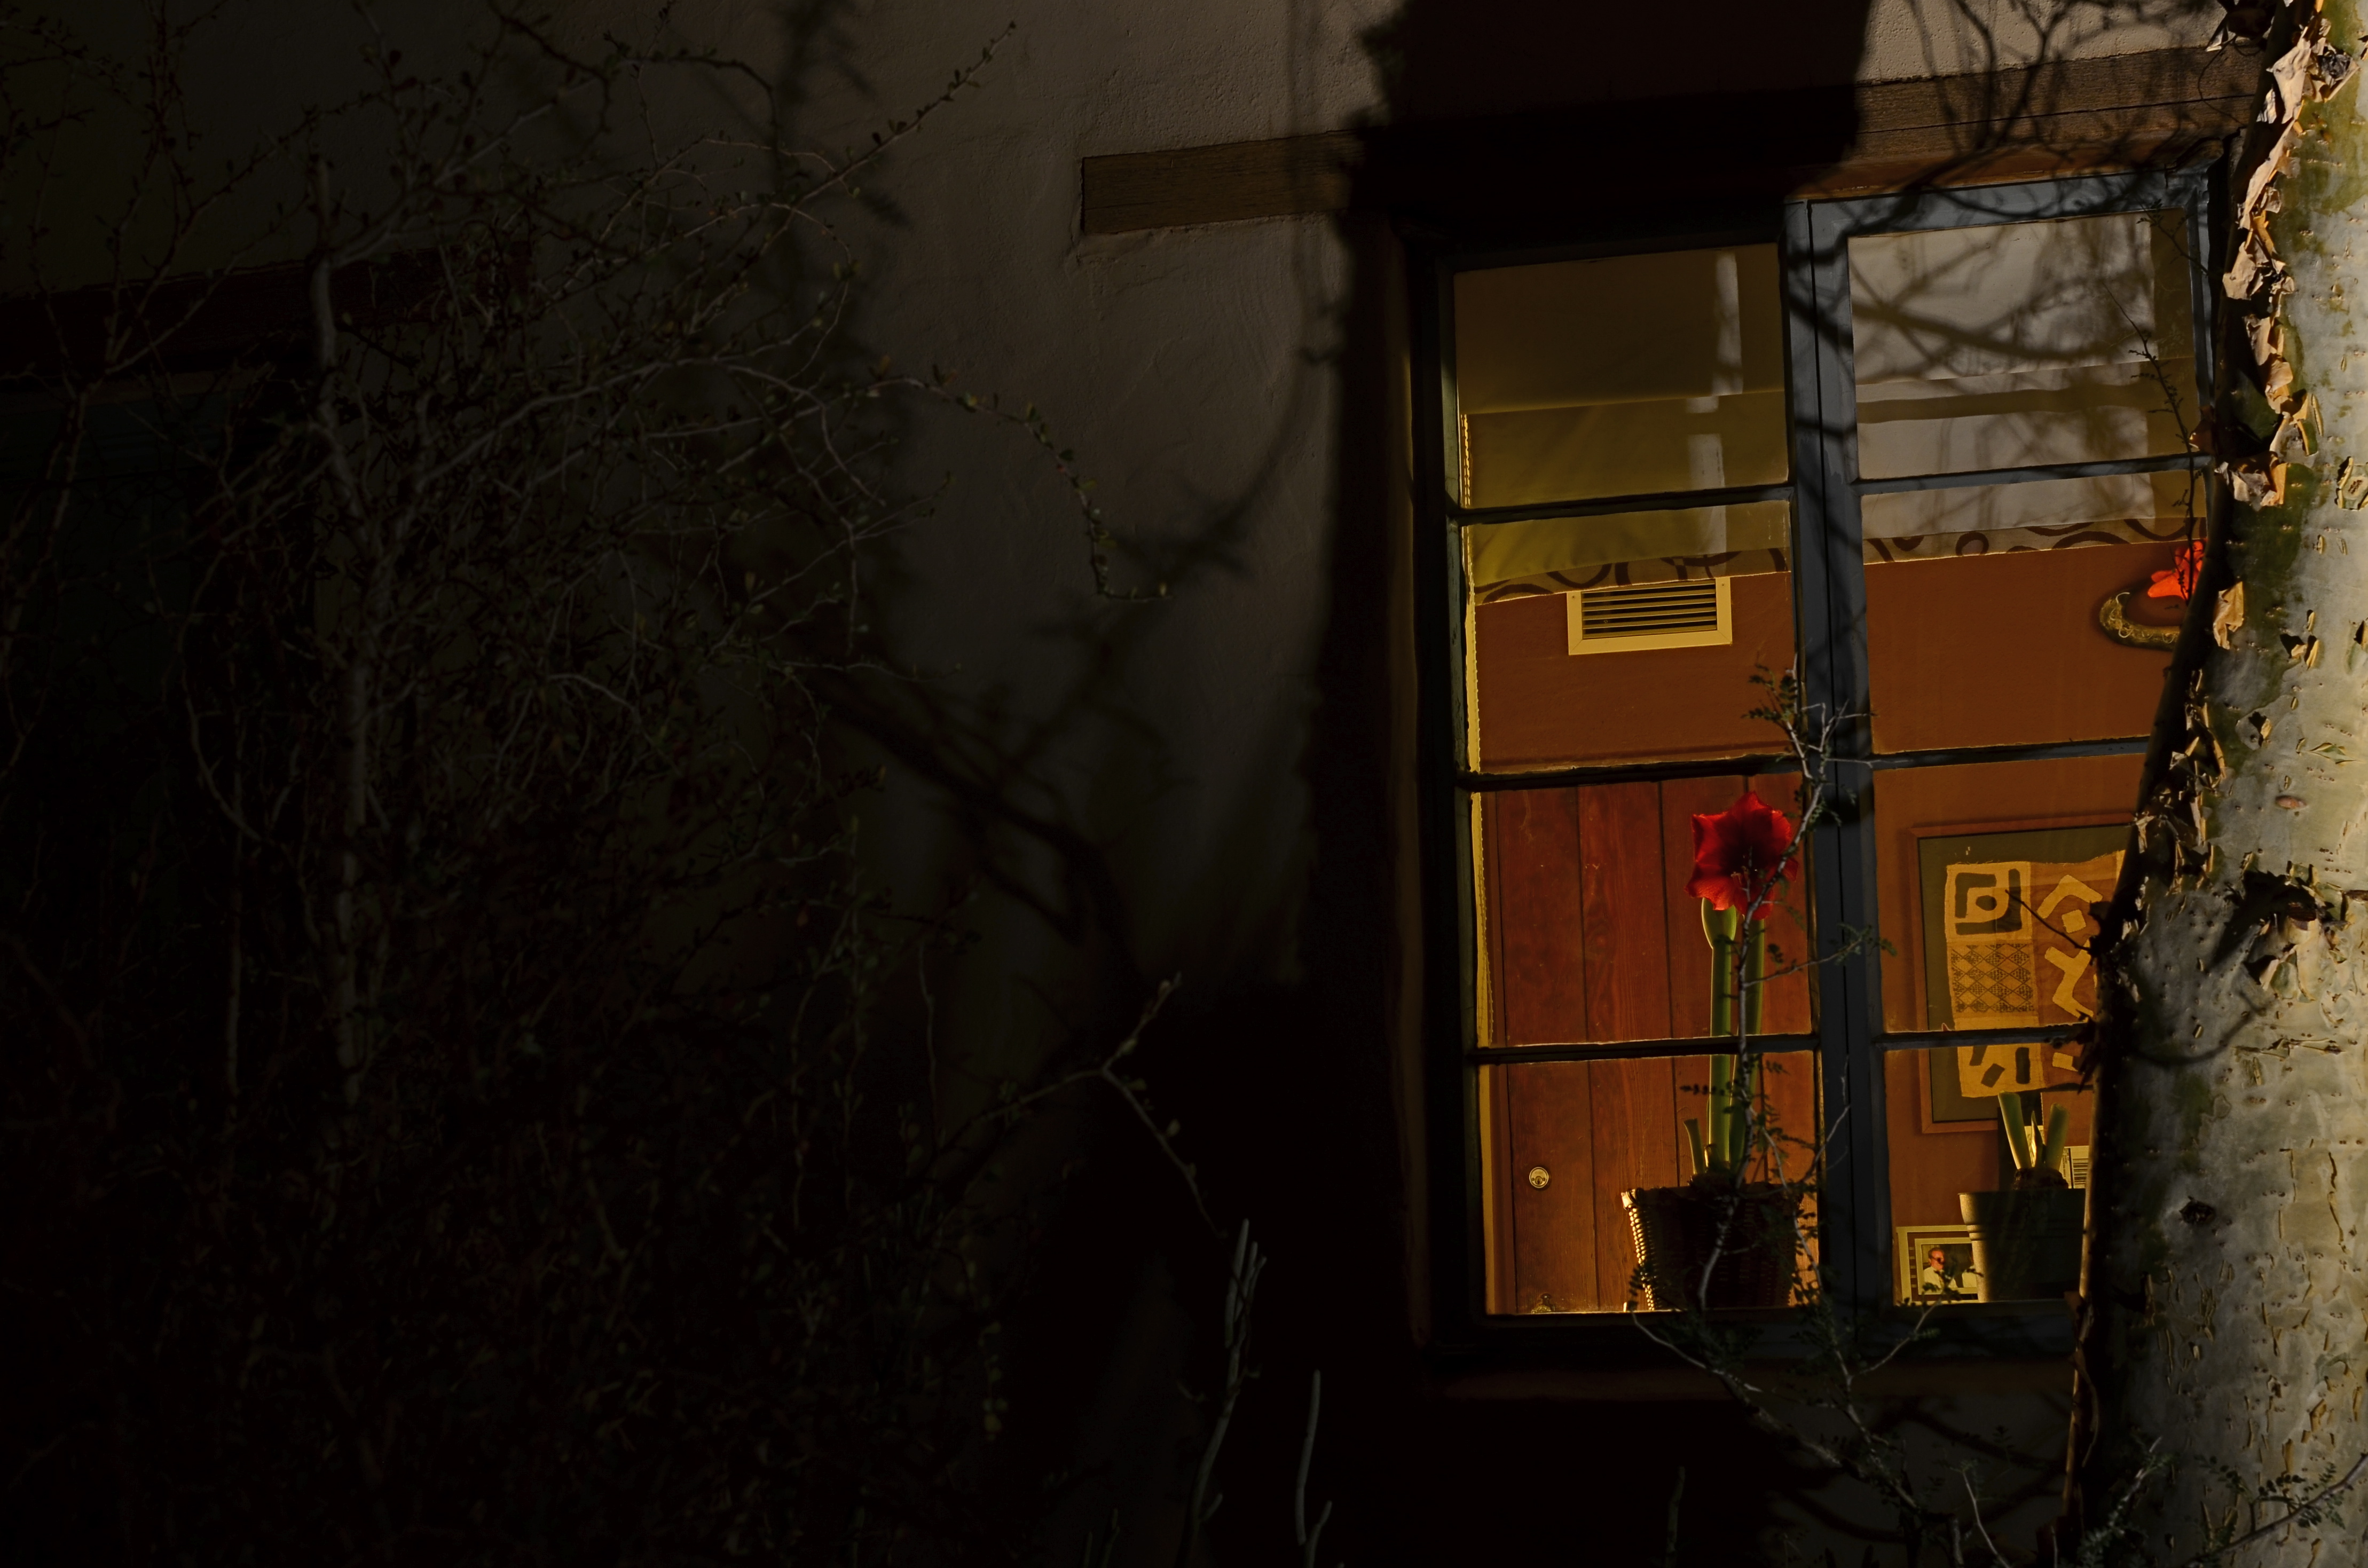
DAYTIME PHOTOGRAPHS OF BUILDING EXTERIORS present the interior contents of apartments, stores and offices in a very muted fashion. Glare, sunlight, and plain old dirty glass, along with the limited scope of some camera sensors, render inside space in a somewhat flattened manner. Fortunately, night shots of the same spaces reveal something completely different, hints of the lives of the people who have locked up and headed home for the evening.
Like a picture framed in a black matte or displayed on a bed of velvet, night images of building interiors, taken from outside those buildings, benefit from that contrasty “punching up” between dark and light. More to the point is how people decide to stage their work space when they clock out. Do they leave a single lamp on to illuminate their desk? Is the room largely dark, but partially painted with ambient light from the cleaning person down the hall? Are certain displays, logos, personal effects altered by the overall reduction in illumination? And, for the photographer, does something different emerge in the feel of the room that seems invisible by day?
I recently walked around a large museum campus, taking medium-distance time exposures of several buildings whose exterior lighting scheme seemed altered at night, when I saw the office window you see above. The overall scheme of light in the room was warm. The gorgeous amaryllis plant arching over someone’s desk not only worked that slightly orange room light, but was made especially seductive with the deepening of its own colors. Here was a workspace where someone drew rest, beauty, and solace from the inclusion of just one extra humanizing item. And, after dark, it glowed like a coal to passersby. I had to have it, at least inside my camera.
I’m not saying that all peeks through all windows yield treasures to the photographer’s eye. But the sheer volume of visual information on a city street during the day is cut by half after sundown, and occasionally, you find a late-burning candle that has spent the daylight hours hiding in plain sight.
PICTURES WITH A LEG (OR LEGS) TO STAND ON
By MICHAEL PERKINS
YOU HAVE SEEN THEM A MILLION TIMES. Those brave souls who, despite multiple trips to Failed Fotoland, optimistically point their cel cameras at distant and dark objects, hoping their puny on-board flashes will illuminate cavernous concert halls, banish shadows from vast cathedrals, or, God bless them, turn the night sky into a luminous planetarium. They have faith, these people. But they don’t often take home the prize.
Immense, dark masses of subject matter, from mountain sides to moody urban streets, simply cannot be uniformly exposed with a sudden lucky burst of on-camera flash. The only way to gather enough light to get a usable exposure of such things is to leave your shutter open long enough to let more light soak in. Think dribble instead of flood. Time exposures are remarkably effective in “burning in” an image slowly, but they have their own science and technique, and they must be patiently practiced. They are the dead opposite of a quick fix, but they are worth the trouble.
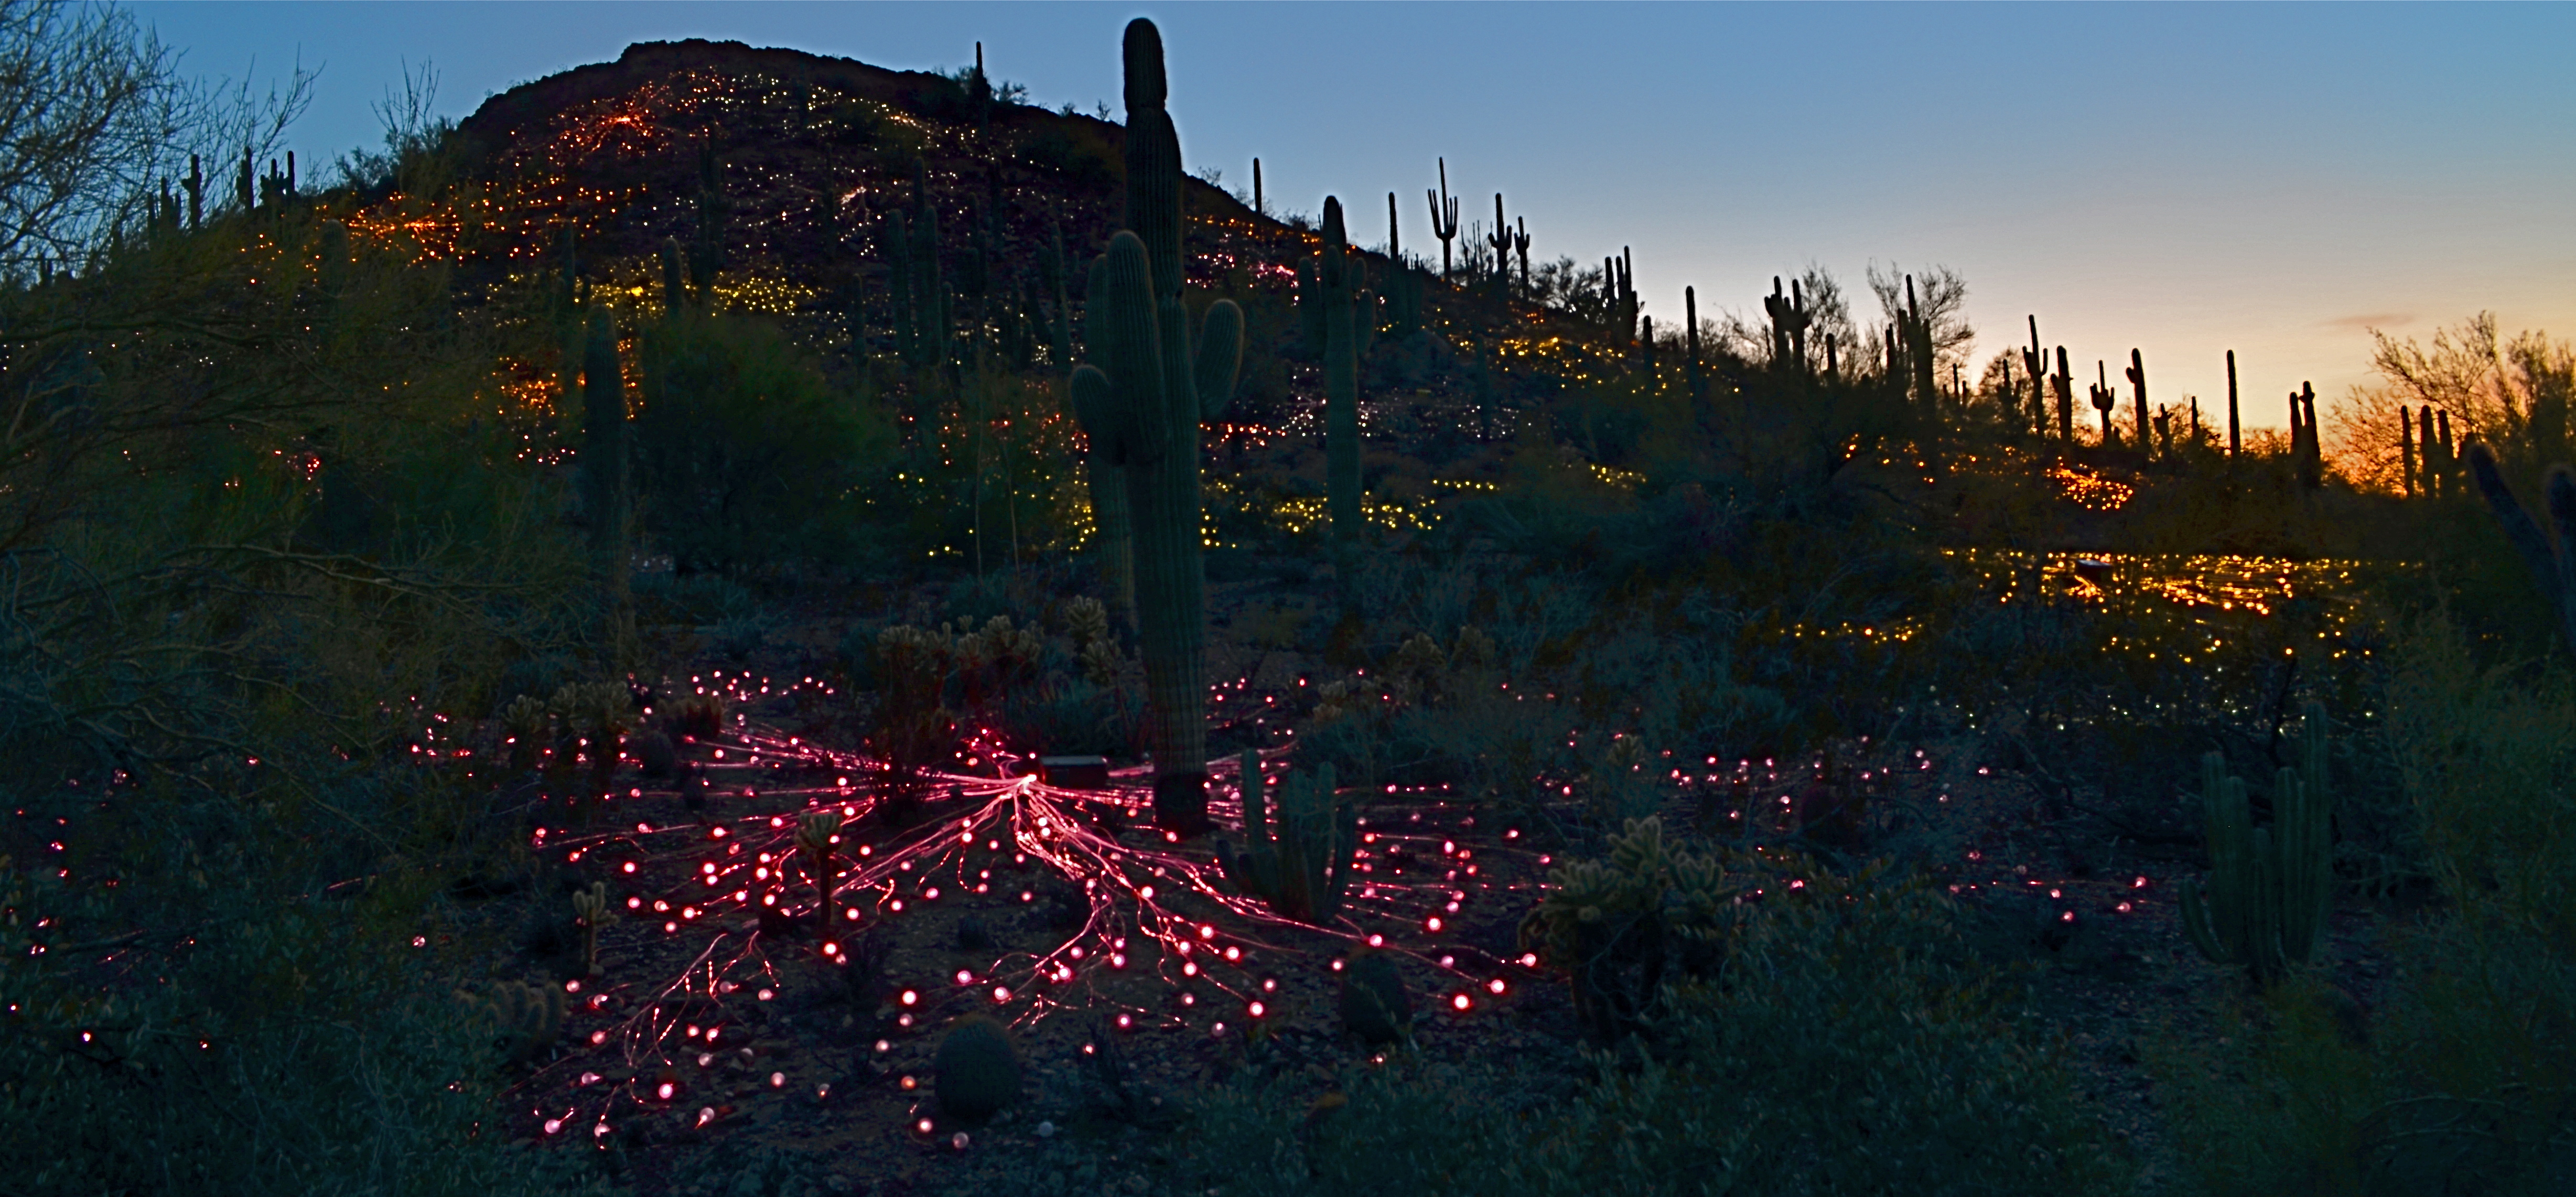
Ember Mountain, 2016. Two separate time exposures nearly a half-hour apart, blended in Photomatix’ “Exposure Fusion” mode.
With today’s editing software, it’s easier than ever to customize even your best time exposures, combining several shots taken over a given time sequence to arrive at a satisfying balance of elements. In the above picture, I wanted to show the colorful “Field Of Light” installation created by artist Bruce Munro for Phoenix’ Desert Botanical Garden, which blankets a desert hillside with over 30,000 globes of color-shifting light. I set up my tripod about a half-hour before local sunset and took exposures five minutes apart until about forty minutes into the onset of evening.
From that broad sequence, I selected two frames; one taken before dark, in which the underlying detail of the hill (desert plants, rocks, etc.) could still be seen, and one taken just after the sky had gone dark to the naked eye, but blue to the camera. I then composited the shots in Photomatix’ “exposure fusion” mode, which is a bit like stacking two backlit slides and gradually changing how much of each can bleed into the other. My object was to get both a blue, but not black, twilight sky and at least some detail from the natural terrain. Neither individual shot could achieve all of this alone, however, given the ease of doing an exposure fusion in nearly any kind of photo software these days, it was a snap to grab the best elements of both frames.
Epilogue: during the fairly long stretch of time I was standing behind my tripod, I counted over two dozen separate visitors who boldly stepped up, aimed their cellphones, cranked off a quick flash, and loped away, muttering something like, “well, that didn’t work.” Some shots are like low-lying fruit, and some have to be coaxed out of the camera. Knowing which is which, ahead of time, makes for happier results.
WITHOUT A LEG TO STAND ON
A tripod night exposure that could have been a contender, had I truly been prepared.
By MICHAEL PERKINS
SHOOTING ON A TRIPOD IS OFTEN RECOMMENDED as the way to afford yourself the most stability in a long exposure. After all, few of us are robotic enough to hold a camera stock-still for anything below a third of a second, so it’s a no-brainer to park your camera on something that’s too inhuman to flinch. You can also take amazing stuff hand-held on shorter night exposures, so long as you (a) have a lens that will shoot around f/1.8 or wider and (b) you can live with the noise a higher ISO will engender.
So, yeah, tripods have their place, but they are not the only determinants in the success of a night-time shoot. And those other x-factors can severely compromise your results. There is the stability of the tripod itself, which isn’t a big sweat if you shelled out $900 for a carbon-fiber Gitzo Pan/Tilt GK, but might generate heartburn if you got something closer to a set of metallic popsicle sticks for $29 at Office Max. The shot above was taken using my own modest (cheap) rig atop Mount Washington across from downtown Pittsburgh, and a few of the healthier gusts threatened to take it and me on a quick lap around the riverfront. Some people buy sandbags. Some believe in the power of prayer. Your choice.
Another x-factor for ‘pod shots is the actual weather you’re shooting in, which will, let’s say, shape your enthusiasm for staying out long enough to get the perfect shot. The smaller your aperture, the longer the exposure. The more long exposures you take, the longer you, yourself, are “exposed”…to snow, sleet, and all that other stuff that mailmen laugh at. Again, referencing the above image, I was contending with freezing drizzle and a windbreaker that was way too thin for heroics. Did I cut my session short? i confess that I did.
I could also mention the nagging catcalls of the other people in my party, who wanted me to, in their profound words, “just take the damned picture” so they could partake of (a)a warm bar, (b) a cold beer, (c) a hot waitress. Result: a less than perfect capture of a fairly good skyline. A little over-exposed, washing out the color. A little mushy, since the selfsame over-exposure allowed the building lights to burn in, rendering them glow-y instead of pin sharp. I was able to fix some of the color deficiencies later, but this is not a “greatest hits” image by any stretch.
Tripods can be lifesavers, but you must learn to maximize their effectiveness just like any other piece of camera equipment. If you’re going to go to a buncha trouble to get a shot, the final result should reflect all that effort, quality-wise.
SEEING THROUGH THE STORM
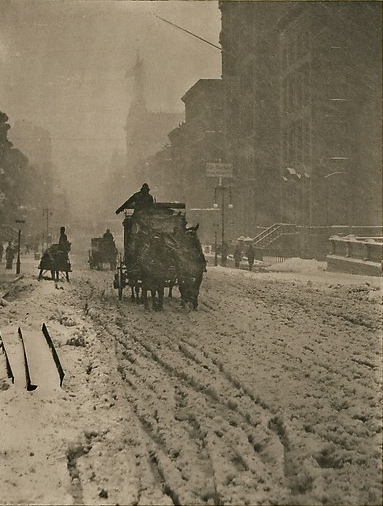
At the time of its initial publication in 1893, this image by Alfred Stieglitz was deemed a failure.
By MICHAEL PERKINS
LOOK CAREFULLY AT THE PHOTOGRAPH TO YOUR LEFT. It was, at one time, judged by contemporary critics as a grand failure. Alfred Stieglitz, the father of modern photography, and the first to advocate for its status as a legitimate art form, made this image after standing for three hours in the miserable blizzard that had buried the New York of 1893 in mounds of cottony snow.
The coachman and his horses are rendered in a soft haze due to the density of the wind-driven snow, and by the primitive slowness of the photographic plates in use at the time. There was, for photographers, no real option for “freezing the action” (unwitting pun) or rendering the kind of razor sharpness that is now child’s play for the simplest cameras, and so a certain amount of blur was kind of baked into Stieglitz’ project. But look at the dark, moody power of this image! This is a photograph that must live outside the bounds of what we consider “correct”.
More importantly, a technically flawless rendering of this scene would have drained it of half its impact.
Of course, at the time it was created, Stieglitz’ friends encouraged him to throw the “blizzard picture” away. Their simple verdict was that the lack of sharpness had “spoiled” the image. Being imperfect, it was regarded as unworthy. Stieglitz, who would soon edit Camera Work, the world’s first great photographic magazine, and organize the Photo-Secession, America’s first collective of artists for promotion of the photo medium, had already decided that photographs must be more than the mere technical recording of events. They could emphasize drama, create mood, evoke passions, and force the imagination every bit as effectively as did the best paintings.
Within a few years of the making of this image, the members of the Photo-Secession began to tweak and mold their images to actually emulate painting. The movement, called Pictorialism, did not last long, as the young turks of the early 20th century would soon demand an approach to picture-making that matched the modern age. The important thing, however, is that Stieglitz fought for his vision, insisted that there be more than one way to make a picture. That example needs to be followed today more than ever. When you make an image, you must become its champion. This doesn’t mean over-explaining or asking for understanding. It means shooting what you must, honing your craft, and fighting for your vision in the way you bring it to life.
NIGHT GALLERY
By MICHAEL PERKINS
I RECENTLY READ AN INTRIGUING STATEMENT ON THE DIFFERENCE BETWEEN PAINTING AND PHOTOGRAPHY to the effect that painters start with nothing, and add information until the image is created, whereas photographers start with total information and work to selectively remove things until their pictures are made. Of course, there are times when both artists borrow the approach of the other, and the practice of “light painting” is one place where photogs can actually wield a kind of brush, beginning in pure darkness and then adding illumination, literally by hand, until a picture, layer by layer, emerges.
Bascially, you’re going down two potential paths with light painting. One is the depiction of fantasy, a custom light creation that is the central subject of the image, rather than an augmentation of something else. Visit the tutorial link below to view some of these visions, as they are truly fascinating (not to mention work-intensive): the flaming fireball dancing across the lake, the geometric noodlings hanging in mid-air, the angel wings growing out of your girlfriend’s back, and so on. The other approach is to amplify the impact of a subject which has either no illumination at night or a lighting scheme that is counter to the mood you’re going for. In this case, your flashlight, LED or light coil is creating the visual reality that you wish existed. It’s “reality-plus”, rather than a complete fantasy. This is the avenue I have tended to favor.
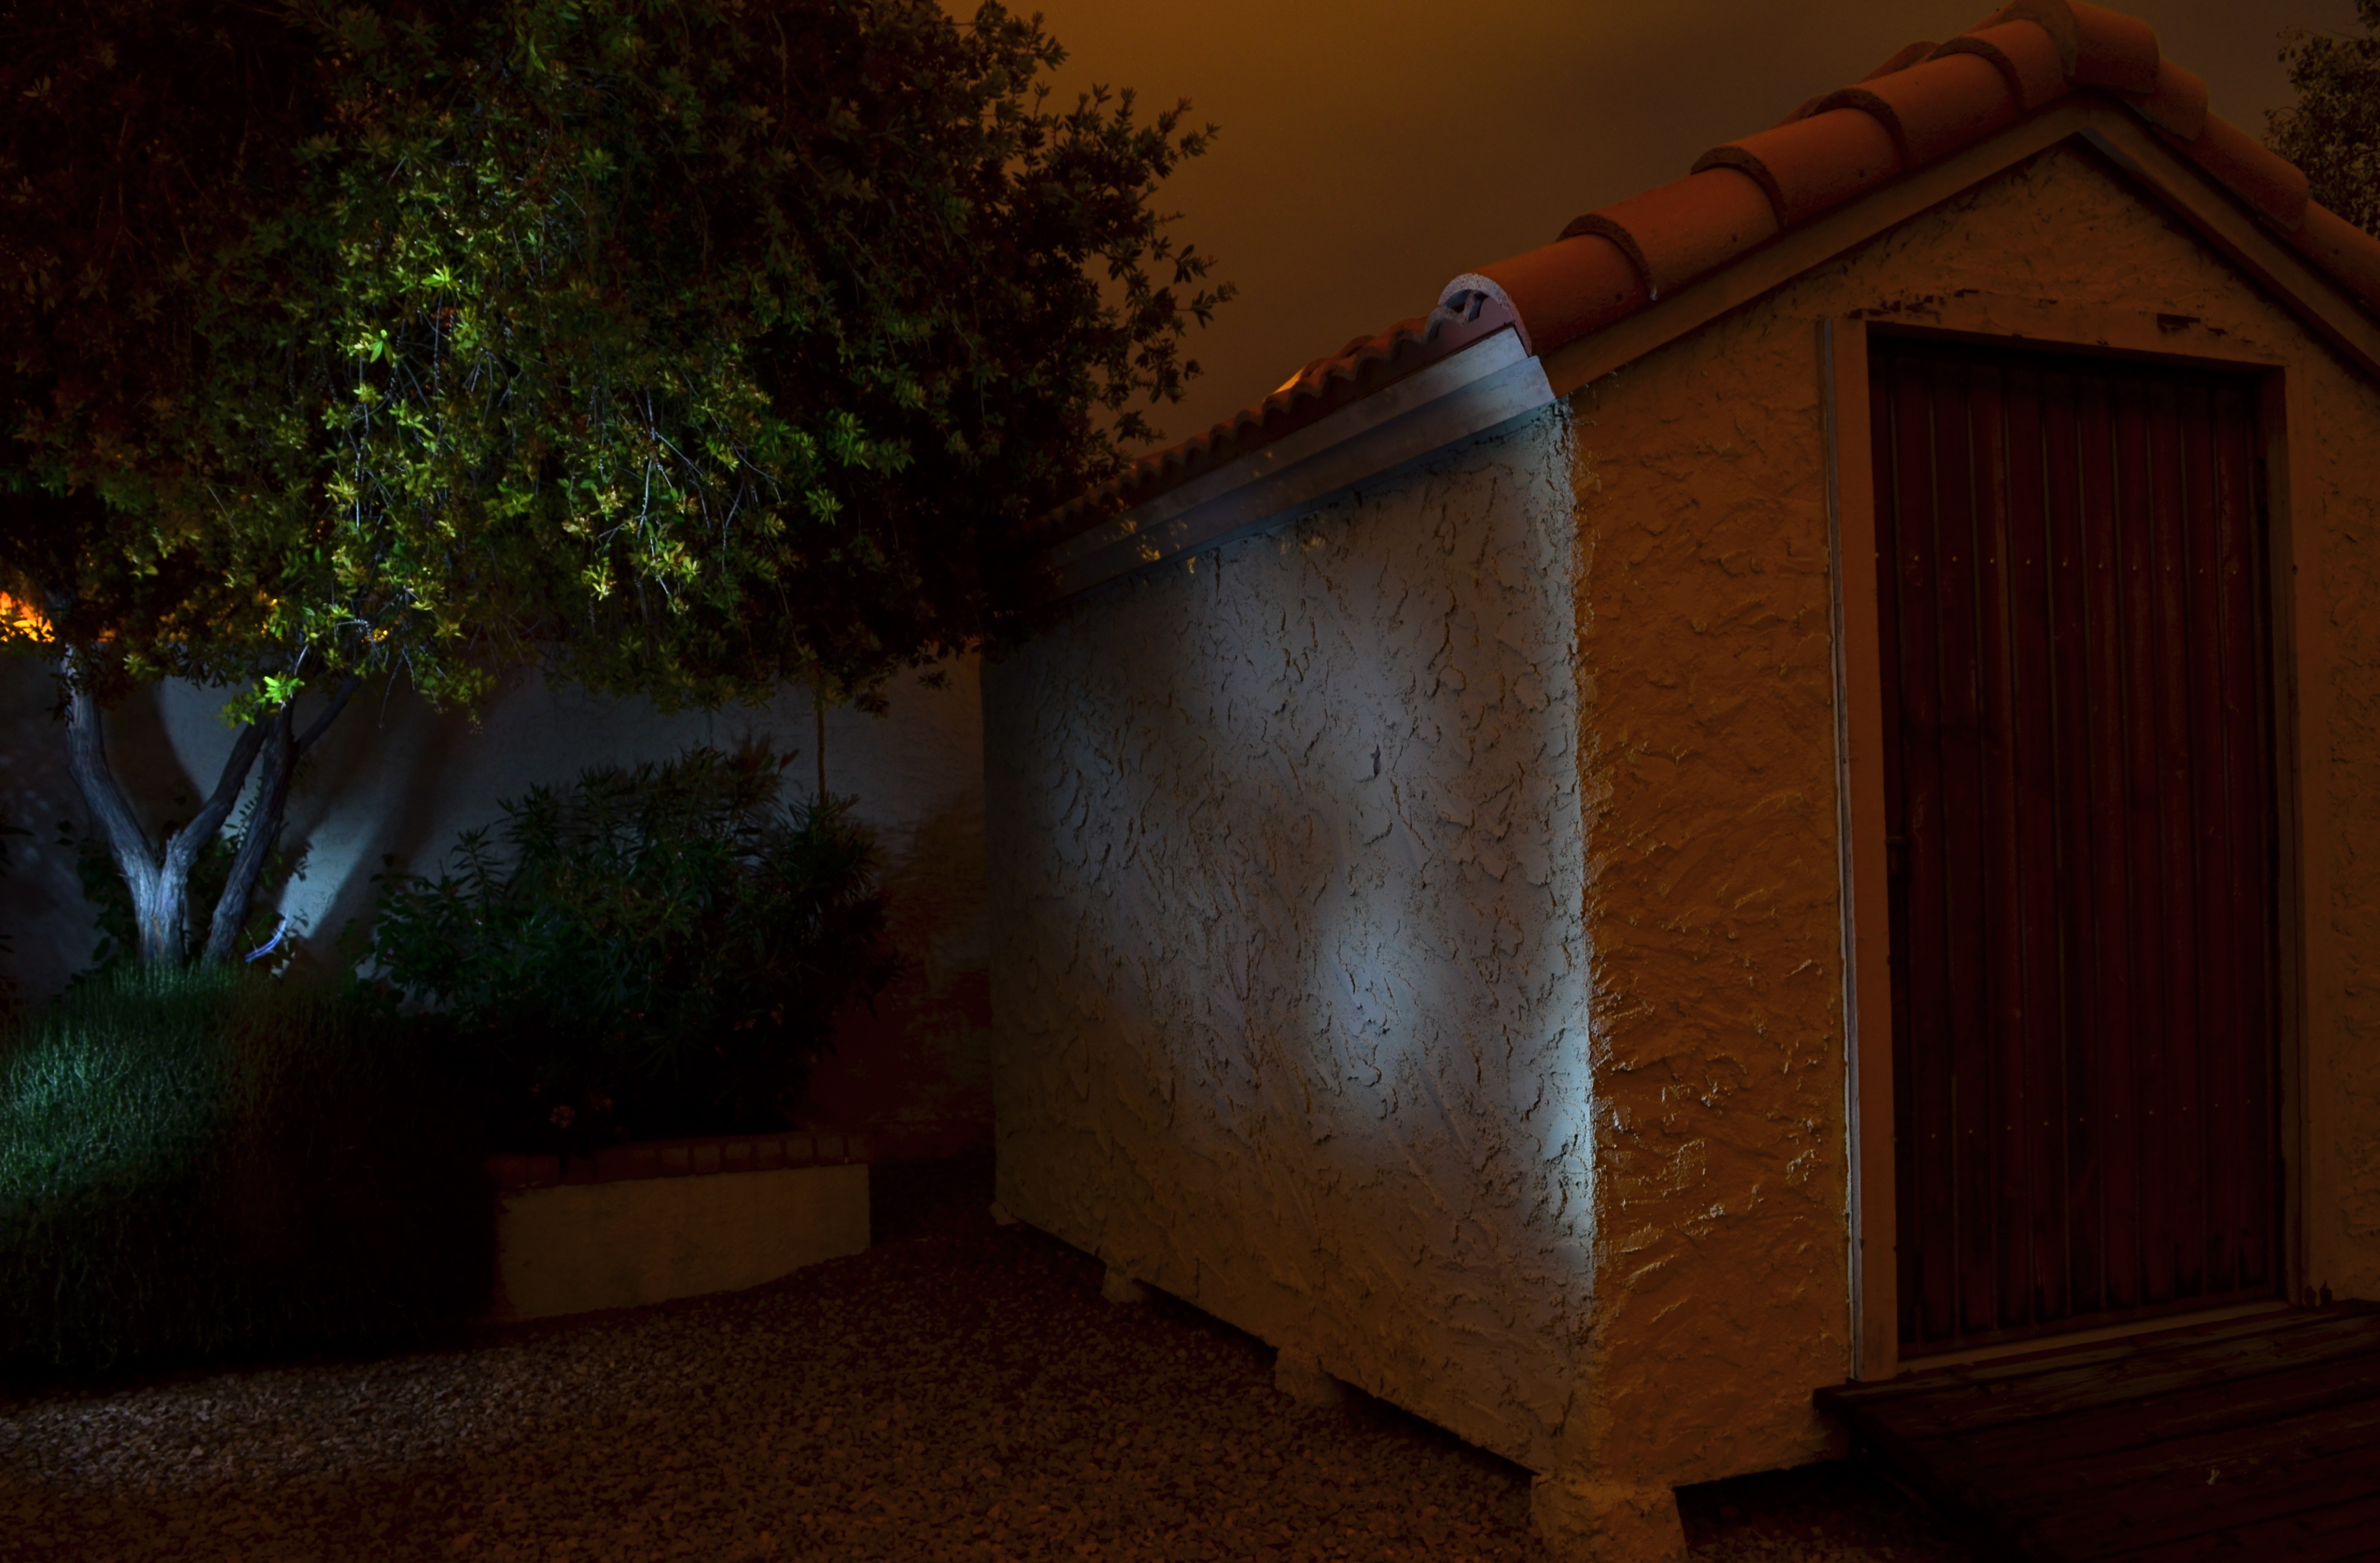
No lighting in the back yard, unless you “paint” it on: 30 sec., f/8, ISO 100, 18mm.
After a year away from light painting, I have started to slink back into it, moving from tabletop arrangements, where control is less of an issue, to exterior locales, which are, frankly, the very definition of trial-and-error.With the camera locked onto its tripod and with a pre-determined exposure and aperture, the responsibility for whether the magic happens is literally in your hands, hands that need real-world training in this technique.
As for lighting: these days, even dollar-store LEDs provide a pretty intense white light in darkness but they don’t throw it very far, and they are also pretty narrowly focused, so, if you want to paint the side of, say, a barn, it’s really hard to do so evenly. Best thing is to avoid the bargain lights: get yourself a powerful torch with a variable focus, something that can shoot both soft and wide. It’ll save you lots of time trying to guess about coverage on larger surfaces. Also, within a single exposure, you can still change off to the pencil-thin lights for special detailing, since, in complete darkness, your shutter will be open long enough for you to switch lights on and off, change position, and touch things up.
The above image was done in a yard with no landscape lighting on hand, other than the light I am applying during a thirty-second exposure. Not a perfect execution, but a quick example of how you can impart night mood to objects that are duller than dishwater in daylight. Lighting is all about setting the terms of view, and hand-painting the light allows you to control that mood, almost as completely as you would with oil, brush or canvas.
More to look at:
KEEPING SPIRITS BRIGHT
1/16 sec., f/4, ISO 100, 20mm.
By MICHAEL PERKINS
IT IS A SEASON OF LIGHT AND COLOR, perhaps one of the key times of the year for all things illuminated, burning, blazing and glowing. It is a time when opportunities for vivid and brilliant images explode from every corner.
And one way to unleash all that light is to manage darkness.
One example: your family Christmas tree involves more delicate detail, tradition and miniature charm than any other part of your home’s holiday decor, but it often loses impact in many snapshots, either blown out in on-camera flash or underlit with a few colored twinkles surrounded by a blob of piny silhouette.
How about a third approach: go ahead and turn off all the lights in the room except those on the tree, but set up a tripod and take a short time exposure.
It’s amazing how easy this simple trick will enhance the overall atmosphere. With the slightly slow exposure, the powerful tree LEDs have more than enough oomph to add a soft glow to the entire room, while acting as a multitude of tiny fill lights for the shaded crannies within the texture of the tree. Ornaments will be softly and partially lit, highlighting their design details and giving them a slightly dimensional pop.
In fact, the LED’s emit such strong light that you only want to make the exposure slow enough to register them. The above image was taken at 1/16 of a second, no longer, so the lights don’t have time to “burn in” and smear. And yes, some of you highly developed humanoids can hand-hold a shot steadily at that exposure, so see what works for you. You could also, of course, shoot wide open to f/1.8 if you have a prime lens, making things even easier, but you might run into focus problems at close range. You could also just jack up your ISO and shoot at a more manageable shutter speed, but in a darkened room you’re trading off for a lot of noise in the areas beyond the tree. Dealer’s choice.
Lights are a big part of the holidays, and mastery of light is the magic that delivers the mystery. Have fun.
DARK NIGHT, BRIGHT NIGHT
Handheld post-sunset image, shot at 1/30 sec., f/3.5, 18mm, ISO 500.
By MICHAEL PERKINS
OFTEN, THE SHOT YOU GET HAPPENS ON THE WAY TO THE SHOT YOU THOUGHT YOU WANTED. We all like to think we are operating under some kind of “master plan”, proceeding along a Spock-o-logical path of reason, toward a guaranteed ( and stunning) result, but, hey, this is photography, so, yeah, forget all that.
Night shots are nearly always a series of surprises/rude shocks for me, since sculpting or harvesting light after dark is a completely different skill from what’s used in the daytime. Even small tweaks in my approach to a given subject result in wild variances in the finished product, and so I often sacrifice “the shot” that I had my heart set on for the one which blossomed out of the moment.
This is all French for “lucky accident”. I’d love to attribute it to my own adventurous intellect and godlike talent, but, again, this is photography, so, yeah, forget all about that, too.
So, as to the image up top: in recent years, I have pulled away from the lifelong habit of making time exposures on a tripod, given the progressively better light-gathering range of newer digital sensors, not to mention the convenience of not having to haul around extra hardware. Spotting this building just after dusk outside my hotel the other night, however, I decided I had the time and vantage point to take a long enough exposure to illuminate the building fully and capture some light trails from the passing traffic.
Same subject, almost same time of night, time-exposed on a tripod. 8 sec., f/13, 18mm, ISO 100.
Minutes before setting up my ‘pod, I had taken an earlier snap with nothing but available light, a relatively slow shutter speed and an ISO of 500 , but hadn’t seriously looked at it: traditional thinking told me I could do better with the time exposure. However, when comparing the two shots later, the longer, brighter exposure drained the building of its edgier, natural shadow-casting features, versus the edgier, somber, burnt-orange look of it in the snapshot. The handheld image also rendered the post-dusk sky as a rich blue, while the longer shot lost the entire sky in black. I wanted the building to project a slight air of mystery, which the longer shot completely bleached away. I knew that the snapshot was a bit noisy, but the better overall “feel” of the shot made the trade-off easier to live with. I could also survive without the light trails.
Time exposures render an idealized effect when rendering night-time objects, not an accurate recording of “what I saw”. Continual experimentation can sometimes modulate that effect, but in this case, the snatch-and-grab image won the day. Next time, everything will be different, from subject to result. After all, this is photography.
TURNING UP THE MAGIC
By MICHAEL PERKINS
CHRISTMAS IS SO BIG THAT IT CAN AFFORD TO GO SMALL. Photographers can, of course, tackle the huge themes….cavernous rooms bursting with gifts, sprawling trees crowning massive plazas, the lengthy curve and contour of snowy lanes and rustic rinks…..there are plenty of vistas of, well, plenty. However, to get to human scale on this most superhuman of experiences, you have to shrink the frame, tighten the focus to intimate details, go to the tiny core of emotion and memory. Those things are measured in inches, in the minute wonder of things that bear the names little, miniature, precious.
And, as in every other aspect of holiday photography, light, and its successful manipulation, seals the deal.

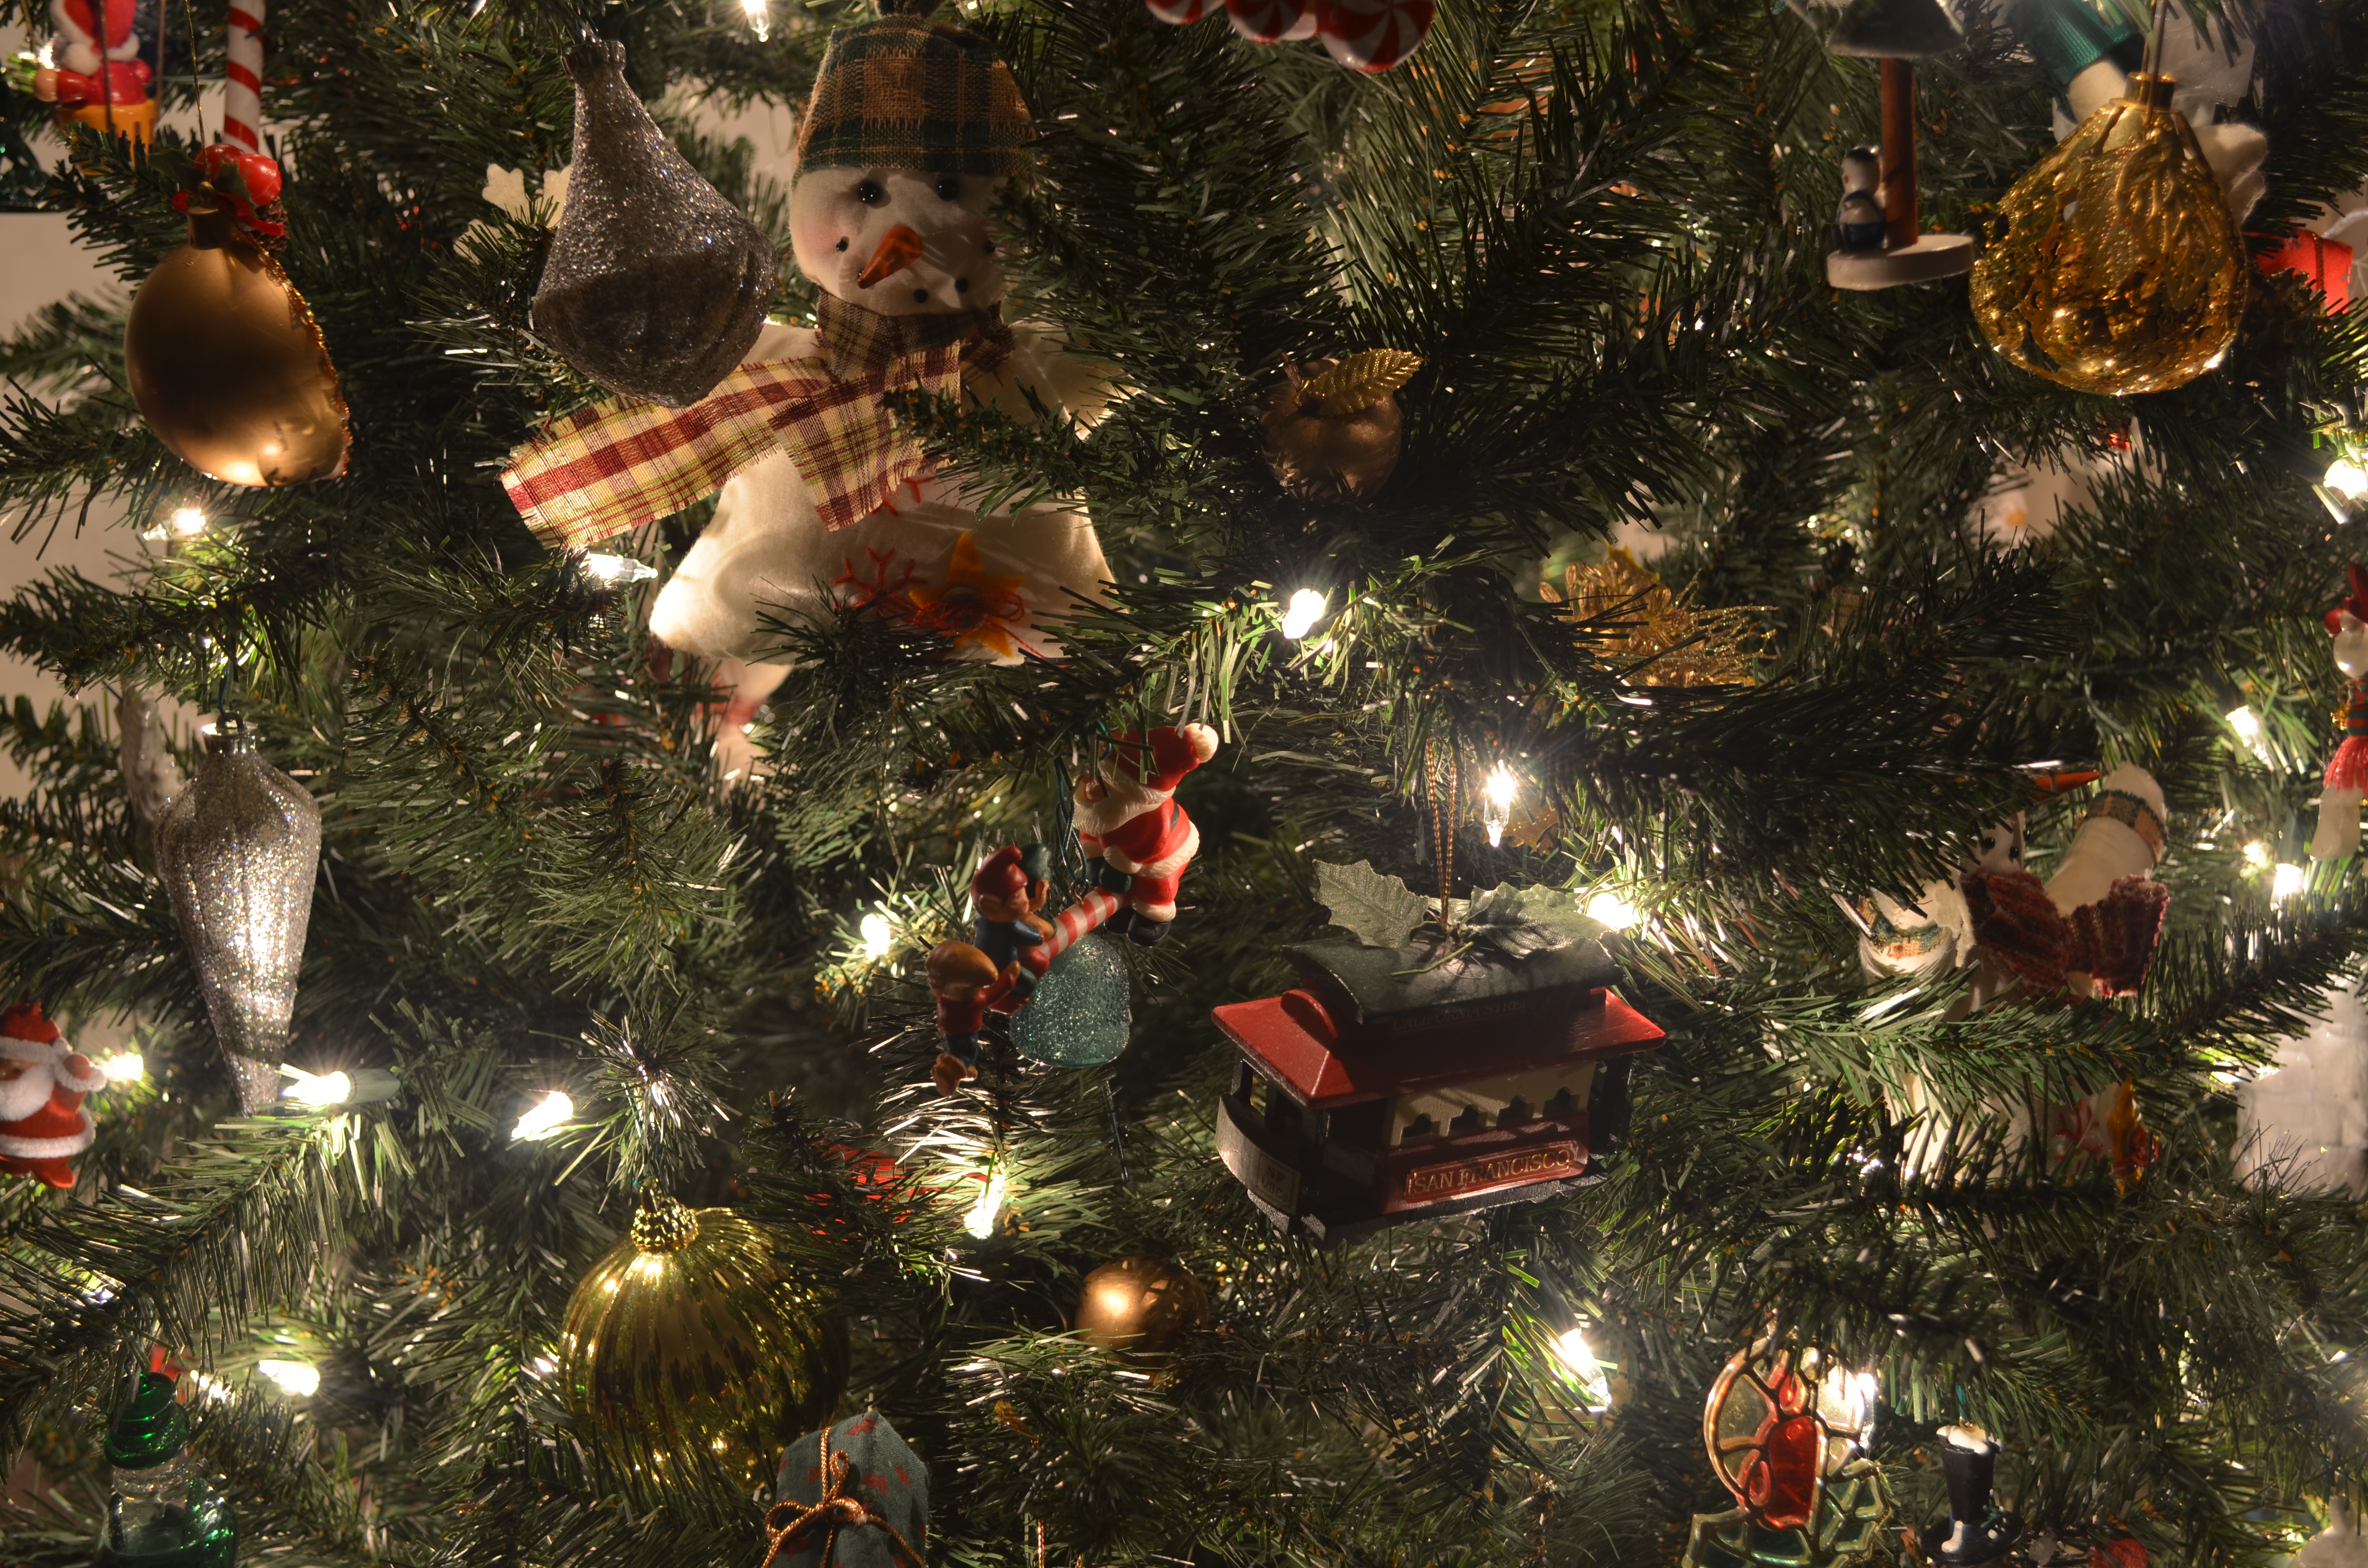
A proud regiment of nutcrackers, made a little more enchanting by turning off the room light and relying on tiny twinklers. 1/2 sec., f/4, ISO 100, 20mm
In recent years I have turned away from big rooms and large tableaux for the small stories that emanate from close examination of corners and crannies. The special ornament. The tiny keepsake. The magic that reveals itself only after we slow down, quiet down, and zoom in. In effect, you have to get close enough to read the “Rosebud” on the sled.
Through one life path and another, I have not been “home” (that is, my parents’ home) for Christmas for many years now. This year, I broke the pattern to visit early in December, where the airfare was affordable, the overall scene was less hectic and the look of the season was visually quiet, if no less personal. It became, for me, a way to ease back into the holidays as an experience that I’d laid aside for a long time.
A measured re-entry.
I wanted to eschew big rooms and super-sized layouts to concentrate on things within things, parts of the scene. That also went for the light, which needed to be simpler, smaller, just enough. Two things in my parents’ house drew me in: several select branches of the family tree, and one small part of my mother’s amazing collection of nutcrackers. In both cases, I had tried to shoot in both daylight and general night-time room light. In both cases, I needed some elusive tool for enhancement of detail, some way to highlight texture on a very muted scale.
Call it turning up the magic.
Use of low-power, local light instead of general room ambience enhances detail in tiny objects, revealing their textures. 1/2 sec., f/4, ISO 100, 20mm.
As it turned out, both subjects were flanked by white mini-lights, the tree lit exclusively by white, the nutcrackers assembled on a bed of green with the lights woven into the greenery. The short-throw range of these lights was going to be all I would need, or want. All that was required was to set up on a tripod so that exposures of anywhere from one to three seconds would coax color bounces and delicate shadows out of the darkness, as well as keeping ISO to an absolute minimum. In the case of the nutcrackers, the varnished finish of many of the figures, in this process, would shine like porcelain. For many of the tree ornaments, the looks of wood, foil, glitter, and fabric were magnified by the close-at-hand, mild light. Controlled exposures also kept the lights from “burning in” and washing out as well, so there was really no down side to using them exclusively.
Best thing? Whole project, from start to finish, took mere minutes, with dozens of shots and editing choices yielded before anyone else in the room could miss me.
And, since I’d been away for a while, that, along with starting a new tradition of seeing, was a good thing.
Ho.
Related articles
- How to Take a Picture of Your Christmas Tree (purdueavenue.com)
