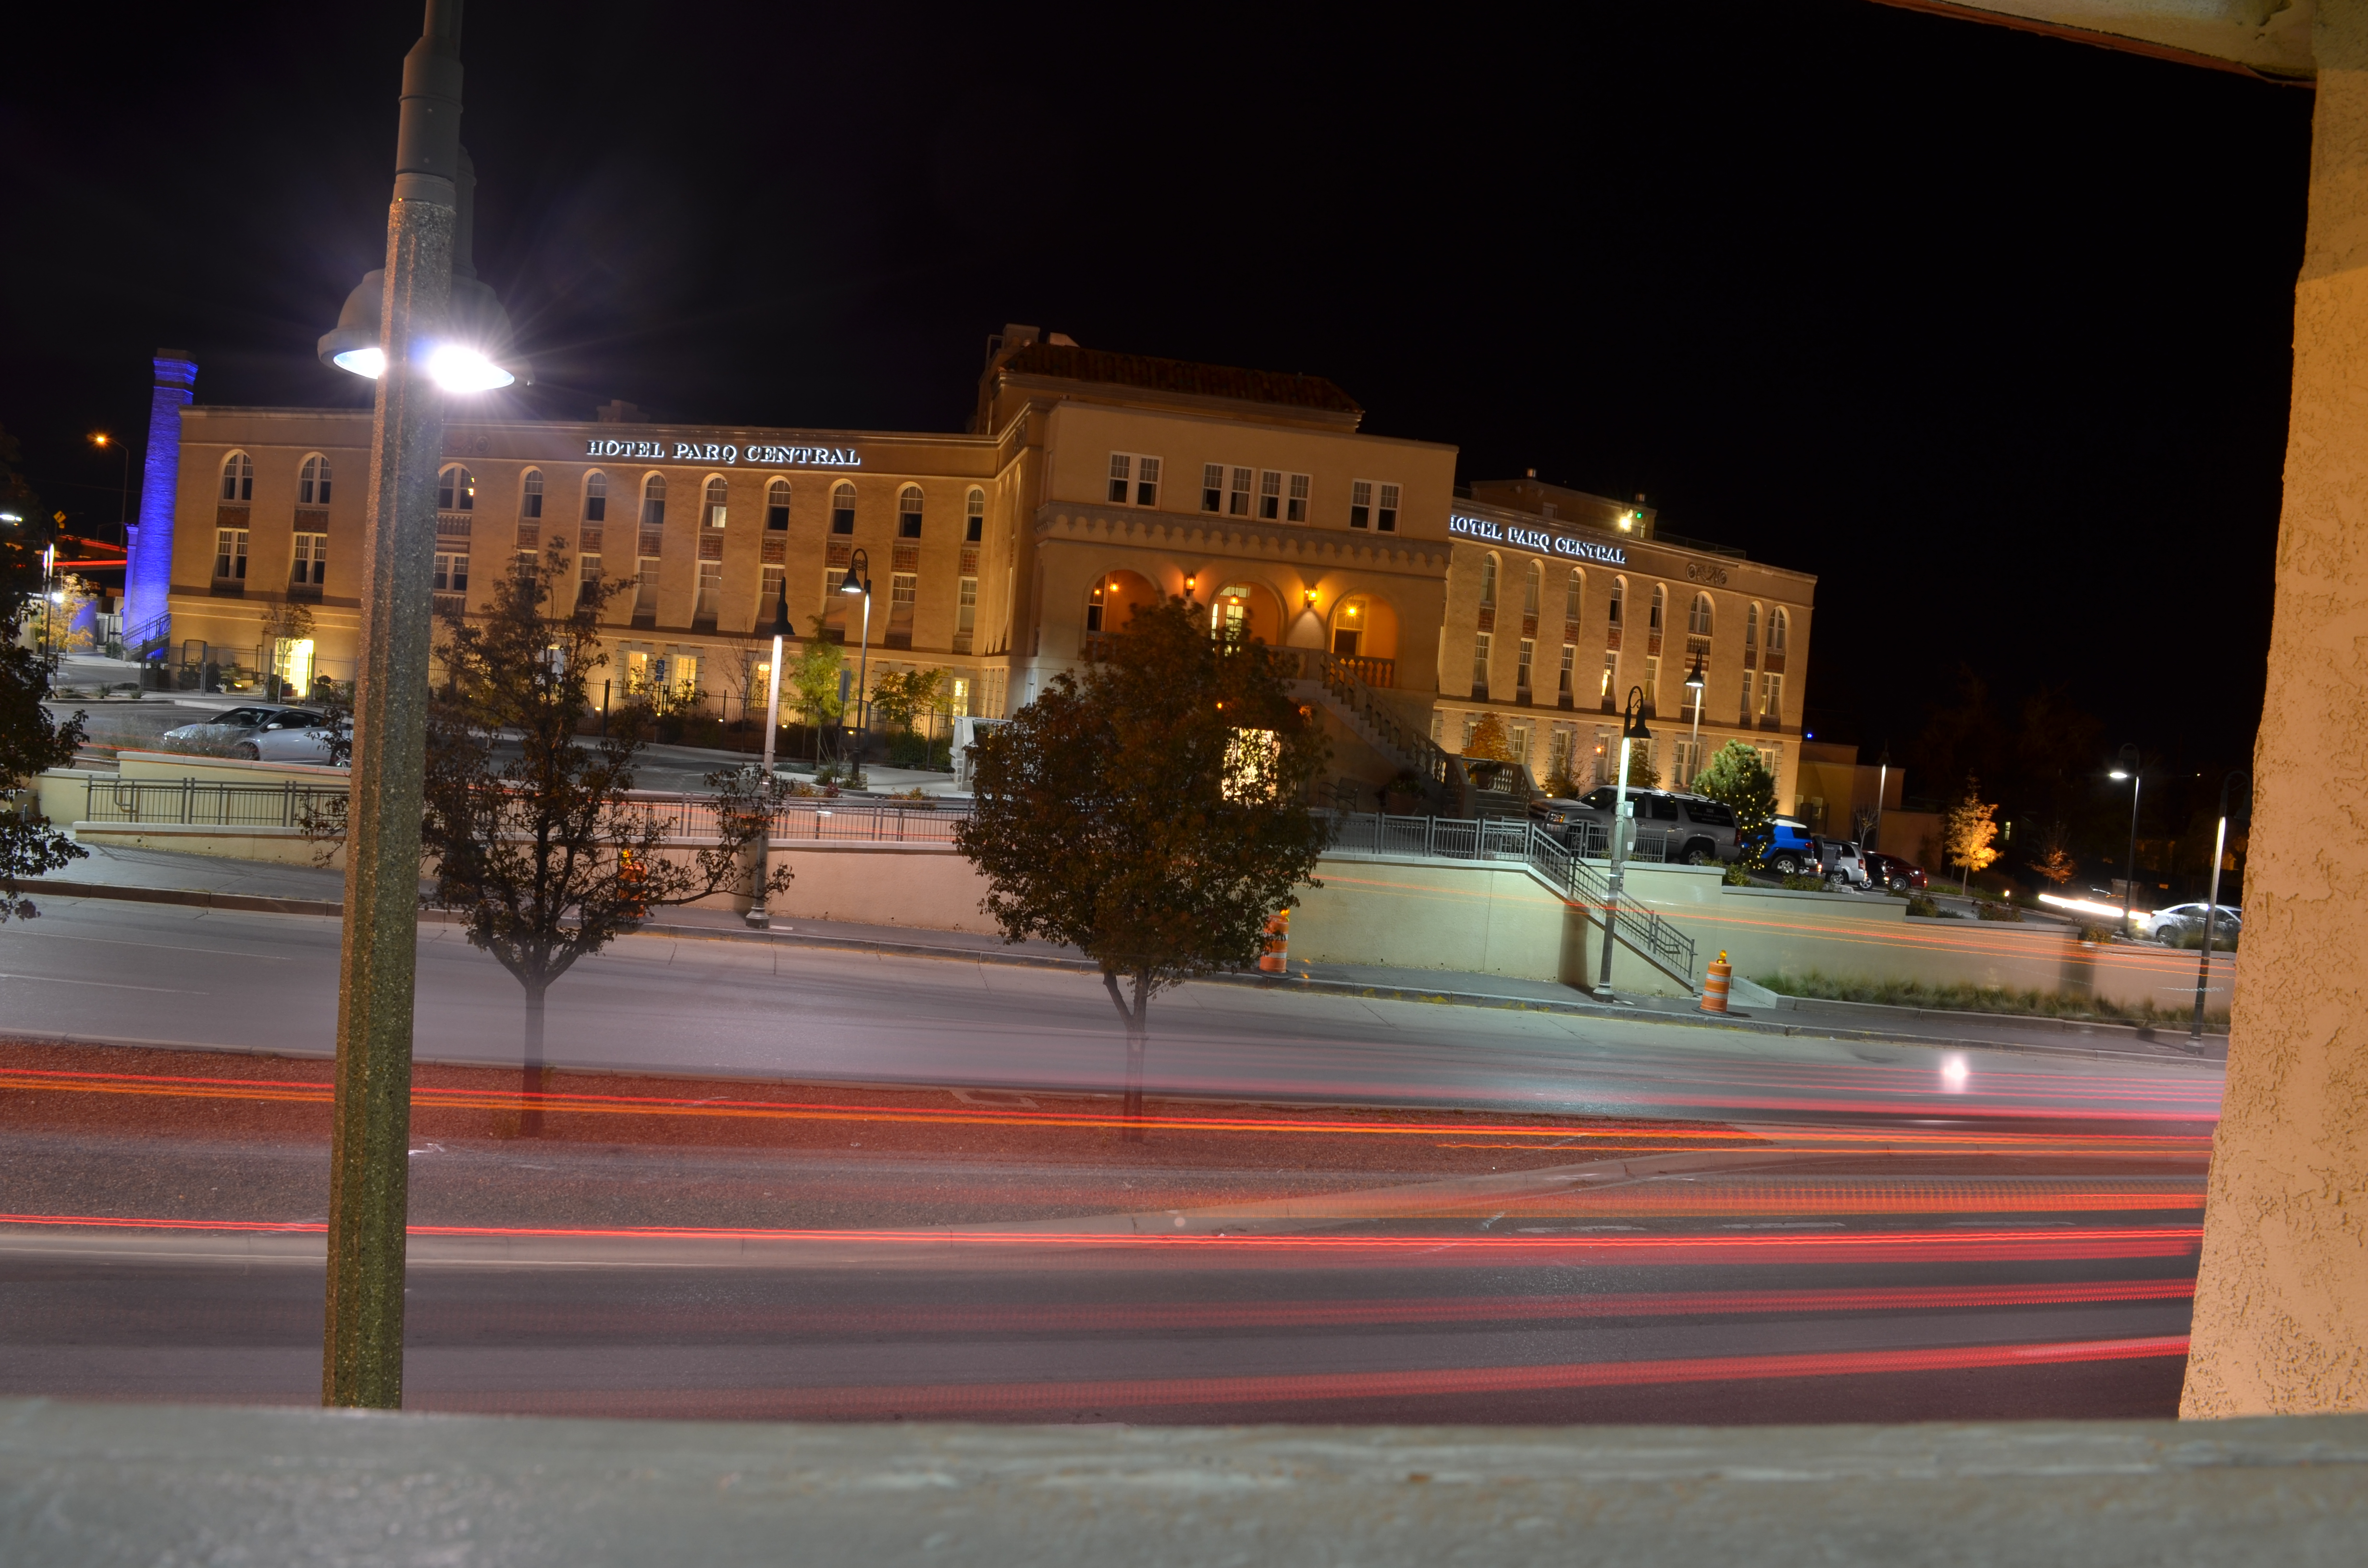
HOME SWEET STUDIO
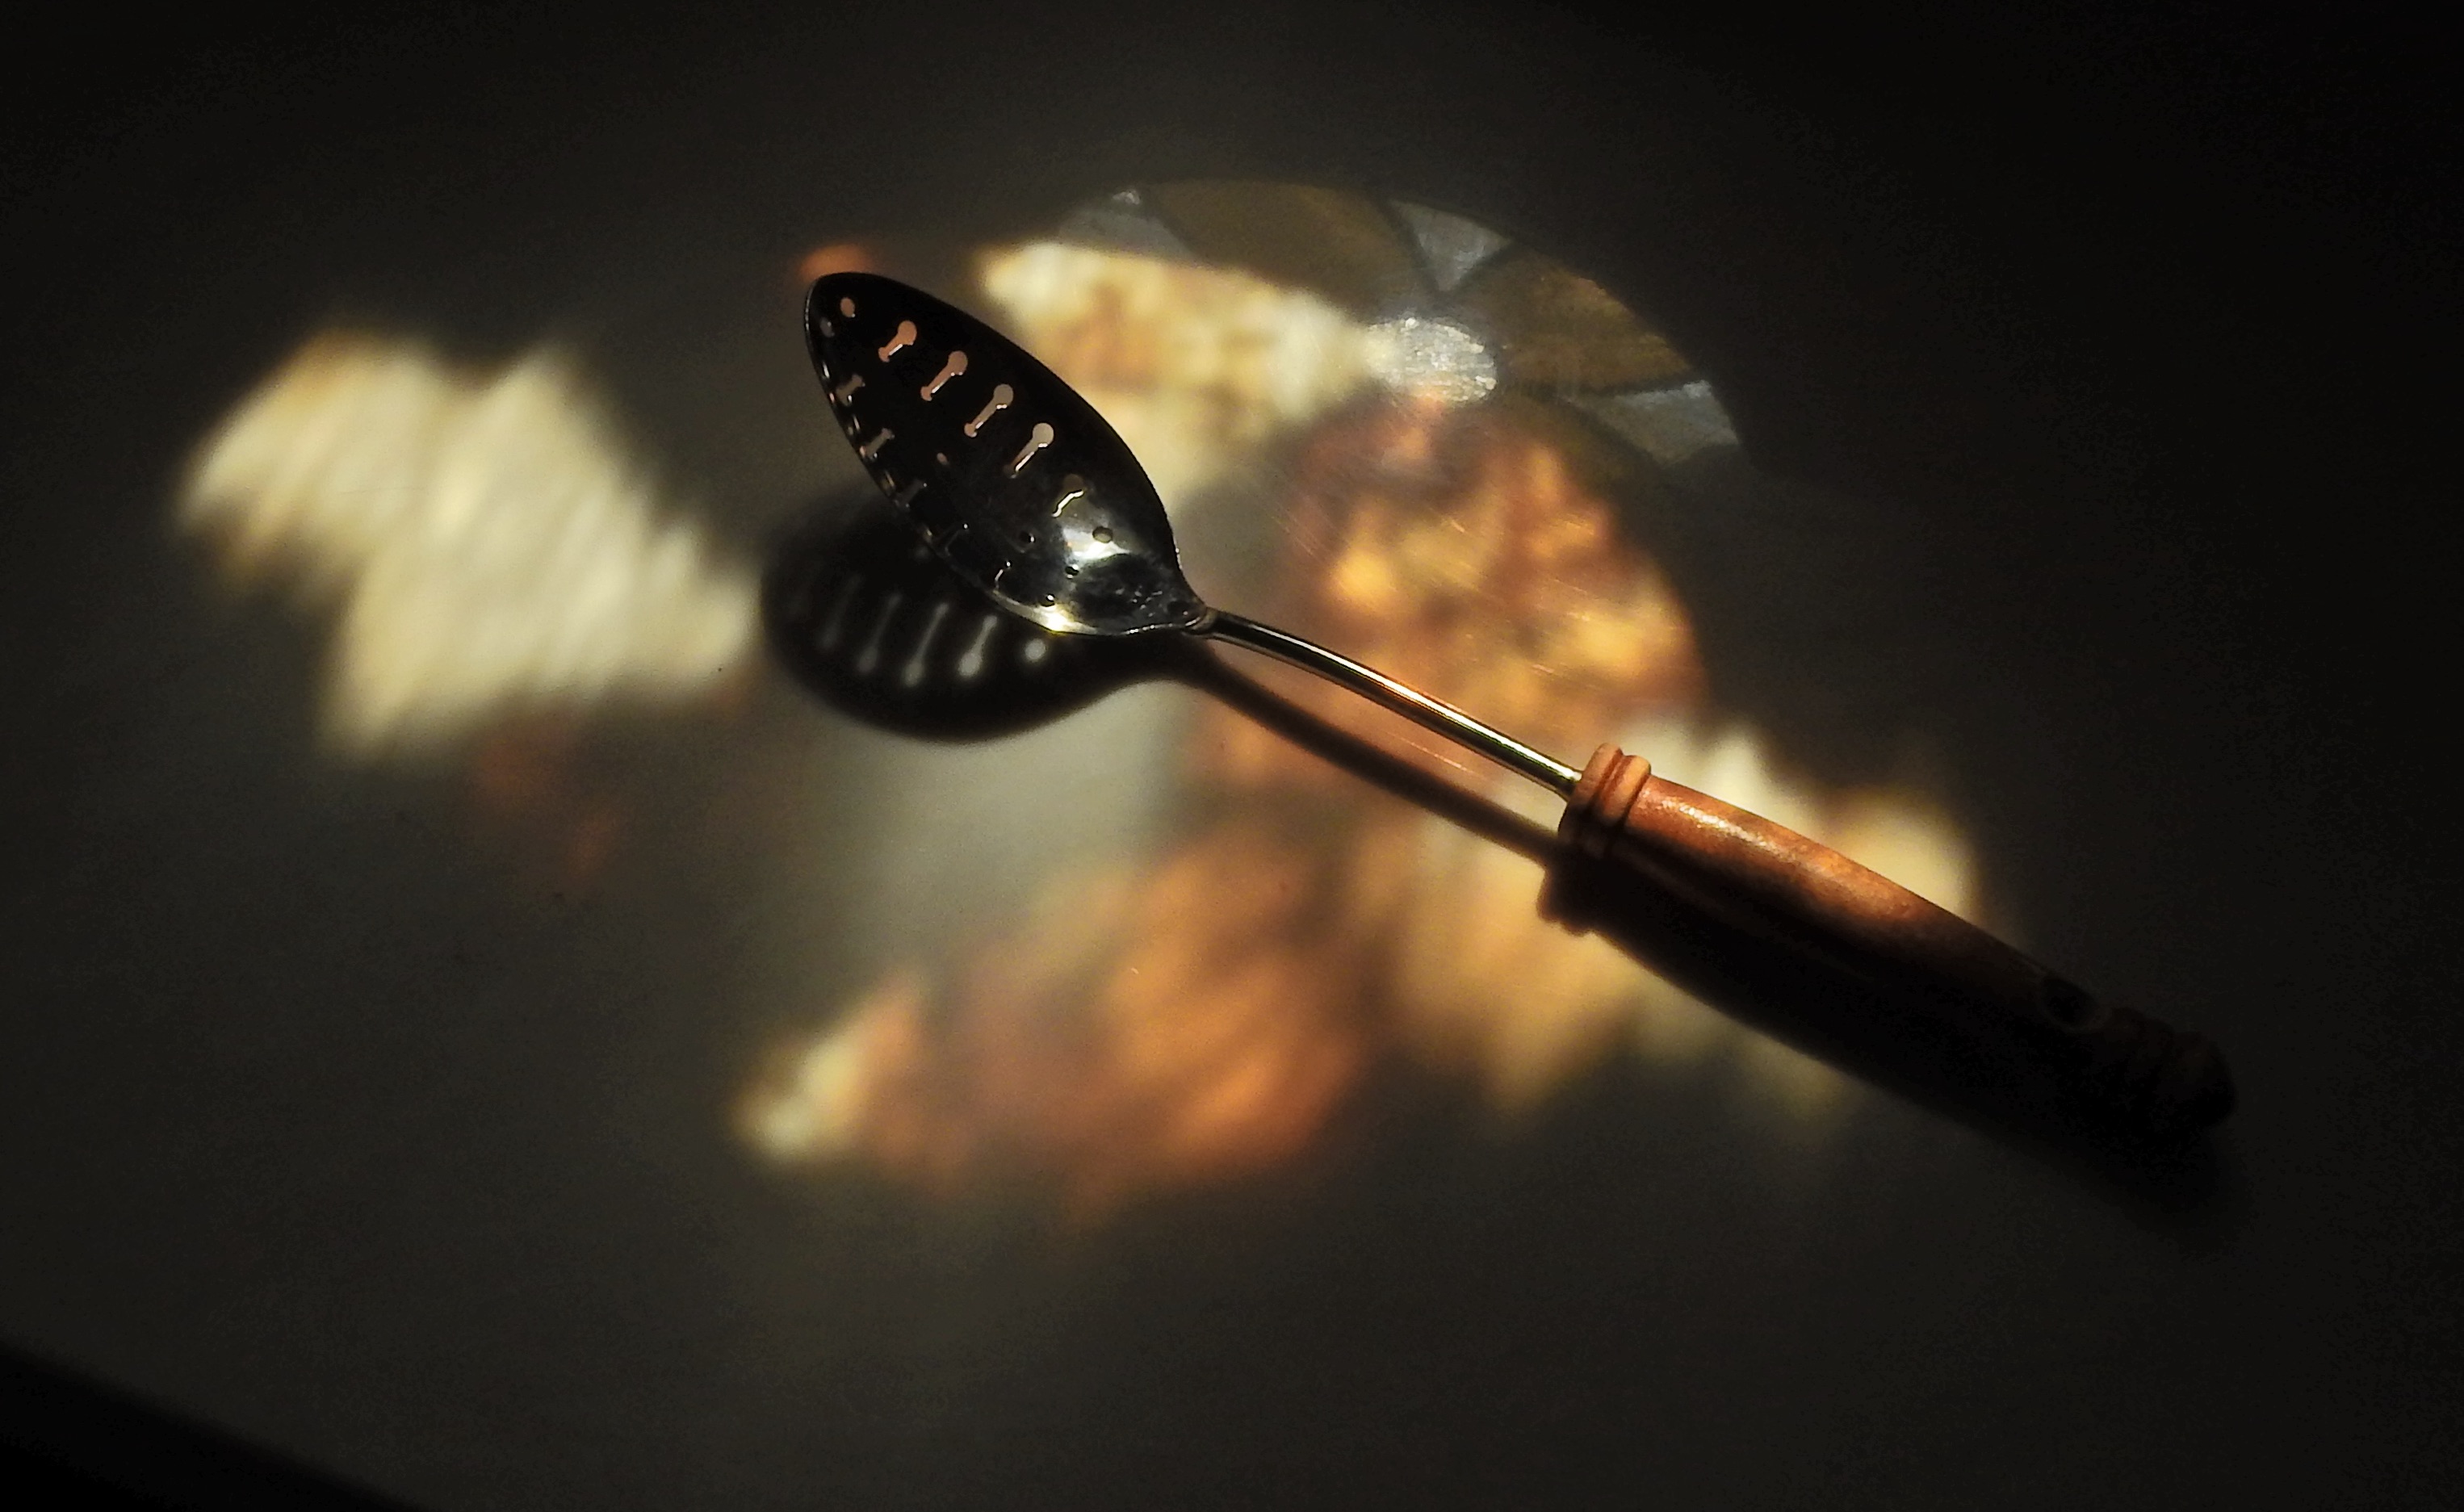
Stained Glass Study One, 3 p.m., April 21, 2020. 1/320 sec., f/8, 24mm, ISO 100.
By MICHAEL PERKINS
FOR PEOPLE WHO OPERATE ON INSTINCT SO MUCH OF THE TIME, photographers certainly can make things unnecessarily complicated. We buy gear we don’t need, thinking that machinery alone will unstick our stuck imaginations. We overthink set-ups. We overthink post-processing. We put a lot of junk in our own path, thinking that more of everything will make better pictures. Maybe it’s a native human need to exercise control. But sometimes, as now, we are all reminded that control can be elusive, or worse yet, a mirage.
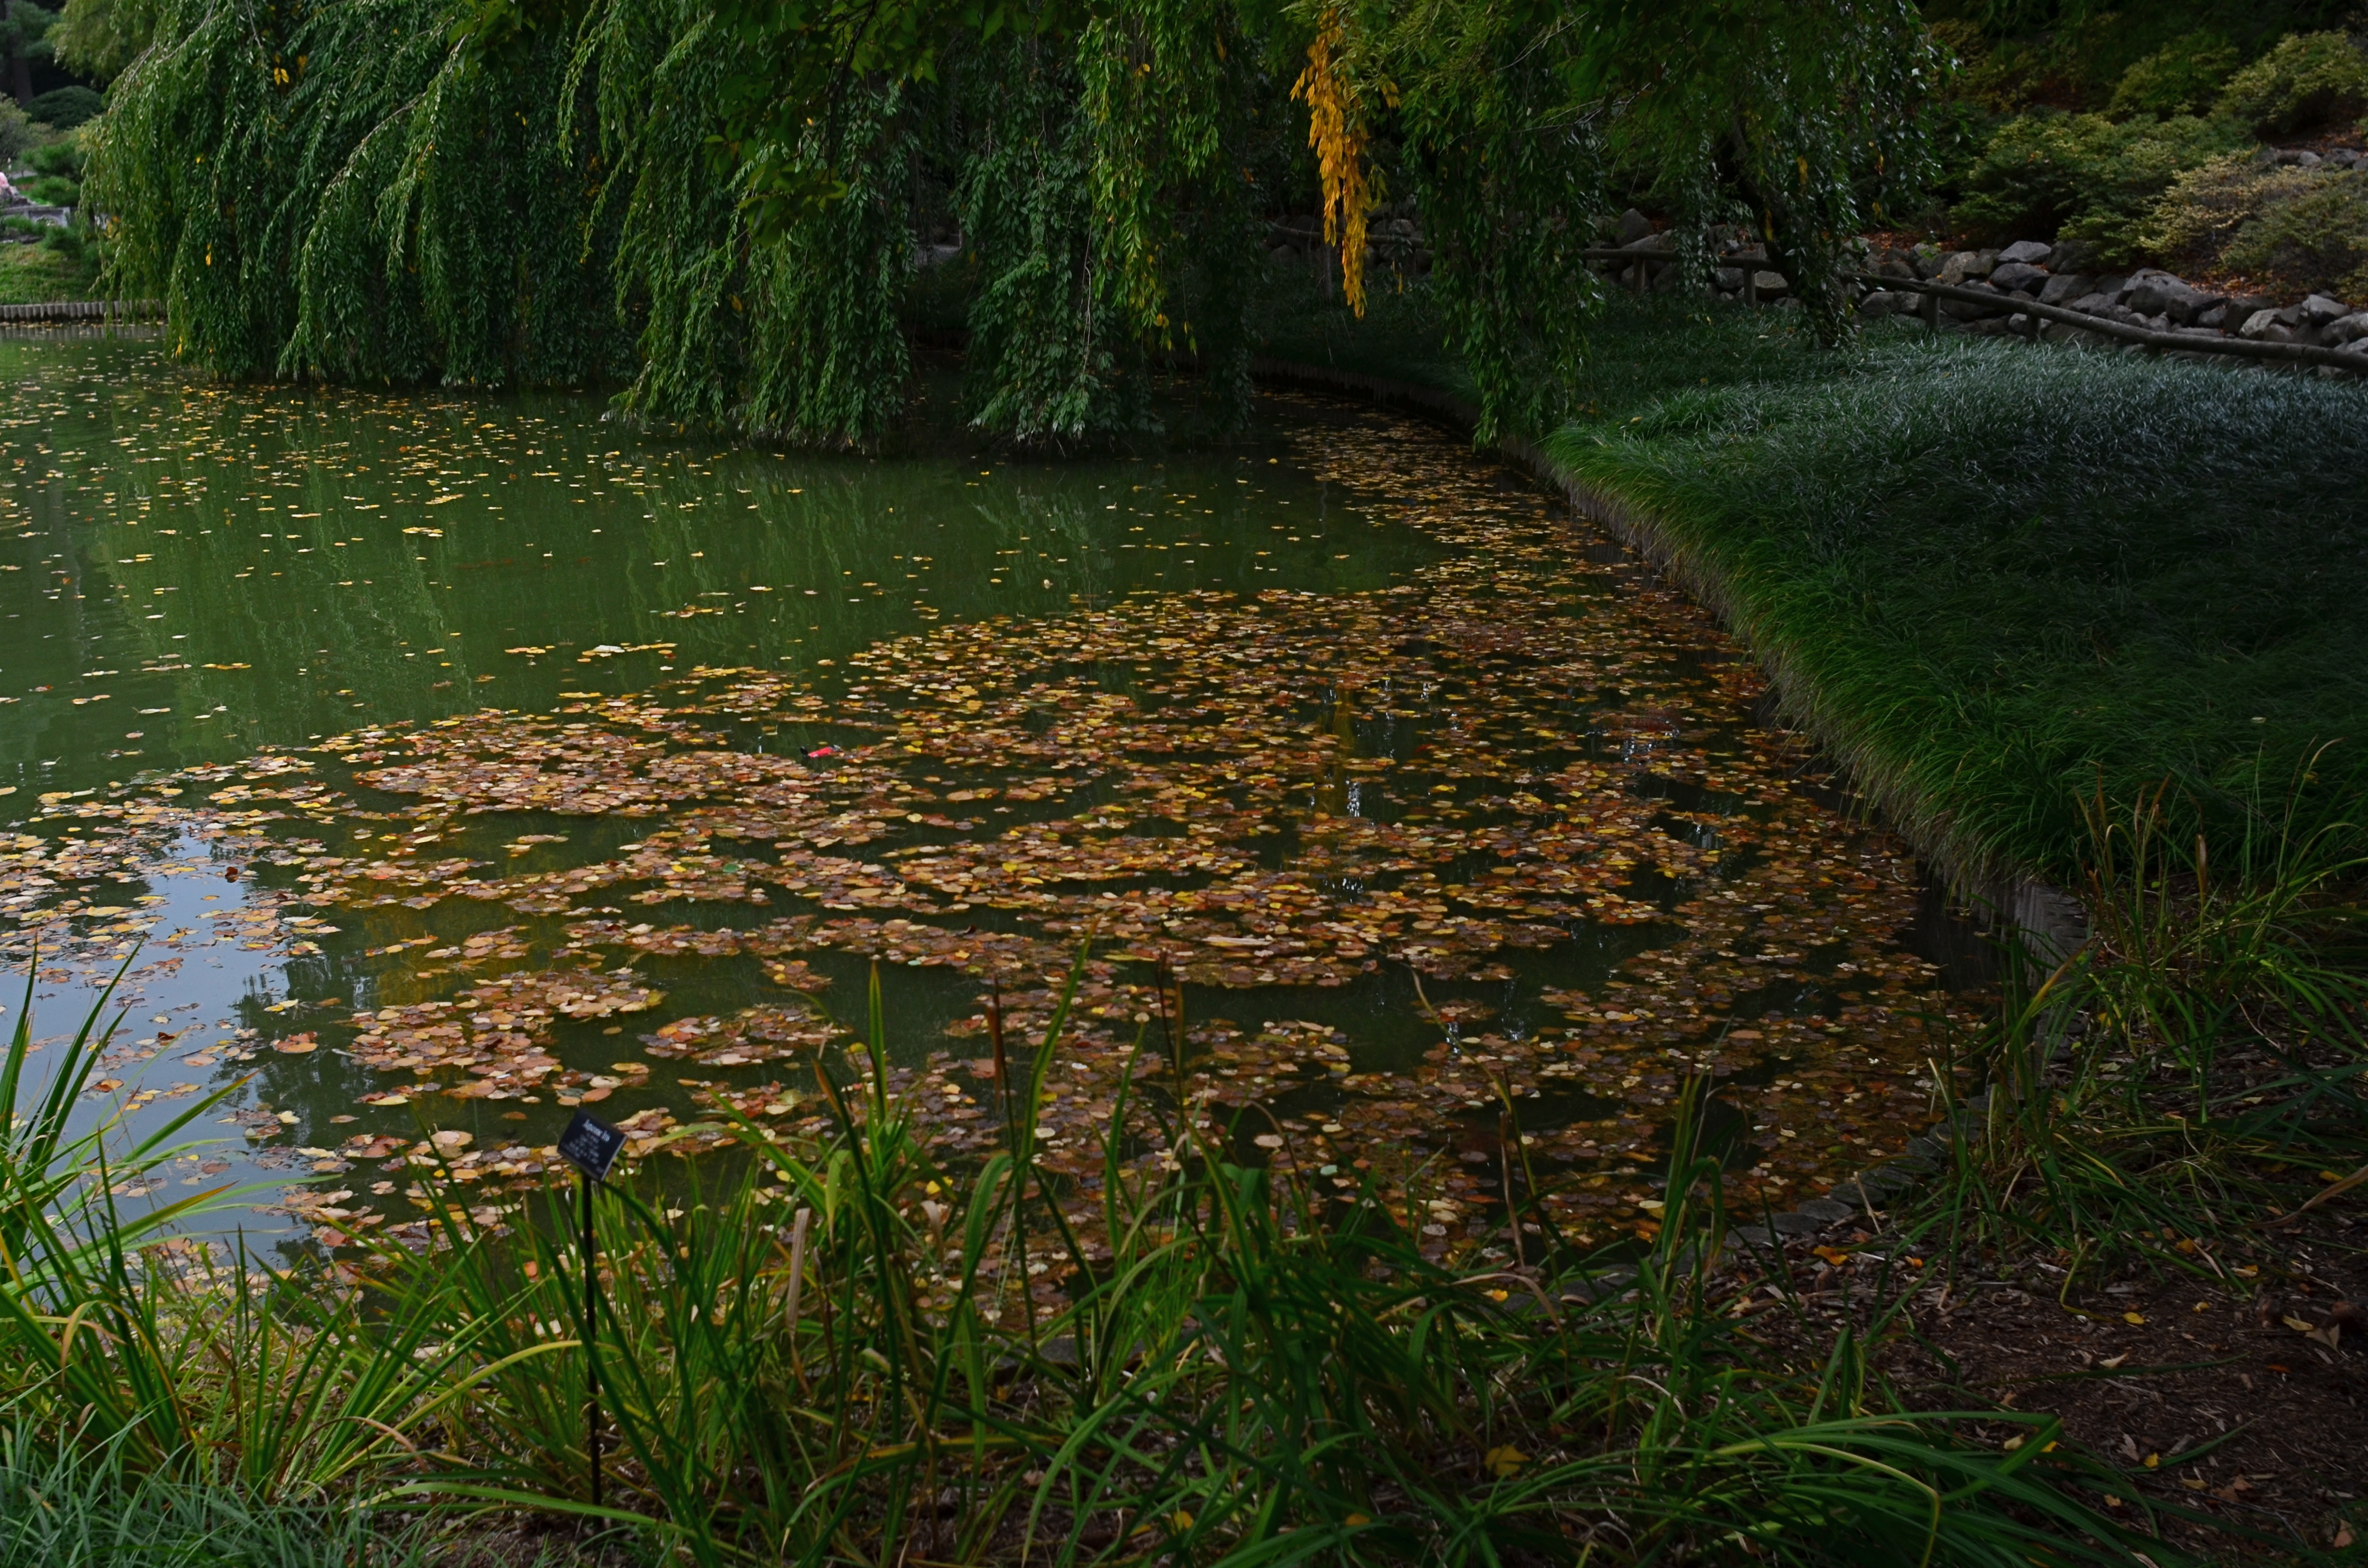
Making photographs isn’t about having all the conditions we’d prefer. It’s more about managing the conditions we’ve got. That’s always been the case, although our present Great Hibernation has made it a lot more obvious. Take the idea of a “studio”. The term can conjure visions of vast banks of backdrops, lights, high-end gear…a professional space, if you will. But at bottom, it’s really just a place to work, and, ideally, to exercise choice over technique and intentions. There are really no official tools, no approved physical location for a studio. Like many others, I’ve been recently reminded that we only need a few things to create one: a knowledge, inside our homes, of where light goes and what it does during the day: the ability to tell time: and a fair bit of awareness of what our camera can and cannot do. If you have these things, you’ve got a studio.
Think through the process: if you have windows, and if you know which way the sun tracks across the sky hour by hour, you already have multiple sites to get different kinds of light depending on your need. One window for harsh midday high-contrast illumination, a dirty one for diffused, etc. As to tools, absent formal studio gear, everything in your house is a potential prop. And then there’s the advantage afforded by all the extra time we find ourselves awash in: that is, the leisure to plan a shot, whether over hours or days. In essence, you’ve got time to tweak like you’ve never tweaked before.
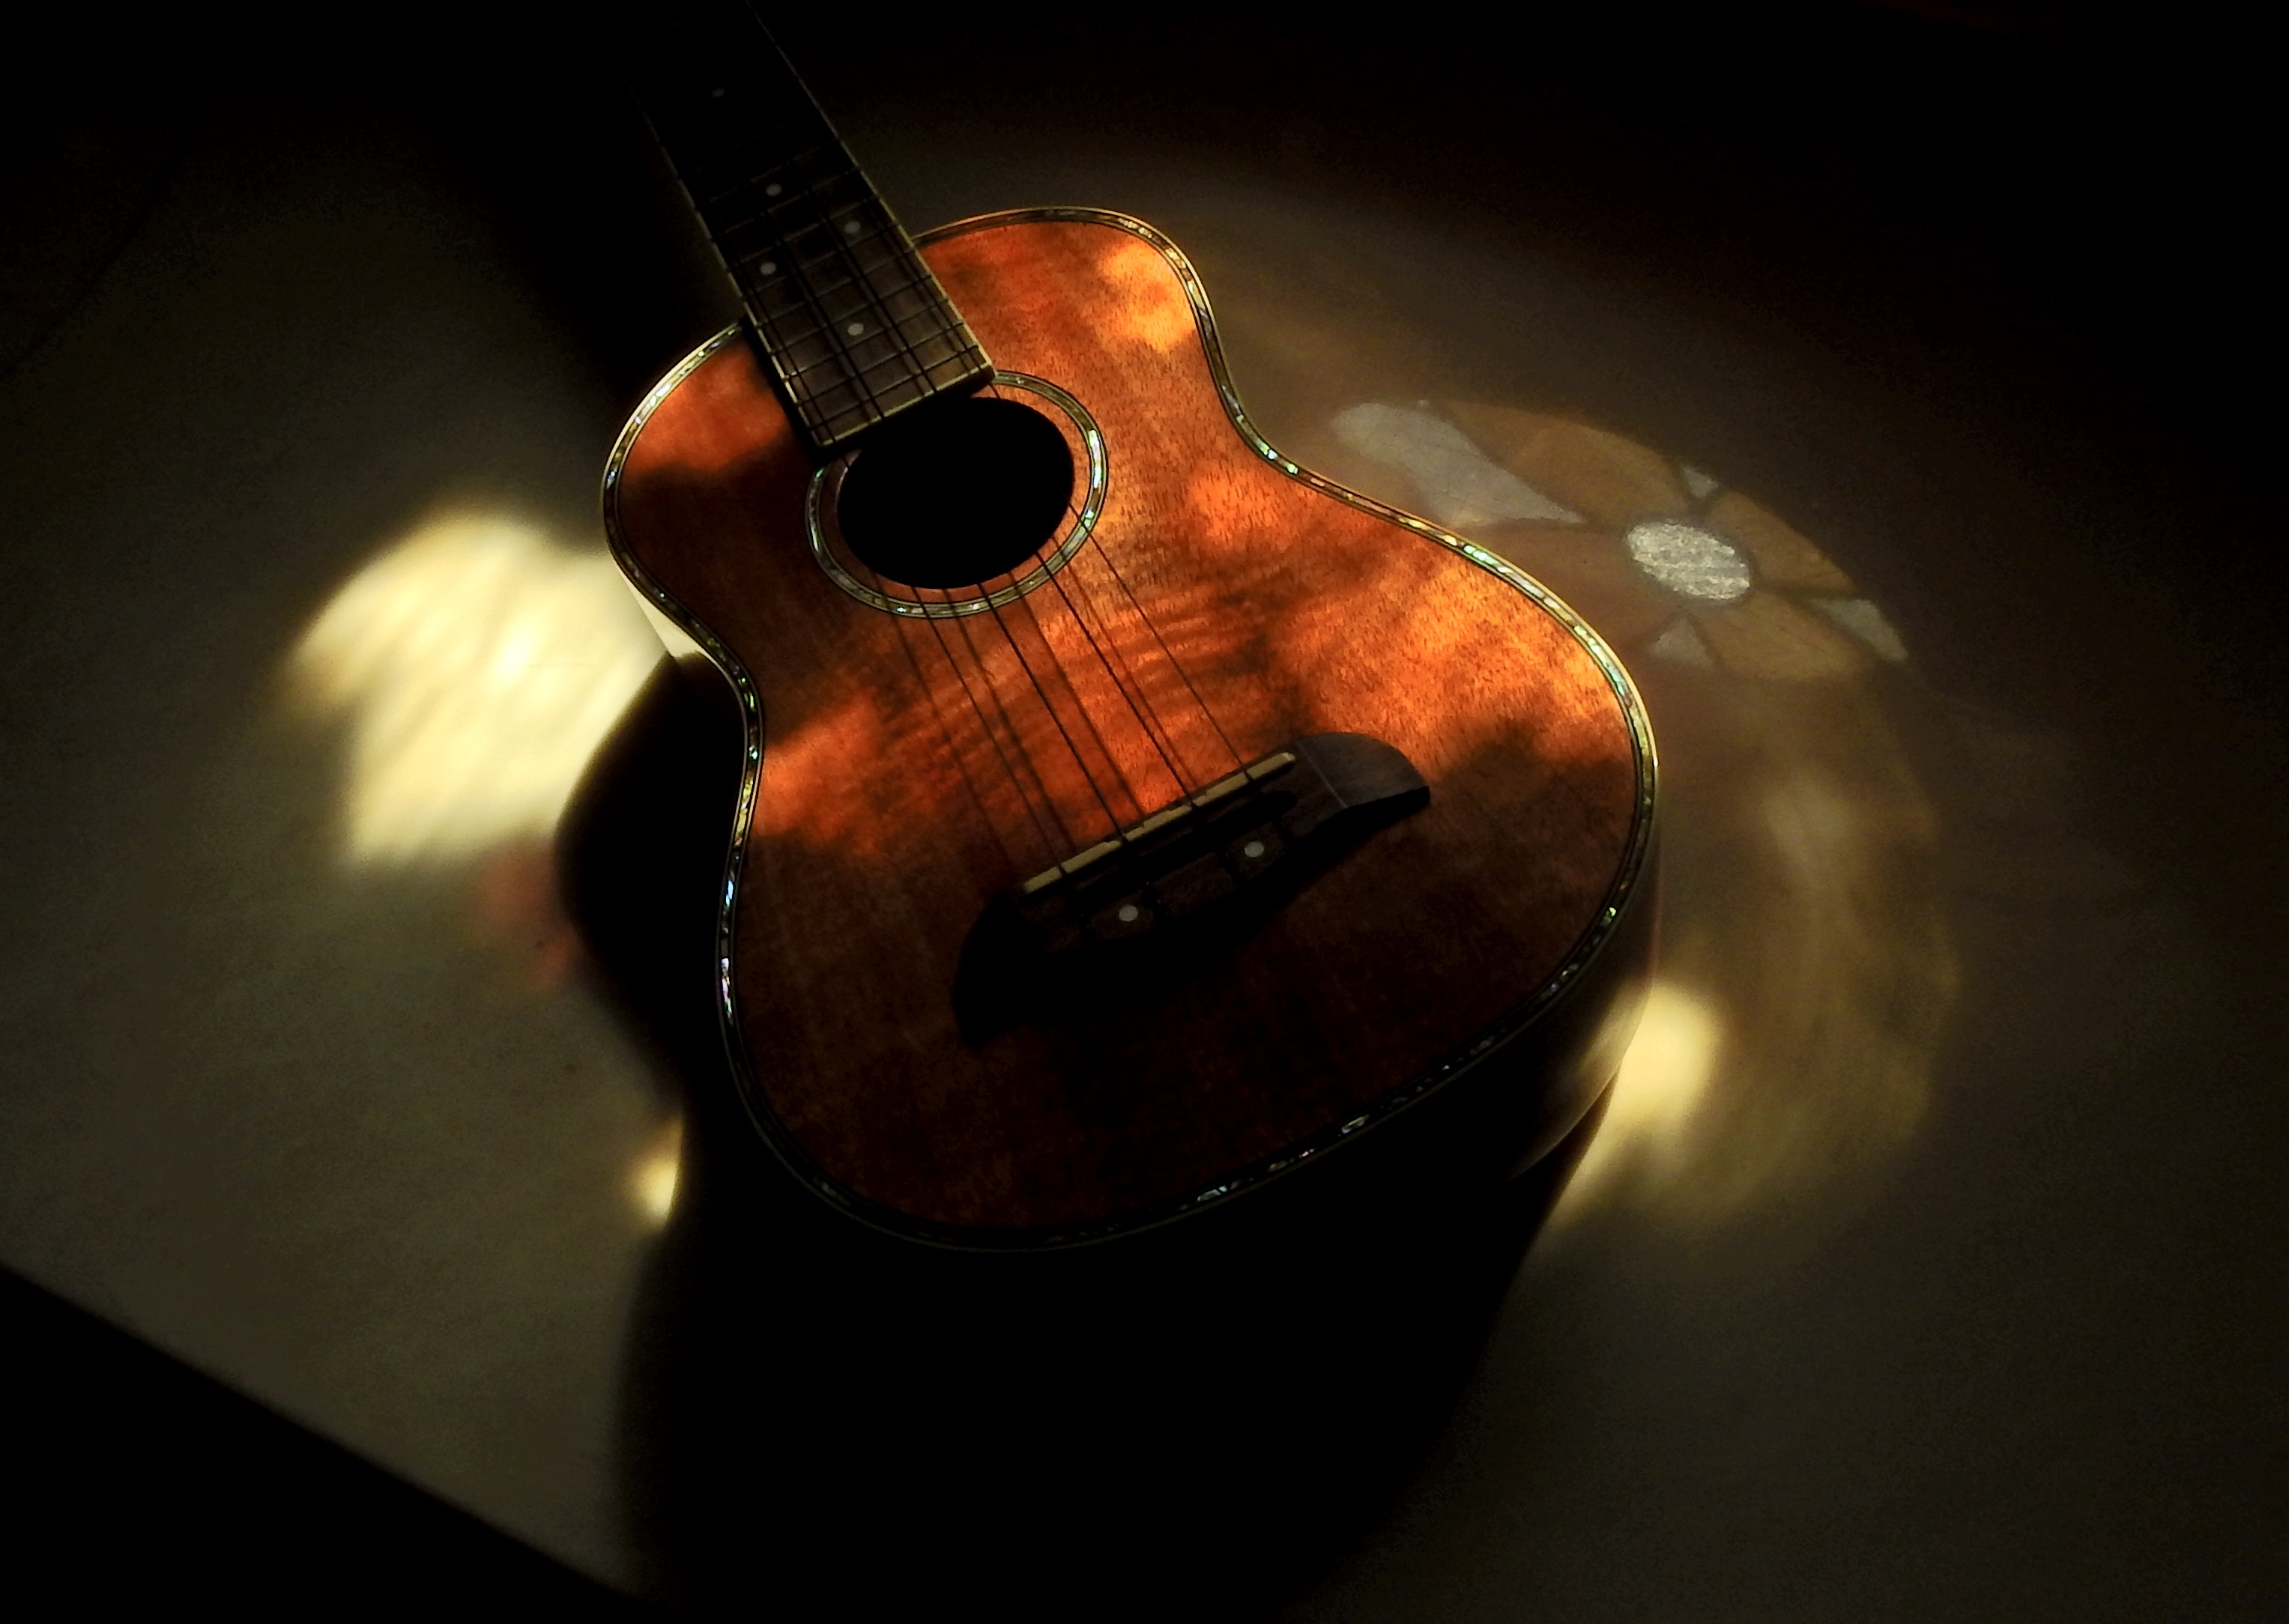
Stained Glass Study Two, 3 p.m., April 25, 2020. 1/200 sec., f/7.1, 24mm, ISO 100
Working within a finite interior space over an extended period, you can really learn its every feature and behavior. For example, I discovered, earlier this week, that a small stained glass window in my guest bathroom casts an intense kaleidoscopic pattern on a reflective counter-top for only fifteen minutes every afternoon. Stumbling on this, I threw a random object into the warm orange glow just to see what kind of permanent image I might eventually want to make with it. I didn’t get back to the room for another three days, by which time I had a rough concept for what I wanted to model the light on. Using the original shot’s shooting data, replicating the exact time of day and exposure settings (and then varying from them) posed no problem, and so I had, in very rudimentary terms, the control normally associated with a “studio”, whatever that word means.
All workspaces are equal once they are maximized and personalized. You don’t need a special locale to make pictures…..or, more to the point, you can make any locale special once you’ve bent it to your will. Right now, we’re trying to bar entry to all invaders from outside, but light will always get a pass. Harness that, and the rest will fall into line.
SALVAGING THE FEEL
By MICHAEL PERKINS
EVEN IF YOU ARE IN THE HABIT OF PACKING A CAMERA ALONG WHEREVER YOU GO, you can only predict some of the conditions you might encounter in a given shooting situation. If you’ve guessed well, you can be ready (depending on how much gear you have with you) for about 75% of the shots you may want to take. What’s left, make no mistake, is a mixture of guesswork and luck, the kinds of shots where you adapt on the fly.
Night shots employ a completely different set of skills from daylight shots. What looks mysterious and romantic to your eye may be a mushy muddle to your camera, and that forces a lot of sudden sorting-out of your choices. On the night of the above shot, taken along the shoreline in Ventura, California, I had not planned on shooting anything at all after nightfall. I loved the deeper blues of the sky as they played just before sundown, and I was especially enjoying watching local kids playing against the darkening surf. Following a few dozen clicks up and down the beach, I walked back inland a block or so to join my wife and some friends at a nearby restaurant, considering myself done for the day.
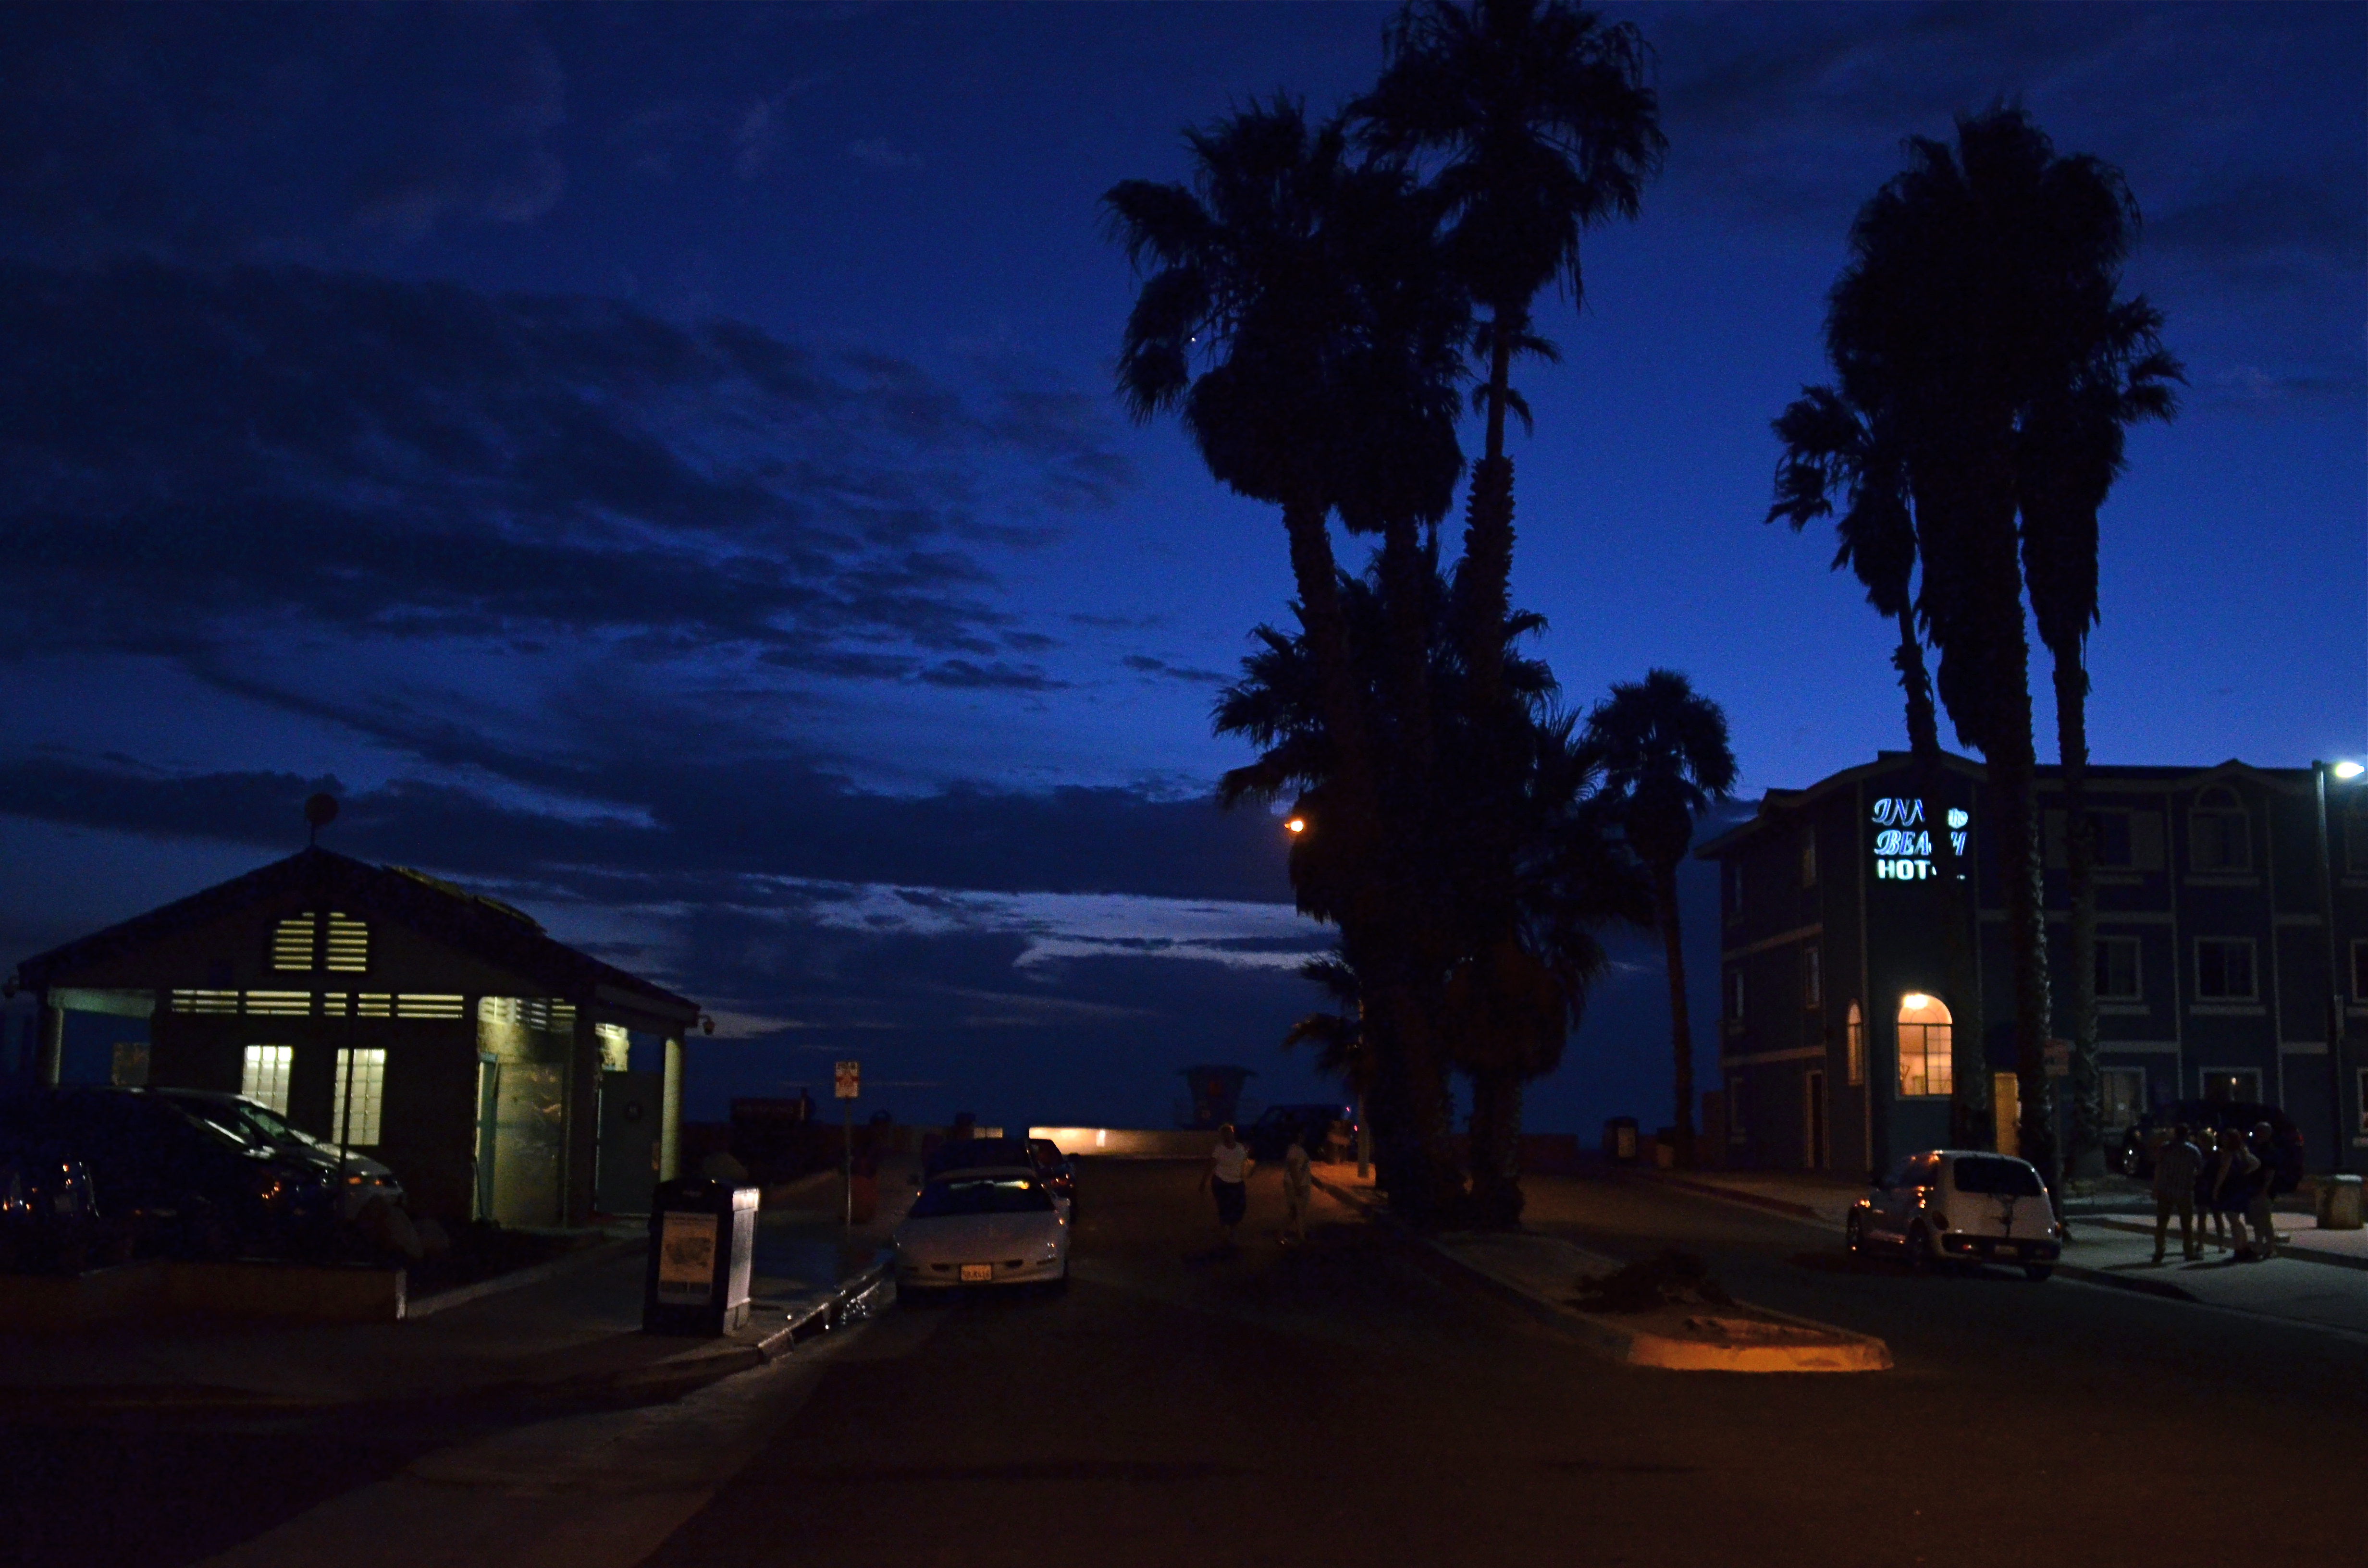
Here Comes The Night (2015). 1/40 sec., f/2.8, ISO 1600, 24mm.
That all changed after dessert, when we walked back onto the street that led down to the shore. I had a 24mm prime lens with me, which had been perfect for the wide-angle coastline stuff, but could also shoot wide open to f/2.8….fairly fast. As the night colors were already deepening, however, I realized that 2.8 was still going to mean shooting as slow a shutter speed as I could hand-hold and jacking the ISO up to a level that I normally tend to avoid. Those were the basic facts on the ground: now it was time to weigh the trade-offs.
Local traffic was swift enough for me to know that, even though I could hand-hold a shutter as slow as 1/15, there would be more than enough soft detail in a shot taken at f/2.8 without risking even more blurring from cars and walkers, so I settled at 1/40 and allowed the ISO to go to 1600 rather than lose the shot entirely.
Obviously, a tripod-mounted time exposure would have delivered a much crisper, more detailed shot, especially at f/11 or above, but I had what I had. And if you’re stuck with the somewhat mushier texture of a wide aperture, you have to determine where you envision the real impact of the image you’re planning. Is it in the fine-tuned detail or the overall atmosphere? There will be times when just salvaging the feel outweighs sharpness as a consideration, and, for me, this was one of those times.
A MATTER OF DEGREE
By MICHAEL PERKINS
NIGHT CREATES SUCH A DRASTICALLY DIFFERENT FLAVOR in anyone’s photography that some shooters, romantically attracted to its unique look, have made night-time their exclusive domain. Night is also the toughest time of day to render properly, and a zone wherein one’s interpretation of “reality” varies wildly. From the earliest days of the photographic medium, the hours after sunset were, first and foremost, a technical minefield, filled with pitfalls and perils.
Today, fast lenses and the higher ISO that can be dialed up pretty much at will mean fewer tripod shots, more hand-held shots, and thus a much bigger yield of often stunning night-time images. Even modest cameras are evolving so quickly that it’s getting hard to remember a time when we couldn’t shoot pretty much whatever we desired.
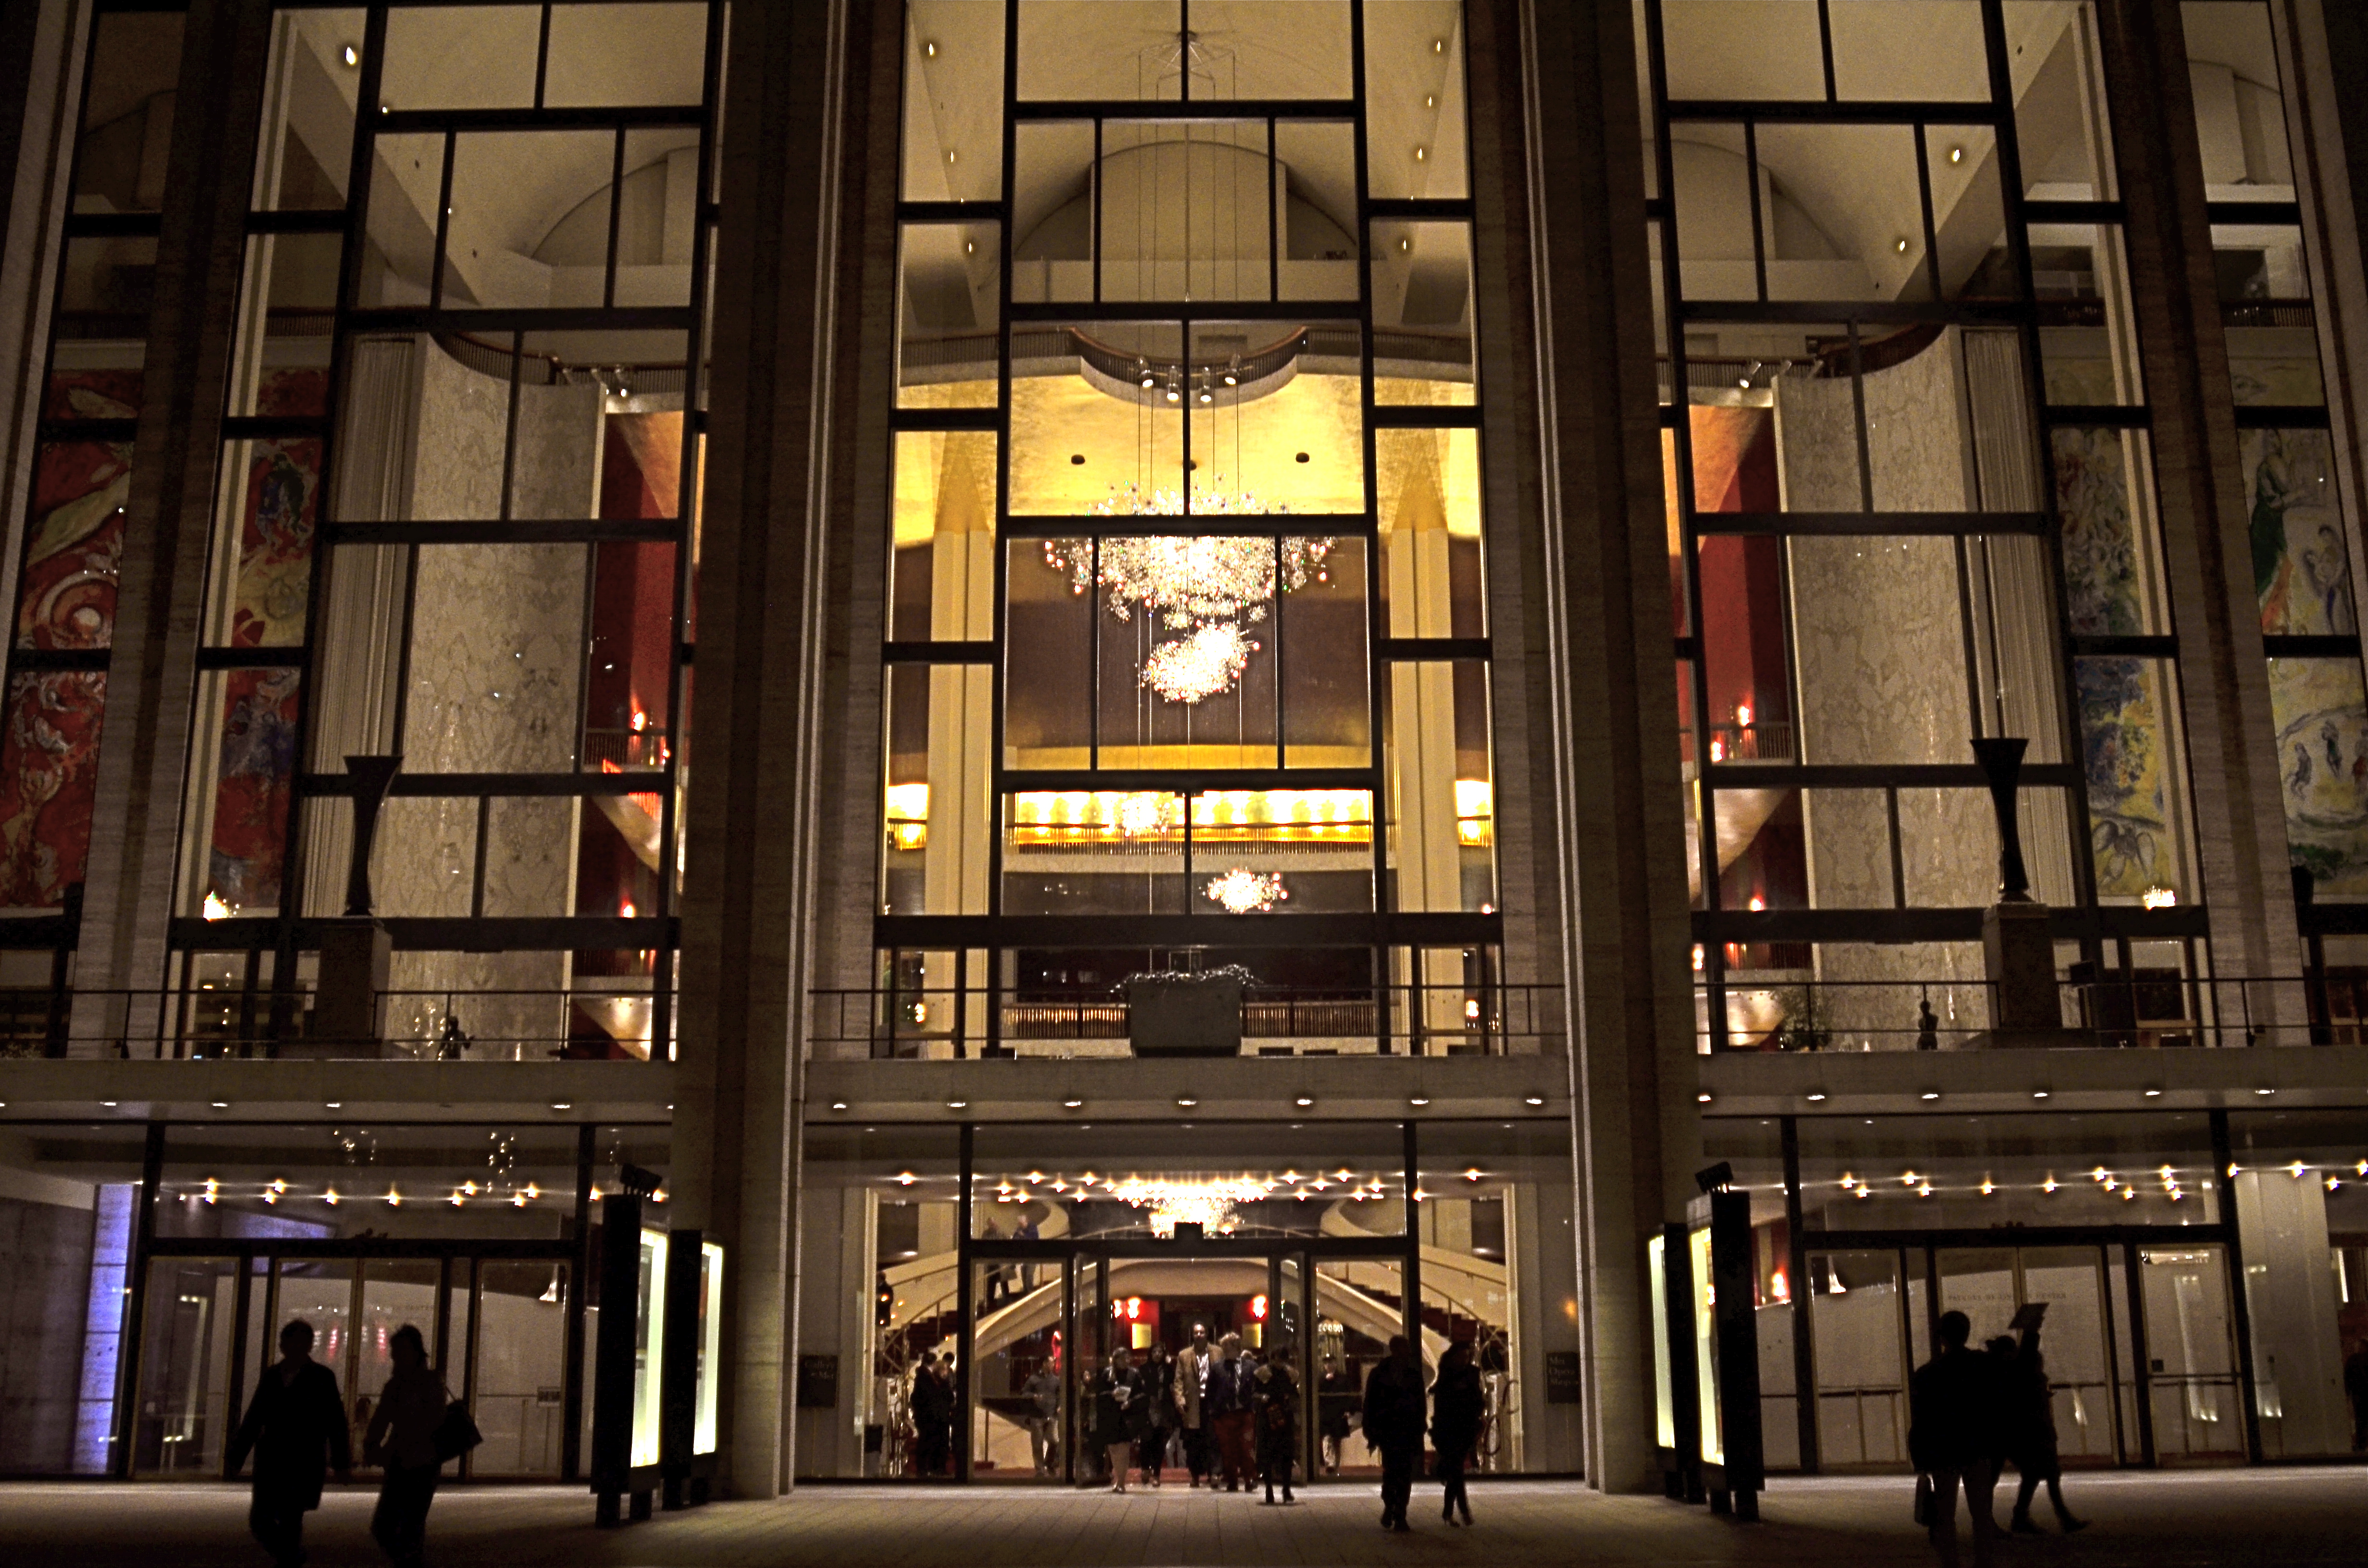
Lincoln Center, 2016
In many night settings, the contrast between bright and dark objects is dramatically multiplied. That means that getting proper exposure still has to be calculated based on widely varying elements within the frame. The night I took this image at New York’s Lincoln Center, I shot the various performance buildings on the “campus” in every compositional combination and setting possible, using a Nikon f/2.8 24mm prime lens. I framed the theatres at right angles to each other, by themselves, juxtaposed with neighboring skyscrapers, with and without the center’s fountain plaza, from medium distances to the lobby, tight distances to the lobby, and so on. In one “almost” calculation, I shot at f/8 and about 1/80 sec. at 1500 ISO, didn’t like how grungy it looked, then cranked the lens wide open to f/2.8, used as slow an exposure as I could execute hand-held (about 1/20 sec.), and backed off the ISO to about 400. That’s the combo you see above.
Normally, an aperture like f/2.8 produces a very shallow depth of field, which is generally bad for distant subjects. However, if you are focused to infinity, and your subject is, say, forty feet away, the image starts to get a little sharper at about twenty feet out, and is pretty sharp by forty. One sharpness caveat: if you use a slow exposure, as I chose to, and you’re also boosting your ISO, the electrical lights in your image will begin to go soft and globby fairly quickly…to “burn in” to some degree. You can see this in my image in the lobby chandelier, which registers as a velvety glow instead of a sharp grouping of individual bulbs. As an alternative, if you have time to experiment, you can amp up the up the ISO a little more, speed up your shutter, and perhaps render the lights a little sharper. This depends greatly on how many wives you have standing nearby, asking, “can we please just walk to the subway now?” It’s also not the only solution possible. Fiddle with it and see what works for you.
Also, if you are lucky enough to be shooting on a tripod, then you can shoot at minimal ISO, an aperture of f/11 or narrower, and as long an exposure as you desire. But the above guidelines are offered for someone shooting hand-held, and in a moderate hurry. I use very fast prime lenses to give me the sharpest focus and the most light latitude possible in the greatest number of situations, assuming that I won’t be allowed to mount a pod, even if I wanted to take one to the theatre (I don’t). So, as always, you have to decide a little ahead of time what you might be shooting, what the reality on the ground will be, and what you’ll need in the way of toys to bring home a goodie. Night is a very different animal, but trying to tame it is surprising and fun.
THE ONLY REAL PRIORITY
By MICHAEL PERKINS
THERE ARE MANY VALUABLE SERVICES OUR CAMERAS WILL RENDER without our consent or participation. Without even considering how many people shoot on full automatic 100% of the time, there are a hundred small calculations that these marvelous devices make to prevent the kind of errors in judgment that used to routinely trip us up, from autofocus and white balance, face detection and contrast control. However, there is a variable percentage of decisions on which we should really take personal action, despite the camera’s best efforts to, in effect, save us from ourselves.
In iffy light situations, for example, several key “semi-auto” modes are truly handy in helping us compensate for grey days or dark corners. One of these is called aperture control, in which you dial in the f-stop you want, based on your preferred depth of field, leaving the camera to set the shutter speed needed to properly expose at that aperture. At first blush, this seems to be a great short cut, and is in fact a neat option for people who are “running and gunning”..shooting lots of frames in a very quick time span. However, what looks like cutting your work in half can also mean cutting the legs off your creativity.
Aperture priority would have worked too hard to make this exposure “balanced”, which was the opposite of what I wanted.
In the above situation, I had a severely overcast day in a lushly green Japanese garden. Without shadows for contrast, I would need colors to be as deep as possible to bring off the mood I was going for, so a slightly underexposed look seemed to be in order. Dialing in f/5.6 as a desired D.O.F. in aperture priority was giving me very slow shutter speeds as the camera tried to give me an ideal exposure. This made a handheld shot a little tougher and gave me way too much high color to suggest anything quiet or moody.
Going to full manual, I dialed in a shutter speed that would render the greens nice and deep, around 1/80, and bumped up the ISO a tad as insurance. It was true that I was shooting a lot at the same f-stop, but not so fast that I would have to surrender fine control by shooting in aperture priority for mere convenience’s sake.
I love some of the protections against my own folly offered by today’s devices, but I just can’t go completely driver-less and feel that I am taking enough responsibility for my results. Hey, if I blow it completely, I can still explain a lousy shot in two simple words.
“…stupid camera…”
NAIL YOUR FOOT TO THE FLOOR
I shot this on a day when I was forcing myself to master a manual f/2.8 lens wide open, and thus shoot all day in only that aperture. That made depth-of-field tricky.
By MICHAEL PERKINS
PHOTOGRAPHY PLACES YOU IN PLENTY OF SITUATIONS WHERE YOU ARE, TO SOME DEGREE, OUT OF CONTROL. From light conditions to the technical limits of your gear to erratic weather, we have all experienced that sinking feeling that accompanies the realization that, to a great extent, we are not in the driver’s seat. Gotta wait til the sun’s up. Gotta wait for the flash to recycle. Gotta cool my heels til these people get out of the frame. Gotta getta bigger bottle of Tums.
So why, given the frequent cases in which we naturally run off the rails, would I recommend that you deliberately hobble yourself, in effect putting barriers in your own way when shooting images? Because, quite simply, failure is a better teacher than success, and you never forget the lessons gained by having to work around a disadvantage. Not only am I encouraging you to flirt with failure, I’m suggesting that there are even perfect days on which to do it…that is, the many days when there is “nothing to shoot”.
It’s really practical, when you think of it. Go out shooting on a day when the subject matter is boring, a day on which you could hardly be expected to bring back a great picture. Then nail your foot to the floor in some way, and bring back a great picture anyway. Pick an aperture and shoot everything with it, without fail (as in the picture at left). Select a shutter speed and make it work for you in every kind of light. Act as if you only have one lens and make every shot for a day with that one hunk of glass. Confine your snaps to the use of a feature or effect you don’t use or understand. Compose every shot from the same distance. The exercise matters less than the discipline. Don’t give yourself a break. Don’t cheat.
In short, shoot stuff you hate and make pictures that don’t matter, except in one respect: you utilized all of your ingenuity in making them. This redeems days that would otherwise be lost, since your shoot-or-die practice sessions make you readier when the shots really do count.
It’s not a lot different from when you were a newbie a primitive camera on which all the settings were fixed and you had zero input beyond framing and clicking. With “doesn’t matter” shooting, you’re just providing the strictures yourself, and maneuvering around all the shortcomings you’ve created. You are, in fact, involving yourself deeper in the creative process. And that’s great. Because someday there will be something to shoot, and when there is, a greater number of your blown photos are already behind you.
WHAT IS HIP?
Shooting “from the hip” can be an urban photographer’s secret weapon. 1/40 sec., f/3.5, ISO 500, 18mm.
By MICHAEL PERKINS
WHEN FACED WITH A COMPLETELY DIFFERENT APPROACH TO OUR PHOTOGRAPHY, the crabbier among us are liable to utter one of two responses. Both sound negative, but one could be positive:
Response #1: “I’d never do that!” (Emphatically negative. Discussion over. You will not persuade me.)
Response #2:”Why would I want to do that???” (Possibly as close-minded as response #1, but the person could be asking a legitimate question, as in, ‘show me the benefit in doing it your way, because I can’t imagine a single reason why I should change’.)
When first reading about the street photography technique of “shooting from the hip”, I was a definite response #2. Wasn’t going to slam the door on trying it, but failed to see what I would get out of it. The phrase means just what you’d think it does, referring to people with obvious cameras who do “street” work, shooting with the camera hanging at waist level, never bringing the viewfinder up to their eye. Subjects don’t cringe or lock up because you don’t “seem” to be taking a picture, and thus your images of them are far more unguarded and natural.
Now, suggesting this to a person who has never even owned a camera that didn’t have a viewfinder is a little like asking him to try to take pictures from the inside of a burlap sack. Kinda makes my inner control freak throw a bratrum (a brat tantrum). Think of it from my point of view. If I shoot manually all the time (I do) and if I need my viewfinder like Linus needs his blanket (cause, hey, I’m a tortured and insecure artist), then squeezing off a shot without even knowing if it’s in frame is, to say the least, counter-intuitive (French for “nuts”).
So there you have your honestly expressed Response #2.
Some things that finally made it worth at least trying:
It don’t cost nothin’.
I can practice taking pictures that I don’t care about. I wouldn’t be shooting these things or people even with total control, so what’s to lose?
Did I mention it don’t cost nothin’?
Shooters beware: clicking from the hip is far from easy to master. Get ready to take lots of photos that look like they came from your Urban Outfitter Soviet Union-era Plastic Toy Hipsta Camera. You want rakish tilt? You got it. You like edgy, iffy focus? It’s a given. In other words, you’ll spend a lotta time going through your day’s work like the Joker evaluating Vicki Vale’s portfolio (….”crap….crap….crap….” ). But you might eventually snag a jewel, and it feels so deliciously evil to procure truly candid shots that you may develop an addiction to the affliction. Observe a few basics: shoot as wide as you can, cause 35s, 50s and other primes won’t give you enough scope in composition at close range: go with as fast a shutter speed as the light will allow (in low light, compromise on the ISO): if possible, shoot f/5.6 or smaller: and, finally,learn how to pre-squeeze the autofocus and listen for its quiet little zzzz, then tilt the camera just far enough up to make sure everyone has a head, and go.
At worst, it forces you to re-evaluate the way you “see” a shot, since you have no choice but to accept what the camera could see. At best, you might see fewer bared fangs from people snarling, “hey is that a $&@*! camera?” inches from your nose. And that’s a good thing.
DARK NIGHT, BRIGHT NIGHT
Handheld post-sunset image, shot at 1/30 sec., f/3.5, 18mm, ISO 500.
By MICHAEL PERKINS
OFTEN, THE SHOT YOU GET HAPPENS ON THE WAY TO THE SHOT YOU THOUGHT YOU WANTED. We all like to think we are operating under some kind of “master plan”, proceeding along a Spock-o-logical path of reason, toward a guaranteed ( and stunning) result, but, hey, this is photography, so, yeah, forget all that.
Night shots are nearly always a series of surprises/rude shocks for me, since sculpting or harvesting light after dark is a completely different skill from what’s used in the daytime. Even small tweaks in my approach to a given subject result in wild variances in the finished product, and so I often sacrifice “the shot” that I had my heart set on for the one which blossomed out of the moment.
This is all French for “lucky accident”. I’d love to attribute it to my own adventurous intellect and godlike talent, but, again, this is photography, so, yeah, forget all about that, too.
So, as to the image up top: in recent years, I have pulled away from the lifelong habit of making time exposures on a tripod, given the progressively better light-gathering range of newer digital sensors, not to mention the convenience of not having to haul around extra hardware. Spotting this building just after dusk outside my hotel the other night, however, I decided I had the time and vantage point to take a long enough exposure to illuminate the building fully and capture some light trails from the passing traffic.
Same subject, almost same time of night, time-exposed on a tripod. 8 sec., f/13, 18mm, ISO 100.
Minutes before setting up my ‘pod, I had taken an earlier snap with nothing but available light, a relatively slow shutter speed and an ISO of 500 , but hadn’t seriously looked at it: traditional thinking told me I could do better with the time exposure. However, when comparing the two shots later, the longer, brighter exposure drained the building of its edgier, natural shadow-casting features, versus the edgier, somber, burnt-orange look of it in the snapshot. The handheld image also rendered the post-dusk sky as a rich blue, while the longer shot lost the entire sky in black. I wanted the building to project a slight air of mystery, which the longer shot completely bleached away. I knew that the snapshot was a bit noisy, but the better overall “feel” of the shot made the trade-off easier to live with. I could also survive without the light trails.
Time exposures render an idealized effect when rendering night-time objects, not an accurate recording of “what I saw”. Continual experimentation can sometimes modulate that effect, but in this case, the snatch-and-grab image won the day. Next time, everything will be different, from subject to result. After all, this is photography.
NOT A LEG TO STAND ON
No tripod, no problem. Minimal noise even at 3200 ISO. Handheld in NYC’s theatre district at 1/50 sec., f/3.5, 18mm.
By MICHAEL PERKINS
ADVANCES IN PHOTOGRAPHY, WHETHER IN THE SCIENCES OF LENSES, FILMS, SENSORS OR TECHNIQUE, ALL HAVE, AS THEIR AIM, THE SAME RESULT: to make it easier to take more pictures…more often, and with fewer barriers between what you see and what you can catch in the box. Taking more pictures means increasing the yield of wonderful pictures, even if 95% of what you shoot is doody, and getting to the decisive moment of the “click” beats any other imperative. Any gimmicks or toys that don’t increase your readiness to shoot are wasteful detours.
This means that we are constantly weeding out dead growth, trimming away systems or ideas that have outgrown their usefulness. Rusty ways of doing things that cost us time, require extra steps, and eventually rob us of shots.
And that’s why it’s the age of the tripod is nearly over.
Getting past our artistic bias toward the ‘pod as a vital tool in the successful creation of images is tough; we still associate it with the “serious” photographer, even though today’s cameras solve nearly all of the problems tripods were once reliable in offsetting. What we’re left with, regarding the tripod’s real value, then, is old brain wiring and, let’s face it, sentiment.
More importantly, to my first point, the tripod is not about, “Okay, I’m ready!”. It’s about, “Hold on, I’ll be ready in a minute.” Worse yet, to the petty dictators who act as the camera police in churches, monuments, retail establishments and museums, they scream, “you can’t be here”. Call me crazy, but I still think of lack of access (spelled “getting kicked out”) as, well, sort of a hindrance to photography.
Just sayin’.
Tripods were, once upon a time, wonderful protection again several key problems, among them: slow film/sensor speed, vibration risk, and sharpness at wider apertures, all of which have long since been solved. Moreover, tripods may tempt people to shoot at smaller apertures, which could lead to softer overall images.
Had I stopped to set up a tripod here, my light, and my chance, would have melted away. 1/15 sec,. handheld, with a 35mm prime, wide-open, at f/1.8, ISO 640.
I readily concede that tripods are absolutely vital for extended night exposures, light painting, miniature work, and some other very selective professional settings. But for more than a century, ‘pods have mostly been used to compensate where our cameras were either flawed or limited. So, if those limits and flaws have faded sufficiently to allow you to take a nighttime snap, handheld at f/1.8, with a 1/15 shutter speed and the virtual guarantee of a well-lit shot, with negligible noise, why would you carry around twice the gear, pretty much ensuring that you would lose time, flexibility, and opportunities as a result?
The tripod has served us well, as was once true of flash powder, glass plates, even the torturous neck braces used to hold people’s heads in position during long exposures. But it no longer has a leg to stand on.
Follow Michael Perkins on Twitter @MPnormaleye.
HOLLYWOOD NIGHTS
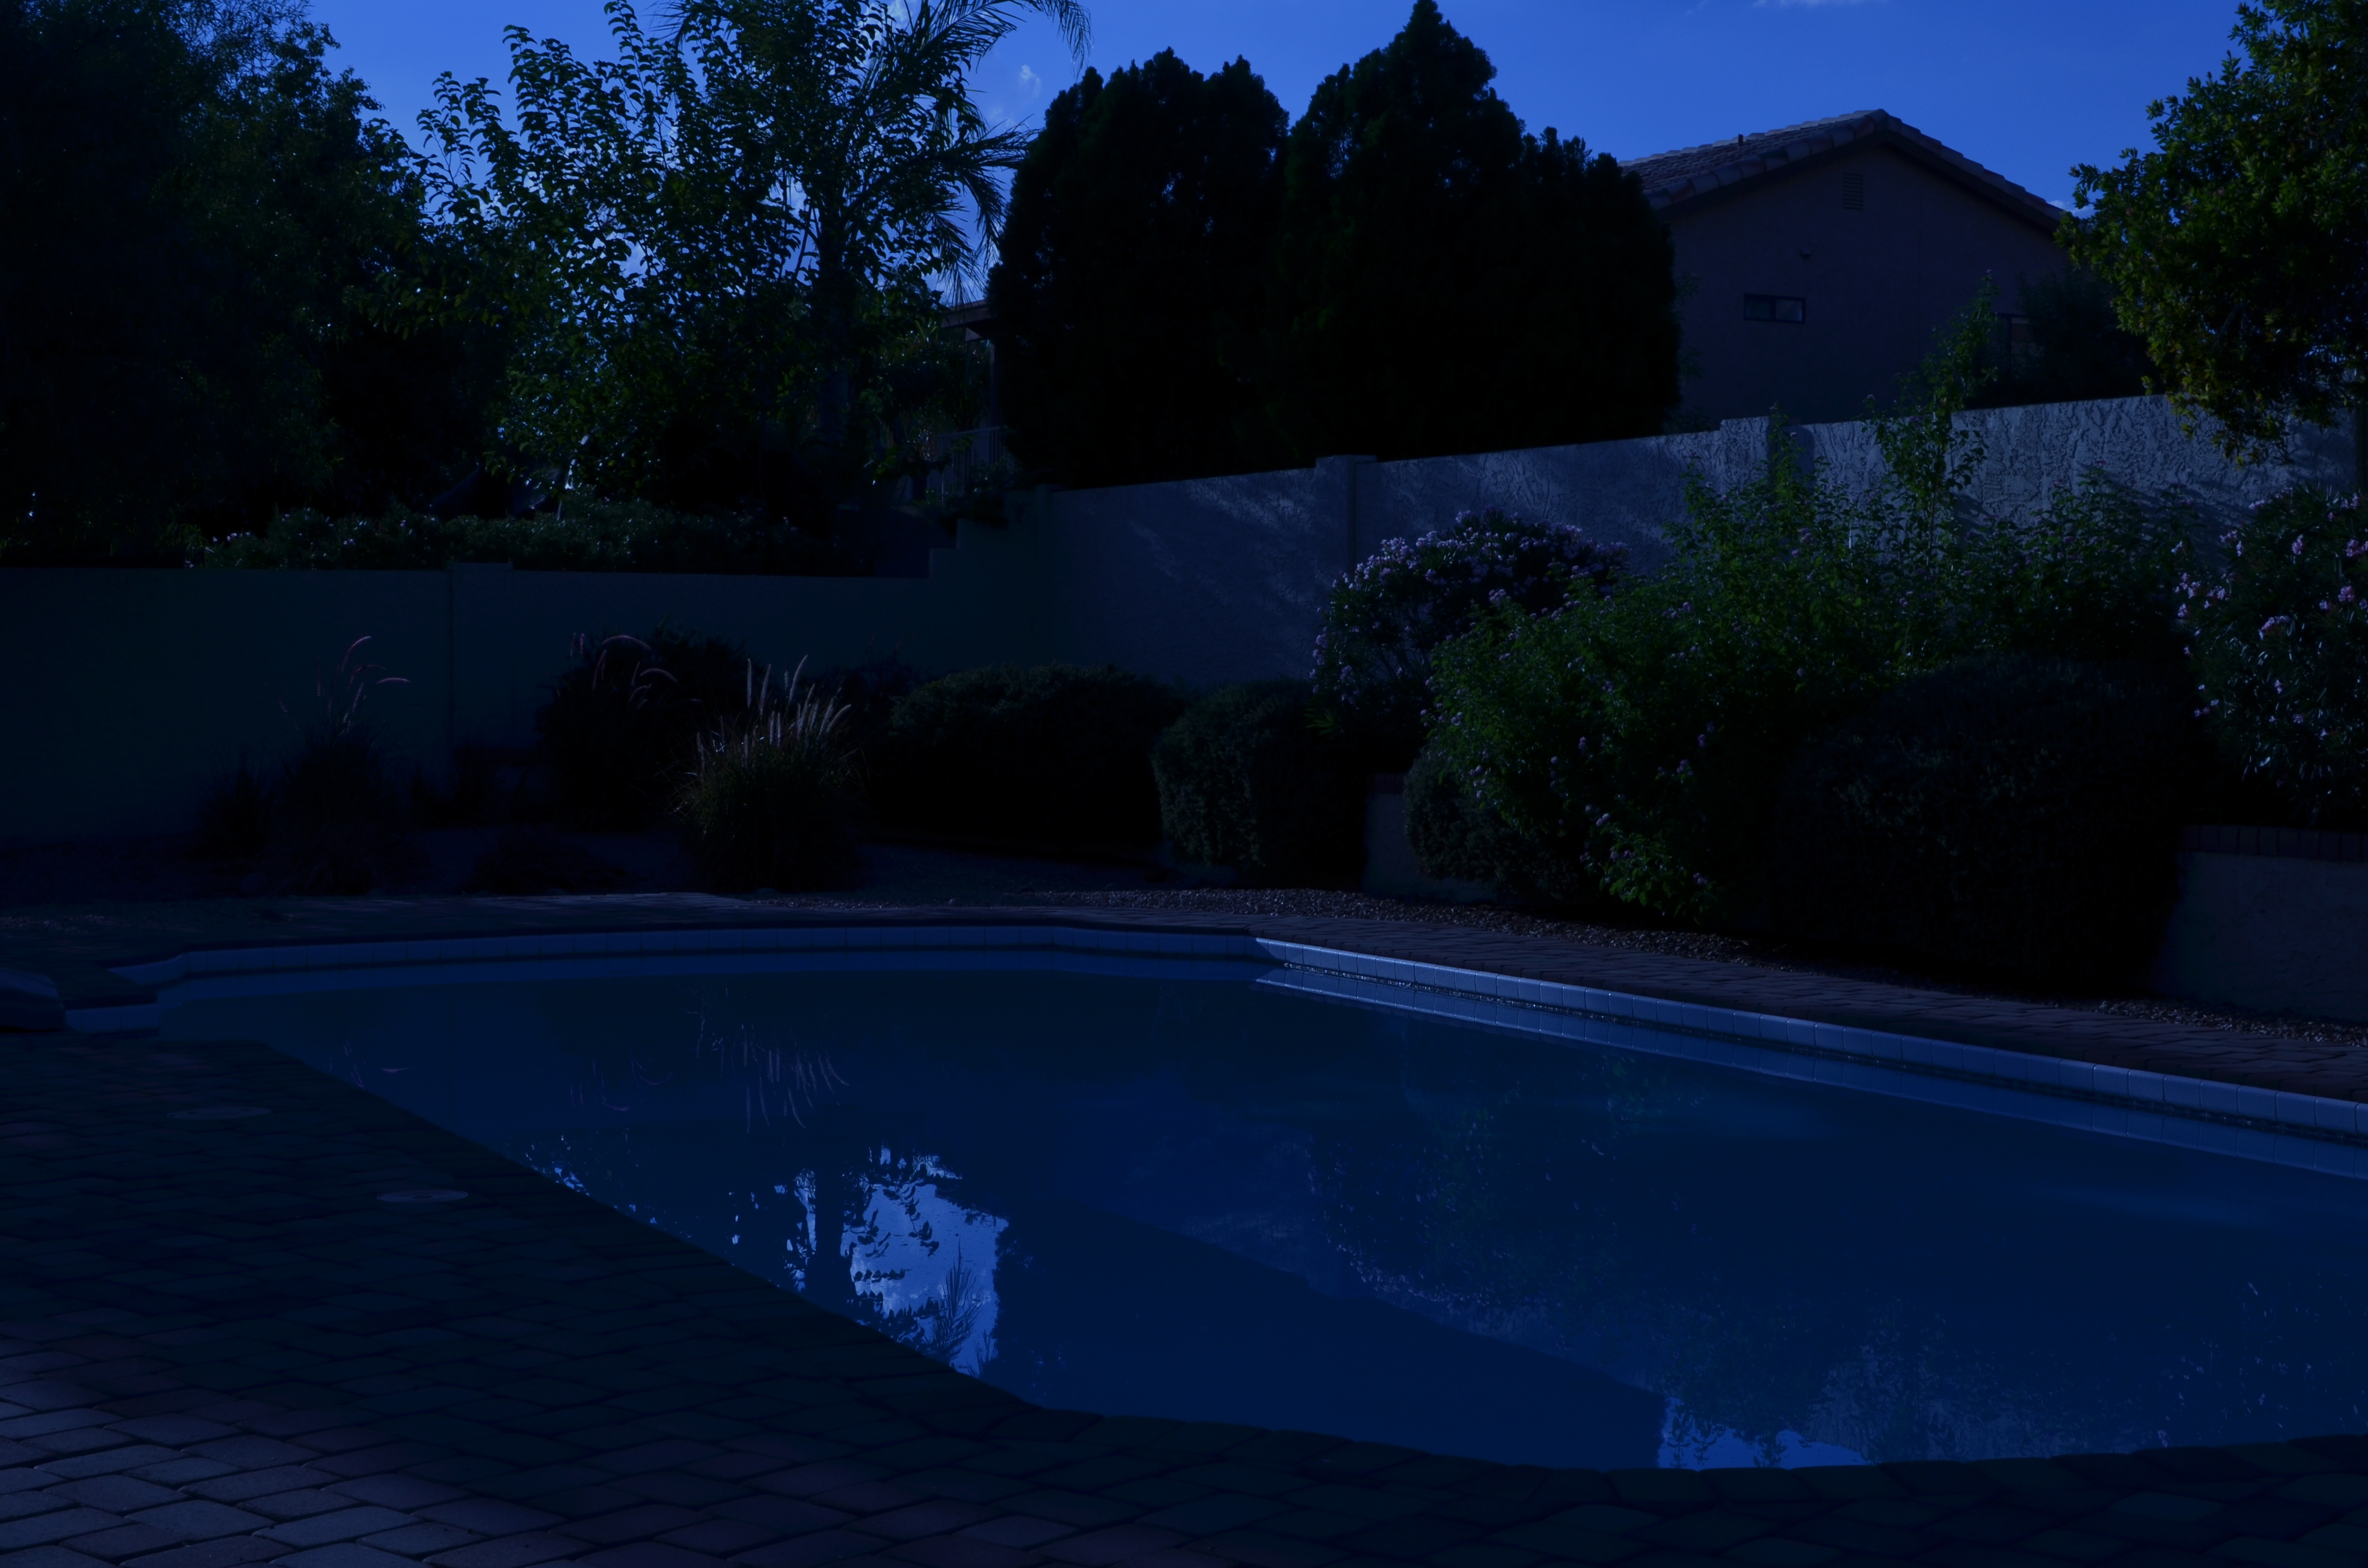
Moonlight night around the poolside, only not really: a “day-for-night” shot taken at 5:17pm. 1/400 sec., f/18, ISO 100, 35mm, using a tungsten white balance.
By MICHAEL PERKINS
TIME LIMITS US IN EVERY PHOTOGRAPHIC SITUATION: LIGHT HEMS US IN EVEN FURTHER. Of course, the history of photography is rife with people who refuse to just accept what time and nature feel like giving them. In fact, that refusal to settle is source of all the artistry. Too bright? Too bland? Wrong time of day? Hey, there’s an app for that. Or, more precisely, a work-around. Recently, I re-acquainted myself with one of the easiest, oldest, and more satisfying of these “cheats”, a solid, simple way to enhance the mood of any exterior image.
And to bend time… a little.
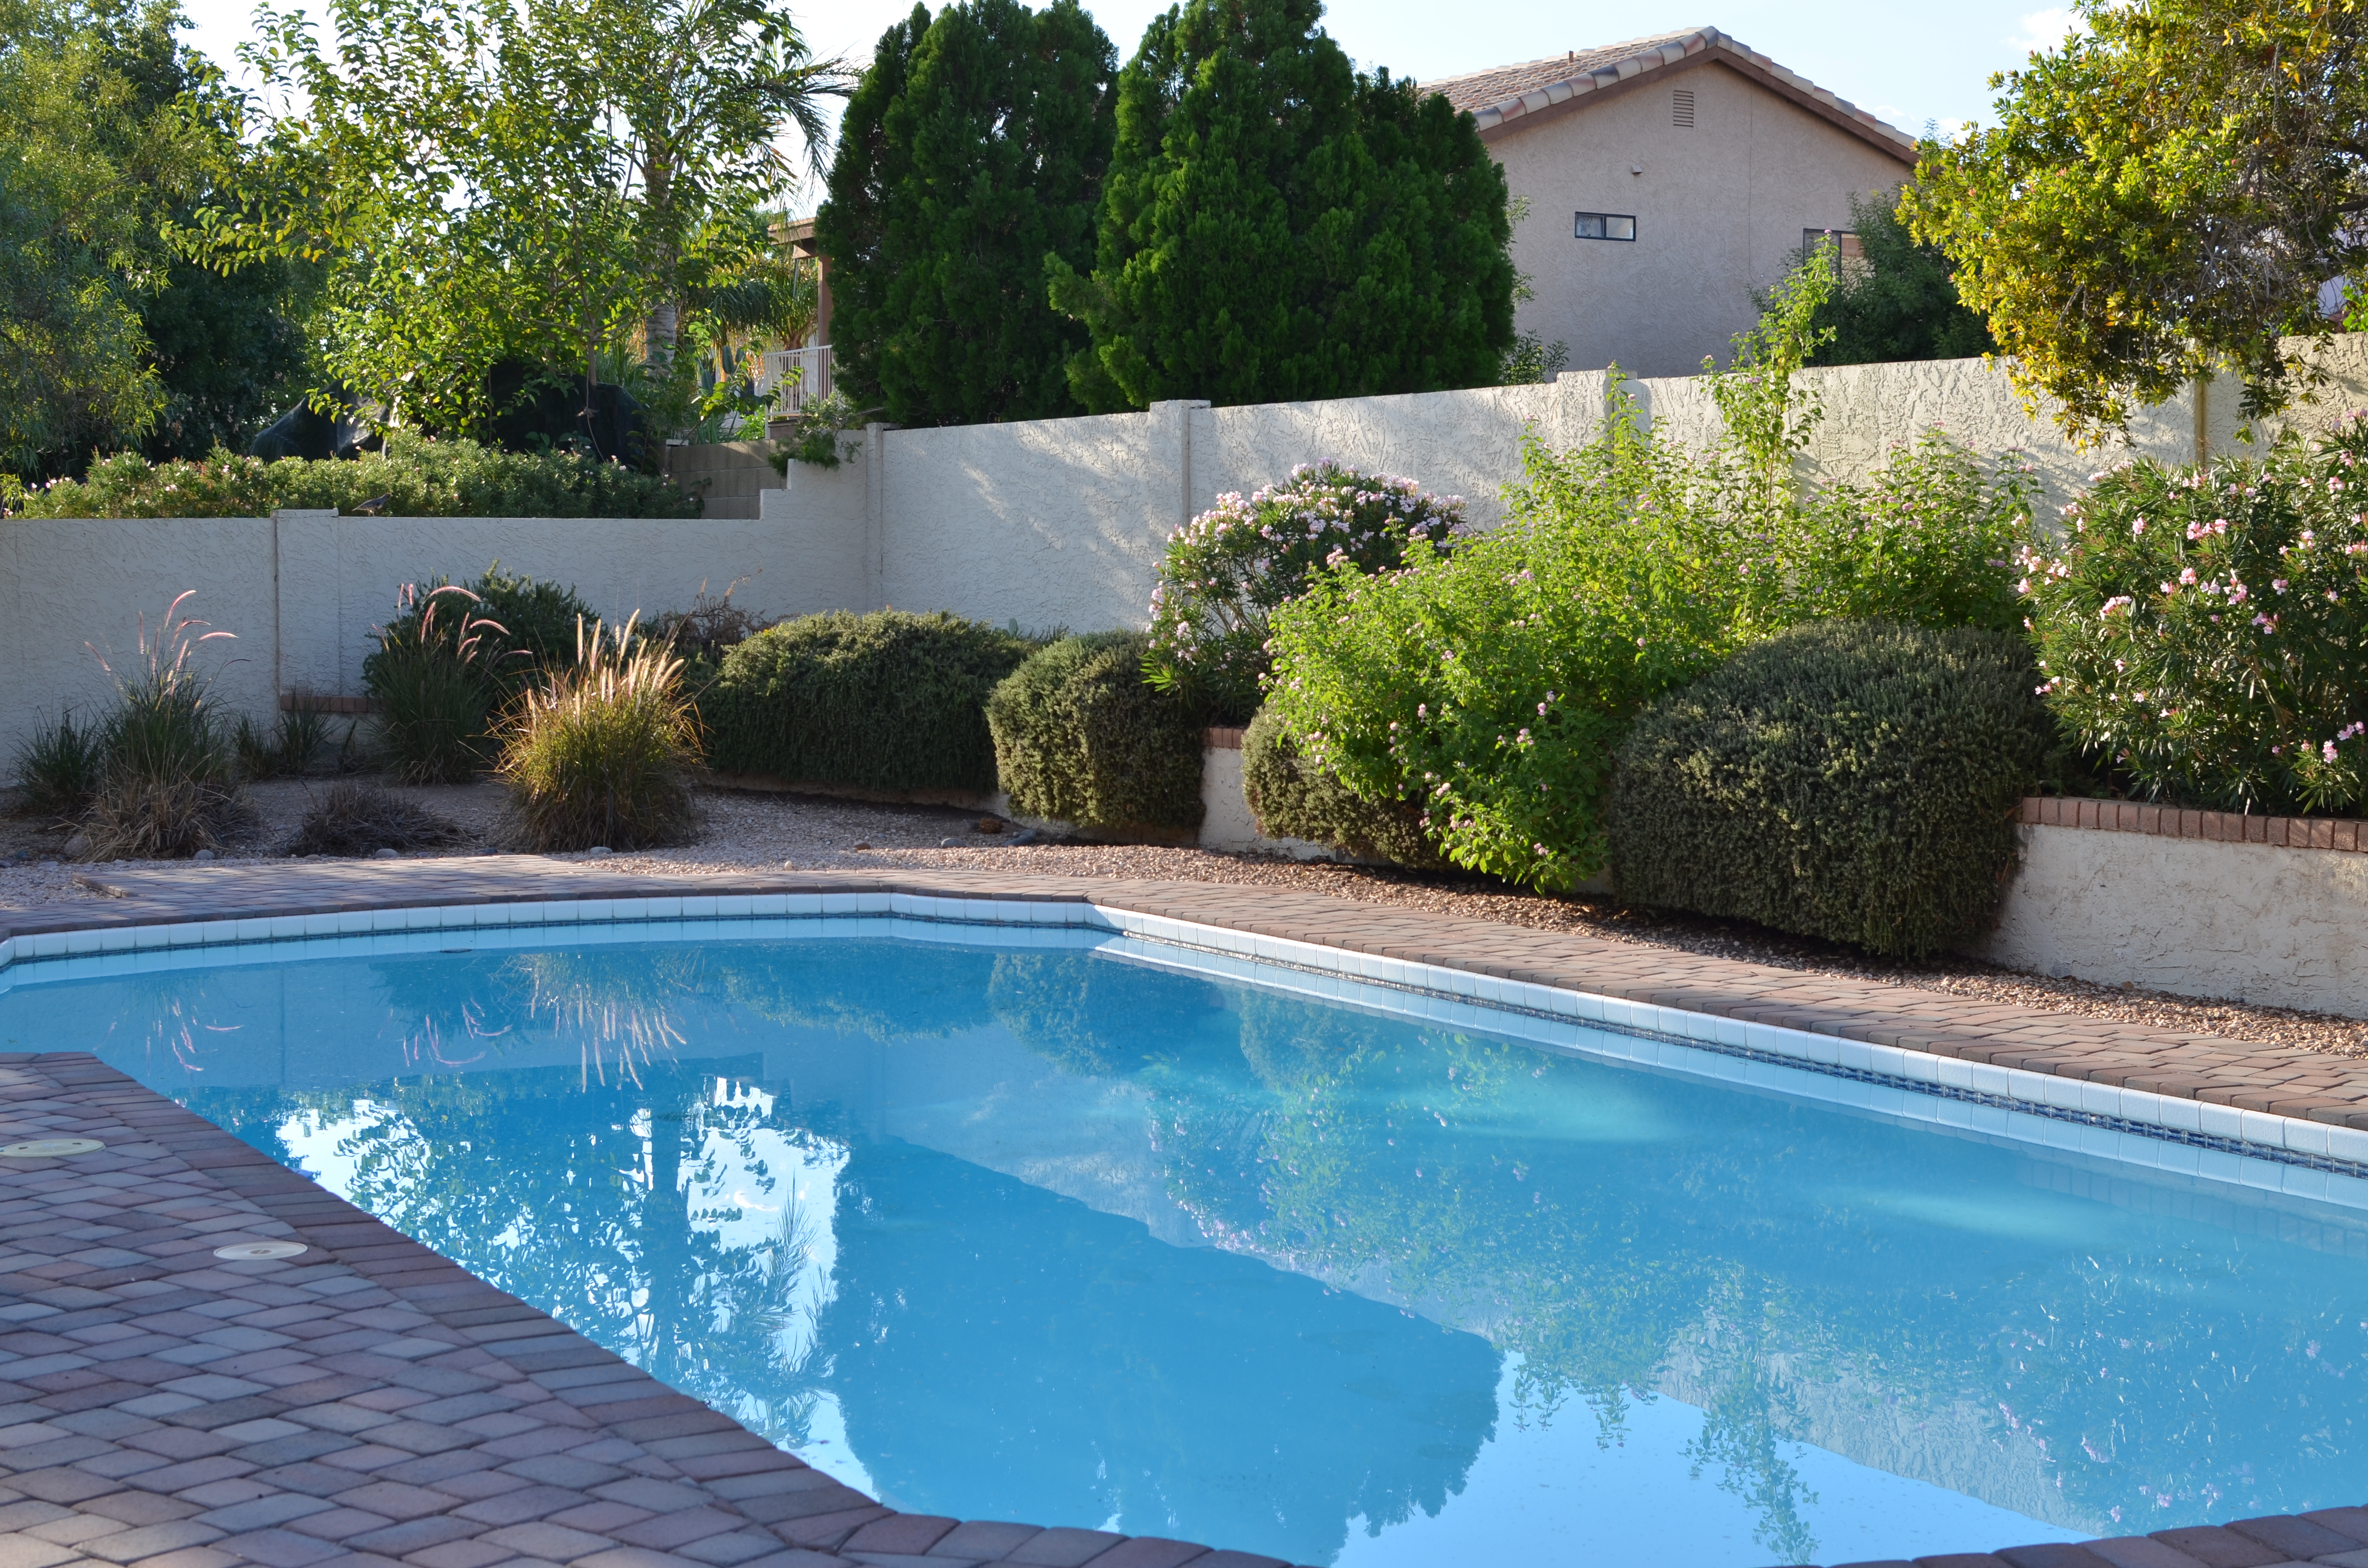
Same scene as above taken just seconds later, but with normal white balancing and settings of 1/250 sec., f/5.6, ISO 100, 35mm.
It’s based on one of Hollywood’s long-standing budget-savers, a technique called day-for-night. For nearly a century, cinematographers have simulated nightfall while shooting in the daytime, simply by manipulating exposure or processing. Many of the movie sequences you see represented as “night” are, in fact, better lit than any “normal” night, unless you’re under a bright, full moon. Day-for-night allows objects to be more discernible than in “real” night because their illumination is actually coming from sunlight, albeit sunlight that’s been processed differently. Shadows are starker and it’s easier to highlight what you want to call attention to. It’s also a romantically warm blue instead of, well, black. It’s not a replication of reality. Like most cinematic effects, it’s a little bit better than real.
If you’re forced to approach your subject hours before sunset, or if you simply want to go for a different “feel” on a shot, this is a great shortcut. Even better, in the digital era, it’s embarrassingly easy to achieve: simple dial up a white balance that you’d normally use indoors to balance incandescent light. Use the popular “light bulb” icon or a tungsten setting. Indoors this actually helps compensate for cold, bluish tones, but, outside, it amps up the blue to a beautiful, warm degree, especially for the sky. Colors like reds and yellows remain, but under an azure hue.
The only other thing to play with is exposure. Shutter-speed wise, head for the high country
A faux “night” at the park. 1/320 sec., f/20, ISO 100, 35mm.
at anywhere from f/18 to 22, and shorten your exposure time to at least 1/250th of a second or shorter. Here again, digital is your friend, because you can do a lot of trial and error until you get the right mix of shadow and illumination. Hey, you’re Mickey Mouse with the wizard hat on here. Get the look you want. And don’t worry about it being “real”. You checked that coat at the door already, remember?
Added treats: you stay anchored at 100 ISO, so no noise. And, once you get your shot, the magic is almost completely in-camera. Little or no post-tweaking to do. What’s not to like?
I’m not saying that you’ll get a Pulitzer-winning, faux-night shot of the Eiffel Tower, but, if your tour bus is only giving you a quick hop-off to snap said tower at 2 in the afternoon, it might give you a fantasy look that makes up in mood what it lacks in truth.
It ain’t the entire quiver, just one more arrow.
Follow Michael Perkins at Twitter @MPnormaleye.
THE GOLDEN AGE OF JUST OKAY
Plenty of mistakes made on this one. Is it a success or a failure? Does it matter? All that’s important is that you, not the camera, is making the picture. Manual mode, 1/100 sec., f/5.6, ISO 100, 18mm.
By MICHAEL PERKINS
WE ALL SAY IT: THERE ARE NO SHORTCUTS TO SUCCESS.
We all say it. None of us believes it. It’s just not, well, American to throw aside our national myths, and the folk tale of the lucky, quick genius who zooms to the head of the line to fame, bounding in front of all the sloggers and suckers, is intoxicating. One blinding inspiration, we tell ourselves, just one great notion, and we can bypass all that “practicing and patience” stuff, the same virtues we feel honor bound to extol in others. In anyone else but me.
Me, I’m taking the shortcut.
So now is about the time when the photography angle of this rant should kick in, right?
Okay, here goes.
As the automode functions of cameras have grown ever more complex, they have made taking a perfectly acceptable picture effortless. Great for immediate gratification. Not so great for the art of photography. Think about it. It has become so fabulously easy to point and get something that isn’t too bad, that we are bypassing the slower, uglier, but eventually more satisfying process that comes with trial, error, recalculation, and risk. We produce more error-free pictures than ever before, but, to do that, we have to hang our own creativity…..the raw, sloppy process of imagineering our own vision…on the wall. We get fat and lazy. And so do our pictures.
Now that I have successfully defended my title as the great Grinch Buzzkill, trying to rid Whoville of good, clean camera fun, let me just ask one more question. Do we want a large mountain of “okay” pictures, taken, to an ever greater degree, by our cameras, or a smaller, more amazing pile of remarkable pictures borne of our own sweat and struggle? Tricky part: there is no right or wrong answer, just a choice to be made based on your own expectations. Turning off the “green zone” of guaranteed effect modes and really educating ourselves as to what is going into the making of our pictures means turning off a snapshot mentality and opting for the unpredictable.
Hey, I’m not suggesting you go all Matthew Brady and lug around forty pounds of wet plates and a covered wagon full of caustic chemicals just to take a birthday picture of Grandma blowing out her candles. But we can probably aspire to more than just the golden age of okay.
We already know how easy it is to take a picture. Now we need to rediscover how hard it can be, and what miracles can spring from our minds when we get our hands dirty and go down the rockier path.
180 DEGREES

This image, the reason I ventured out into the night, originally eluded me, causing me to turn a half circle to discover a totally different scene and feel waiting just over my shoulder. 20 sec., f/8, ISO 100, 20mm.
By MICHAEL PERKINS
I WISH I HAD A LEICA for every time I came away from a shooting project with something completely opposite from the prize I was originally seeking. The odd candid moment, the last-minute change of light, the bizarre intervening event….there are so many random factors even in the shots that are the most meticulously planned that photography is kept perpetually fresh, since it is absolutely impossible to ensure its end results, especially for infants playing at my level. That point was dramatically brought home to me again a few weeks ago, and all I had to do was turn my head 180 degrees.
All during a week’s stay at a conference center near Yosemite National Park, I had been struck by how the first view a visitor got of the main lodge and its surrounding pond, from an approach road slightly above the building, was by far a better framing of the place than could be had anywhere else on the grounds. A few days of strolling by the lodge from several approaches had not provided any better staging of the quiet scene, but, with the harshness of the daylight at that altitude, I was convinced that a long exposure done just after nightfall would convey a more peaceful, intimate mood than I could ever hope to capture by day. And so, on the evening before I was to leave the lodge for home, I decided to take my tripod to the approach road and set up for a try.
The road is rather twisty and narrow, and so its last turn before heading for the lodge’s parking areas is lit with a street lamp, and a bloody bright one at that. It’s a sodium vapor light, which registers very orange to the eye. I’m used to these monsters, since, back home in Phoenix, they are the predominant city light sources, creating less long-distance “light pollution” for astronomers in Flagstaff trying to see the finer features in the night sky. At any rate, the road was so bright that I had to set up closer to the lodge than originally planned in order to avoid a lot of ambient light over my shoulder killing the subdued dark I wanted for my shot. Intervening event and last-minute change of light. Changing my stance, I was also having problems with movement on the pond surface. It was a tad too swift to allow for a mirroring of the lodge, and a long exposure was going to soften it up even more. I was going to get pretty colors, but they would be diffuse and gauzy rather than reflective. At the same time I was trying to avoid framing another lamp, this one to the right of the lodge. Illuminating a walking path, it would, over the length of the exposure, pretty much burn its way into the scene and distract from the impact. Typical problems, but I was already losing my love for the project, and after about a half-dozen flubbed attempts, I was trying to avoid mouthing several choice Anglo-Saxon epithets.
It was the need to take a break that had me looking around to see if anything else could be done under the conditions, and that’s when I turned my head to really see the light from the approach road that had been over my shoulder. Candid moment. Now I saw that orange light illuminating the road, the rustic fence, and the surrounding trees and shrubs in an eerie, Halloween-ish cast. The same scene in daylight or natural color would have registered just as “some nice trees”, but now it was Sleepy Hollow, the scary walk home after the goblins come out, the place where evil things breed. Better yet, if I stepped just about six inches to the right of where I was standing, the hated lamp-post would be totally obscured by the largest tree in the shot, casting its shadow another 20 or so feet longer and serving up a little added drama as a bonus. Suddenly, the lamp had been transformed from a fiend to a friend. I swiveled the tripod’s head around, set the shot, and got where I needed to be in two clicks.

After first trying (and failing) to nail the image of the lodge, I pivoted around and found this scene, which had been waiting to be discovered right behind me. Once I shot this, I turned around and made one more attempt on the lodge, using, as it turned out, the exact same setting as this picture; 20 sec., f/8, ISO 100, 20mm.
Better yet, the break in the action allowed me to re-boot my head vis-a-vis the lodge image. I turned back around, and, oddly, with the exact same exposure settings, hit a balance I could live with. Neither shot was perfect, but the creation of one had actually enabled the capture of the other. On the walk back to my cabin, I was already dissecting the weaknesses in both, but they each, in turn, had taught me, again, the hardest lessons, for me, in photography. Slow down. Look. Think. Plan, but don’t be afraid of reactive instinct. Sometimes, a sacred plan can keep you from “getting the picture”, figuratively and literally.
All I have to do is remember to turn my head around.
A BOX FULL OF ALMOSTS


Shooting for 3D (top image) often cost me a lot of composition space, forcing me to frame in a narrow vertical range, but learning to frame my message in those cramped quarters taught me better how to draw the viewer “in deep” when composing flat 2D images.
By MICHAEL PERKINS
I RECENTLY SPENT AN ANGUISHED AFTERNOON sifting through a box of prints that I shot from about 1998 through 2002, a small part of my amateur work overall, but a particularly frustrating batch of images to revisit. Even given the high number of shots of any kind that one has to take to get a small yield of cherished images, the number of “keepers” from this period is remarkably low. It is a large box of almosts, a warehouse of near misses. Still, I felt that I needed to spend some “quality time” (strange phrase) mentally cataloguing everything that went wrong. I could have used a stiff drink.
One reason that the failure rate on these pictures was so high was because the pictures, all of them stereoscopic, were taken with one of the only cameras available for taking such shots at the time. The Argus 3D was an extremely limited film-based point-and-shoot which had been introduced for the sole purpose of producing cheap prints that could be developed by any vendor with conventional processing. The resulting 4×6 prints from the Argus were not the red-green anaglyph shots requiring the infamous cardboard glasses to decipher their overlaid images. but single prints made up of two side-by-side half-frame images in full color, which could later be inserted into an accompanying split-glass viewer that came with the camera.
The 3D effect was, in fact, quite striking, but the modest camera exacted a price for producing this little miracle. Since stereo works more dramatically at longer focal lengths, only shots made at f/11 or f/16 were offered on the Argus, which also had a fixed shutter speed and could not accommodate films rated higher than ASA 100. As for better 3D cameras, most available in the late ’90’s were dusty old relics from the late ’40’s and ’50’s, meaning that any hobbyist interested in stereo photography had to pretty much accept the built-in limitations of the rigs that were available. As a result, I had only basic control over exposure; light flares would invariably create huge streaks on one of the two angled lenses, creating a headache-y “flicker” in the viewing of the final print; and, worst of all, you had to compose every shot in vertical orientation, regardless of subject, in half the width in which you normally worked.
Worse for the artistic aspect of the project, I seem to have been sucked into the vortex that traps most shooters when learning a new technique; that is, I began to shoot for the effect. It seems to have been irrelevant whether I was shooting a bouquet of roses or a pile of debris, so long as I achieved the “eye-poke” gimmick popping out of the edge of the frame. Object (and objectives) became completely sidelined in my attempts to either “wow” the viewer or overcome the strictures of the camera itself. The whole carton of prints from this period seems to be a chronicle of a man who has lost his way and is too stubborn to ask directions. And of the few technically acceptable images in this cluster of shots, fewer still can boast that the stereoscopic element added anything to the overall impact of the subject matter. Can I have that drink now?
A few years later, I would eventually acquire a 1950’s-vintage Sawyer camera (designed to make amateur View-Master slides), which would allow me to control shutter speed, film type, and depth of field. And a few years after that, my stereo shots started to be pictures first, thrill rides second. Grateful as I was for the improved flexibility, however, the Argus’ cramped frame had, indeed, taught me to be pro-active and deliberate in planning my compositions. Learning to shoot inside that cramped visual phone booth meant that, once better cameras gave me back the full frame, I had developed something of an eye for where to put things. Even in 2D, I had become more aware of how to draw the eye into a flat shot.
Today, as I have consigned 3D to an occasional project or two, the lessons learned at the hands of the cruel and fickle Argus serve me in regular photography, since I remain reluctant to trust even more advanced cameras to make artistic decisions for me. Thus, even in the current smorgasbord of optical options, I feel that, in every shot, I am still the dominant voice in the discussion.
That makes all those “almosts” worth while.
Almost.
Bartender? Another round.
Thoughts?
